
Adviace 463344116, 466344116 (4-Burner)
Adviace Replacement Parts User Manual
For Charbroil Advantage 463344116, 466344116 Gas Grills (4-Burner)
Introduction
This user manual provides comprehensive instructions for the installation, maintenance, and troubleshooting of Adviace replacement parts for Charbroil Advantage 463344116 and 466344116 gas grills. These parts are designed to restore your grill's functionality and extend its lifespan by replacing worn or rusted components.
Product Contents
Each kit is designed to provide the necessary components to refurbish your grill's core heating system. The 4-Burner kit typically includes:
- 4 x Stainless Steel Grill Pipe Burners (Dimensions: 14 3/8" x 5/8")
- 4 x Stainless Steel Heat Plate Shields (Flavorizer Bars) (Dimensions: 15 1/2" X 2")
- 3 x Adjustable Stainless Steel Carryover Tubes (Extends from 5" - 9.5")
- 4 x Grill Igniters

Image: Overview of the complete replacement parts kit, showing burners, heat plates, crossover tubes, and igniters.

Image: Detailed view of the adjustable crossover tubes, illustrating their length adjustment capability.
Compatibility
These replacement parts are specifically designed for the following Charbroil Advantage gas grill models:
- Charbroil Advantage 463344116
- Charbroil Advantage 466344116
It is highly recommended to measure your existing grill components and compare them with the provided specifications (Burner Dimensions: 14 3/8" x 5/8"; Heat Plate Dimensions: 15 1/2" X 2"; Crossover Tube Adjustment: 5" - 9.5") to ensure a precise fit before installation.
Installation Instructions
Before beginning, ensure your grill is completely cool and disconnected from its gas supply. It is advisable to wear protective gloves during the installation process.
- Remove Old Components:
Carefully remove the cooking grates and heat tents from your grill. Then, detach the old, rusted burners and crossover tubes. Note the position and connection points of the igniters. Old parts may be corroded and require gentle force or rust penetrant for removal.

Image: Example of old, rusted grill burners that need replacement.
- Clean Grill Interior:
Thoroughly clean the interior of your grill, removing any debris, grease, or rust flakes. A wire brush can be useful for this step.
- Install New Burners:
Place the new stainless steel pipe burners into their respective slots. Ensure they are properly seated and aligned with the gas orifices at the back of the grill. Secure them if necessary, typically with a cotter pin or screw at the front.
- Connect Crossover Tubes:
Adjust the length of the new crossover tubes to span between the burners. Connect them to the designated points on each burner. These tubes facilitate flame transfer between burners.
- Install Igniters:
Attach the new grill igniters to their corresponding burners. Ensure the igniter electrodes are positioned correctly to spark near the gas outlet of the burner. Connect the igniter wires to the main ignition module.

Image: New burners and crossover tubes correctly installed.
- Place Heat Plate Shields:
Position the new heat plate shields (flavorizer bars) directly over the installed burners. These shields protect the burners from dripping grease and help distribute heat evenly.
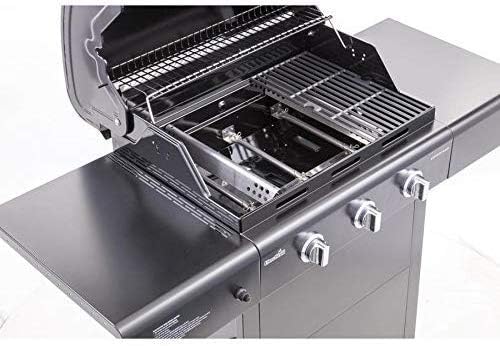
Image: Grill interior with all new replacement parts installed, including heat shields.
- Replace Cooking Grates:
Once all components are securely in place, reinstall your cooking grates.
- Test Grill:
Reconnect the gas supply and perform a leak test. Then, carefully light each burner to ensure proper ignition and even flame distribution. Adjust burner positions if necessary to achieve optimal performance.

Image: The grill fully assembled and ready for operation after part replacement.
Operation
After successful installation of the replacement parts, your Charbroil grill should operate as intended, providing consistent heat for your outdoor cooking needs. Always follow the original grill manufacturer's safety guidelines for operation, including proper ventilation and gas handling procedures.
- Ensure all gas connections are tight and free of leaks before lighting.
- Always open the grill lid before igniting the burners.
- Start with one burner, ignite it, then proceed to others.
- Monitor flame appearance; a healthy flame is typically blue with a yellow tip.
Maintenance
Regular maintenance of your grill's internal components will significantly extend their lifespan and ensure optimal performance. Although these parts are made of stainless steel, proper care is essential.
- Regular Cleaning: After each use, clean the heat plate shields and burners to remove grease and food residue. Accumulated debris can lead to corrosion and uneven heating.
- Inspect for Rust: Periodically inspect the burners, heat plates, and crossover tubes for signs of rust or corrosion. While stainless steel is resistant, prolonged exposure to moisture and food acids can cause surface rust.
- Ventilation: Ensure proper ventilation around your grill to prevent moisture buildup, which can accelerate corrosion.
- Cover Your Grill: Use a grill cover when not in use to protect it from the elements.
Troubleshooting
- Burner Not Lighting:
- Check gas supply: Ensure the gas tank is open and has sufficient fuel.
- Igniter issue: Verify the igniter electrode is clean and properly positioned near the burner's gas port. Check igniter wire connections.
- Gas orifice blockage: Clean any debris from the burner's gas orifice.
- Uneven Heating:
- Clogged burner ports: Clean the small holes along the burner tubes to ensure even gas flow.
- Heat plate positioning: Ensure heat plate shields are correctly seated over the burners.
- Crossover tube issue: Verify crossover tubes are properly connected and not obstructed.
- Premature Rusting:
- Ensure regular cleaning and drying of components.
- Store grill in a dry environment or use a high-quality grill cover.
- Avoid using abrasive cleaners that can damage the stainless steel surface.
Specifications
| Component | Material | Dimensions |
|---|---|---|
| Barbecue Burner | Stainless Steel | 14 3/8" x 5/8" |
| Flavorizer Bar (Heat Plate Shield) | Stainless Steel | 15 1/2" X 2" |
| Crossover Tube Burners | Stainless Steel | Adjustable Extends from 5" - 9.5" |
Product Dimensions (Overall Kit): 15.5 x 2 x 2 inches
Item Weight: 3.12 pounds
Manufacturer: Bigbox
Warranty & Support
For any questions regarding installation, compatibility, or product performance, please contact the manufacturer, Adviace, through their official channels. Specific warranty details may vary; please refer to the product packaging or the seller's information for precise warranty terms.
For general inquiries or to visit the Adviace store, please refer to the link provided with your purchase or search for "Adviace" on Amazon.
Ask a question about this manual
Ask about setup, troubleshooting, compatibility, parts, safety, or missing instructions. Manuals+ will review the question and use this page’s manual context to help answer it.