
ADLER AD-7916
ADLER AD 7916 Portable Air Conditioner User Manual
Model: AD-7916
Introduction
This manual provides detailed instructions for the safe and efficient operation of your ADLER AD 7916 Portable Air Conditioner. Please read this manual thoroughly before use and keep it for future reference. This appliance is designed to provide cooling, dehumidification, and ventilation for indoor spaces.
Important Safety Instructions
Always follow basic safety precautions when using electrical appliances to reduce the risk of fire, electric shock, and injury.
- Read all instructions carefully before operating the appliance.
- Do not operate the unit with a damaged power cord or plug. If damaged, contact qualified service personnel.
- Ensure the power supply voltage matches the specifications on the appliance's rating label.
- Keep the appliance away from water and other liquids to prevent electric shock.
- Do not block the air inlets or outlets of the unit. Maintain adequate clearance around the appliance for proper airflow.
- This appliance is not intended for use by persons (including children) with reduced physical, sensory, or mental capabilities, or lack of experience and knowledge, unless they have been given supervision or instruction concerning use of the appliance by a person responsible for their safety.
- Unplug the unit from the power outlet before cleaning, maintenance, or when not in use for extended periods.
- Only use accessories and attachments specified by the manufacturer.
- Do not attempt to repair or modify the appliance yourself. All servicing should be performed by qualified personnel.
Product Overview
The ADLER AD 7916 is a compact and portable air conditioner designed to provide comfort in various indoor environments. It features multiple operating modes and easy-to-use controls.
Components
- Main Unit (Portable Air Conditioner)
- Remote Control
- Exhaust Hose
- Window Kit Adapters

Figure 1: Front view of the ADLER AD 7916 Portable Air Conditioner.

Figure 2: Rear view showing the exhaust hose connection point and air filters.

Figure 3: Detailed view of the control panel on the top of the unit.

Figure 4: The remote control for the ADLER AD 7916, allowing convenient operation from a distance.
Setup and Installation
Unpacking
Carefully remove the air conditioner and all accessories from the packaging. Inspect the unit for any signs of damage. Retain the original packaging for future storage or transport of the unit.
Positioning the Unit
Place the unit on a flat, stable surface. Ensure there is at least 30 cm (12 inches) of unobstructed space around the unit to allow for proper air circulation and efficient operation.
Exhaust Hose Installation
The exhaust hose is crucial for expelling hot air from the room during cooling and dehumidification modes.
- Attach one end of the exhaust hose to the air outlet port located on the back of the main unit. Twist or push until it is securely fastened.
- Connect the window kit adapter to the other end of the exhaust hose.
- Open a window or sliding door and place the window kit adapter securely in the opening. Extend the window kit to fit the opening and seal any gaps around it to prevent hot air from re-entering the room.
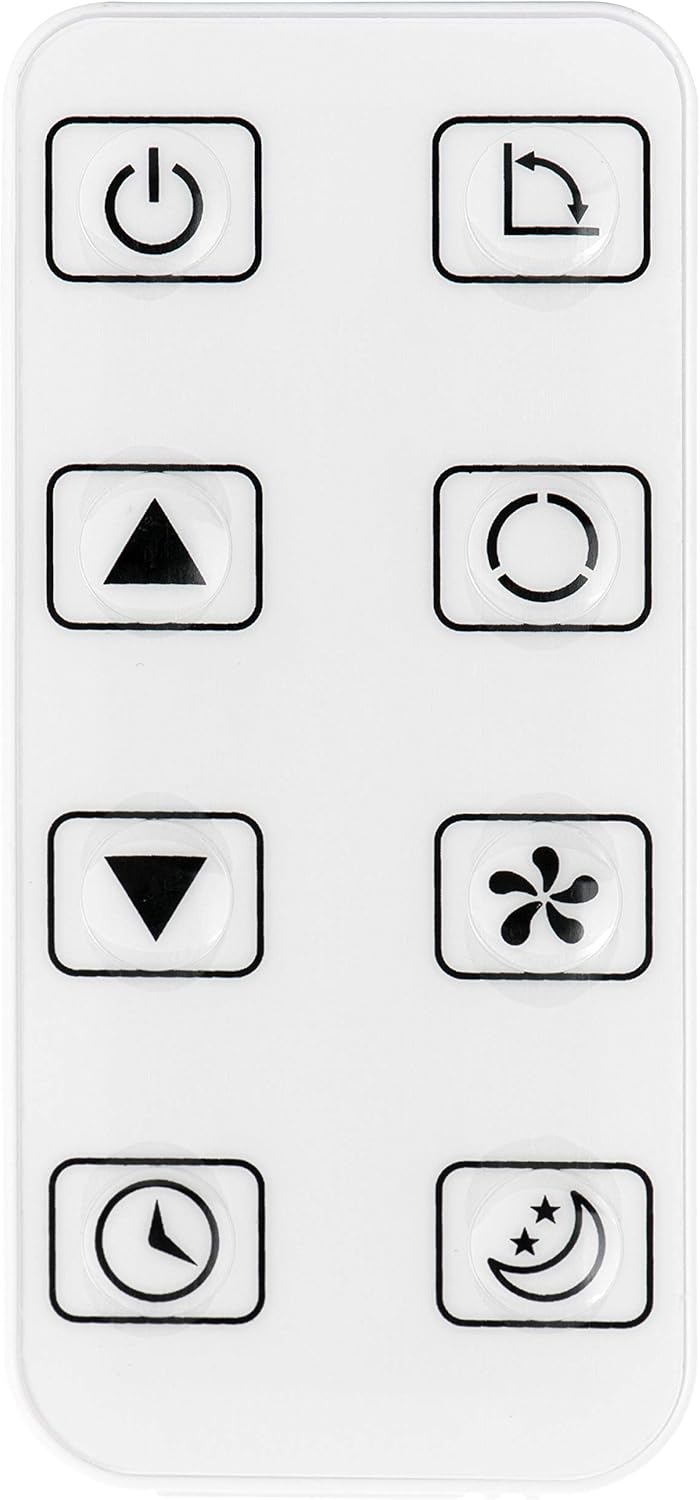
Figure 5: Main unit and accessories, including the exhaust hose and window adapters, ready for setup.
Operating Instructions
The ADLER AD 7916 can be operated using the control panel on the unit or the included remote control.
Powering On/Off
Press the POWER button ( ) on the control panel or remote control to turn the unit on or off.
Mode Selection
Press the MODE button ( ) to cycle through the available operating modes:
- COOL: For cooling the room. The compressor will operate to lower the ambient temperature.
- FAN: For air circulation without cooling. The fan will operate at the selected speed.
- DRY: For dehumidification. The unit will remove moisture from the air, and the exhaust hose must be connected.
Temperature Adjustment (COOL Mode)
In COOL mode, use the UP ( ) and DOWN (
 ) arrow buttons to set the desired temperature between 15°C and 31°C.
Fan Speed Adjustment
Press the FAN button ( ) to select between two fan speeds: Low and High.
Timer Function
Press the TIMER button ( ) to set the operating time from 1 to 24 hours. The unit will automatically turn off or on after the set time, depending on its current state.
Sleep Mode
Press the SLEEP button to activate sleep mode, which operates the unit more quietly and adjusts the temperature gradually for comfortable sleep.
Swing Function
Press the SWING button to activate or deactivate the automatic vertical oscillation of the air outlet louvers, distributing air more evenly across the room.
Maintenance
Regular maintenance ensures the longevity and efficient operation of your air conditioner.
Filter Cleaning
The air filters should be cleaned regularly (e.g., every two weeks, or more often depending on usage) to maintain optimal performance and prevent the growth of bacteria and dust accumulation.
- Unplug the air conditioner from the power outlet before attempting any cleaning or maintenance.
- Locate the air filter covers on the back of the unit. Remove the covers and carefully pull out the filters.
- Clean the filters using a vacuum cleaner to remove loose dust. For a more thorough cleaning, wash them gently with lukewarm water and a mild detergent.
- Rinse the filters thoroughly and allow them to dry completely in a shaded area before reinserting them into the unit. Do not expose them to direct sunlight.
- Once dry, reinsert the filters and secure the covers.
Draining Water (DRY Mode)
When operating in DRY (dehumidification) mode, the unit collects moisture. The unit may have an internal water tank that needs to be emptied periodically, or it may support continuous drainage via a hose connection. Refer to the unit's specific drainage port for details. Ensure the drain plug is securely closed when not using continuous drainage.
Troubleshooting
Before contacting customer support, please refer to the following table for common issues and their solutions.
| Problem | Possible Cause | Solution |
|---|---|---|
| Unit does not turn on. | No power supply; power cord not plugged in; circuit breaker tripped. | Check power connection; ensure the power outlet is functional; reset circuit breaker if tripped. |
| Unit does not cool effectively. | Air filter clogged; exhaust hose not properly installed or sealed; room too large for unit capacity; windows/doors open. | Clean air filter; ensure exhaust hose is securely connected and sealed to the window; close all windows and doors; verify room size is within the unit's recommended cooling area. |
| Loud noise during operation. | Unit not on a stable, flat surface; internal component issue. | Place the unit on a flat, stable surface. If noise persists and is unusual, contact customer support. |
| Water leakage. | Drain plug not secured; water tank full (if applicable for dehumidification). | Ensure the drain plug is securely closed. If operating in DRY mode, empty the water tank or ensure continuous drainage is properly set up. |
Technical Specifications
| Feature | Specification |
|---|---|
| Model Number | AD-7916 |
| Cooling Capacity | 9000 BTU/h (2600W) |
| Power Input (Cooling) | 950W |
| Temperature Range | 15°C to 31°C |
| Air Flow | 380 m³/hour |
| Dehumidification Capacity | 24 liters/day |
| Fan Speeds | 2 (Low, High) |
| Noise Level | 34 dB |
| Energy Class | A |
| Dimensions (L x W x H) | 45 x 40 x 100 cm |
| Weight | 4 Kilograms |

Figure 6: Dimensions of the ADLER AD 7916 unit for placement planning.
Warranty and Support
For detailed warranty information and customer support, please refer to the warranty card included with your product. It is recommended to keep your purchase receipt as proof of purchase for any warranty claims.
Should you require further assistance, technical support, or have questions not covered in this manual, please contact ADLER customer service through their official channels or visit the ADLER website for more information.
Related documentsAD-7916

Ask a question about this manual
Ask about setup, troubleshooting, compatibility, parts, safety, or missing instructions. Manuals+ will review the question and use this page’s manual context to help answer it.