
Beacon Pet Beacon Pet
Beacon Pet Portable Mini Wireless Electric Sewing Machine User Manual
Model: Beacon Pet
Brand: Beacon Pet
Product Overview
The Beacon Pet Portable Mini Wireless Electric Sewing Machine is a compact, lightweight, and practical tool designed for quick repairs and various sewing projects. It is ideal for crafters, DIY enthusiasts, beginners, and experienced sewers alike, offering convenience for both home and travel use.
Package Contents:
- 1 x Portable Sewing Machine
- 1 x Needle
- 1 x Extension Spindle
- 1 x User Manual
- 2 x Bobbins with Thread (random color)

Image: The Beacon Pet Portable Mini Sewing Machine shown with its accessories, including a needle, an extension spindle, and two bobbins of thread.
Key Features
- Portable and Convenient: This mini sewing machine is compact, lightweight, and practical, making it an invaluable tool for quick repairs and alterations. It meets various sewing requirements in daily life, whether at home or on the go.
- Versatile Fabric Compatibility: Suitable for almost all fabrics, it's ideal for sewing and repairing curtains, bags, pants, shirts, T-shirts, jeans, and for crafting. Note: The maximum sewing thickness is 1.8 mm. Fabrics that are too thick, too hard, or too soft cannot be sewn.
- Dual Power Modes: The machine can be powered by 4 AA batteries or a DC 6V power adapter (batteries and adapter are not included). This offers flexibility for use anywhere.
- Travel and Home Use: Its compact and portable design makes it excellent for on-site repairs and emergency sewing needs, perfect for both travel and home environments.
- User-Friendly for All Skill Levels: Simple, convenient, and easy to use, this basic sewing machine is suitable for both beginners and experienced sewers. It can also help develop children's work habits and sewing skills.
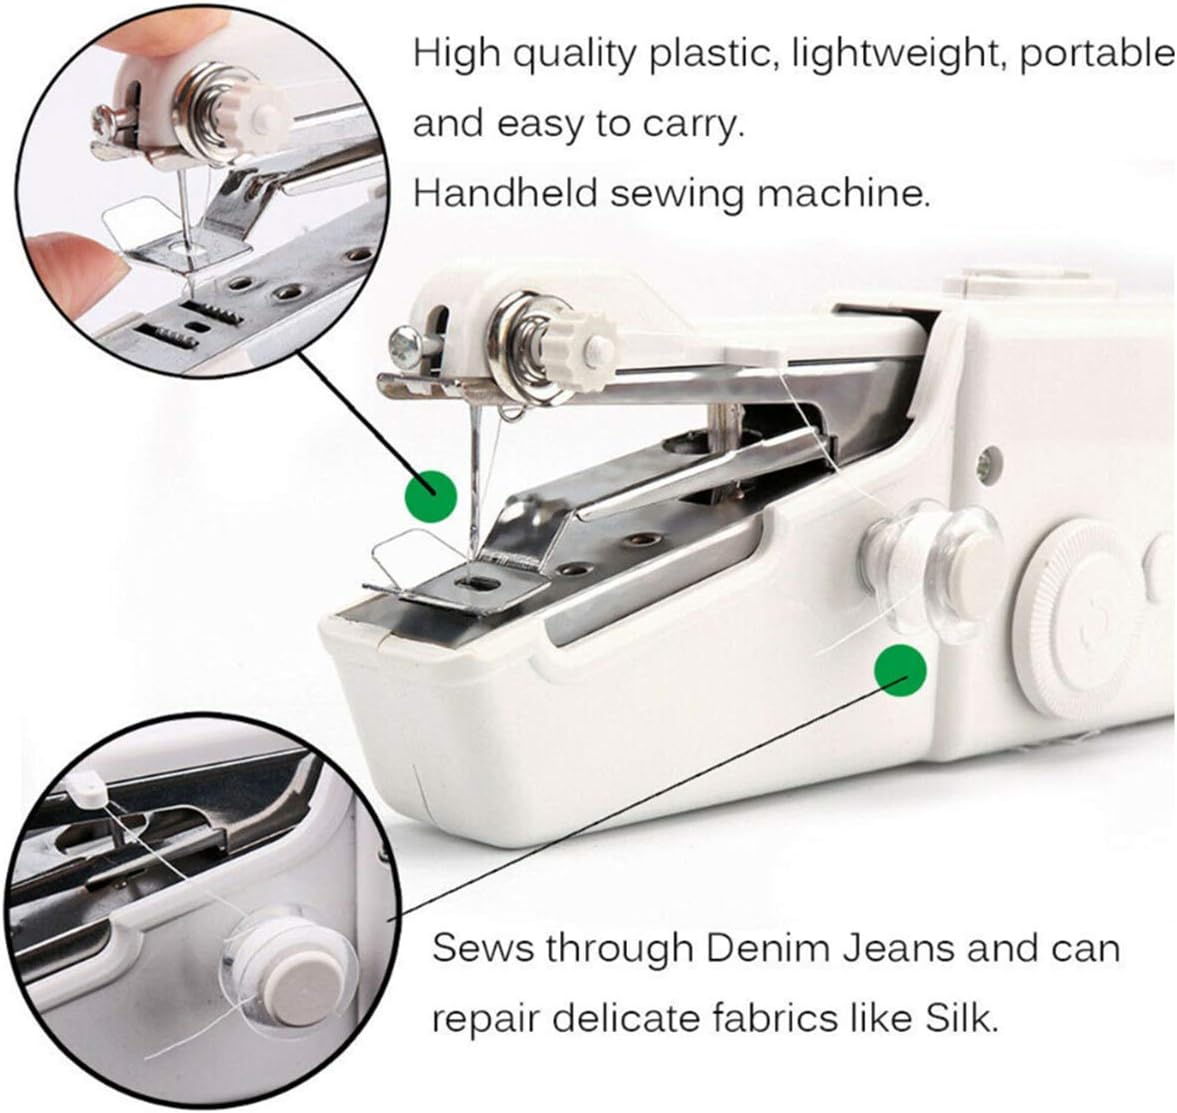
Image: A detailed view of the sewing machine's working mechanism, highlighting its capability to handle various fabric types, from denim to silk.

Image: An illustration detailing the two power supply methods for the sewing machine: using 4 AA batteries or connecting a DC 6V power adapter.
Setup Guide
1. Powering the Machine:
The sewing machine can be powered by either 4 AA batteries or a DC 6V power adapter. Ensure batteries are inserted with correct polarity if using battery power. The power adapter port is located on the side of the machine.
2. Identifying Parts:
Familiarize yourself with the main components of the sewing machine before operation.
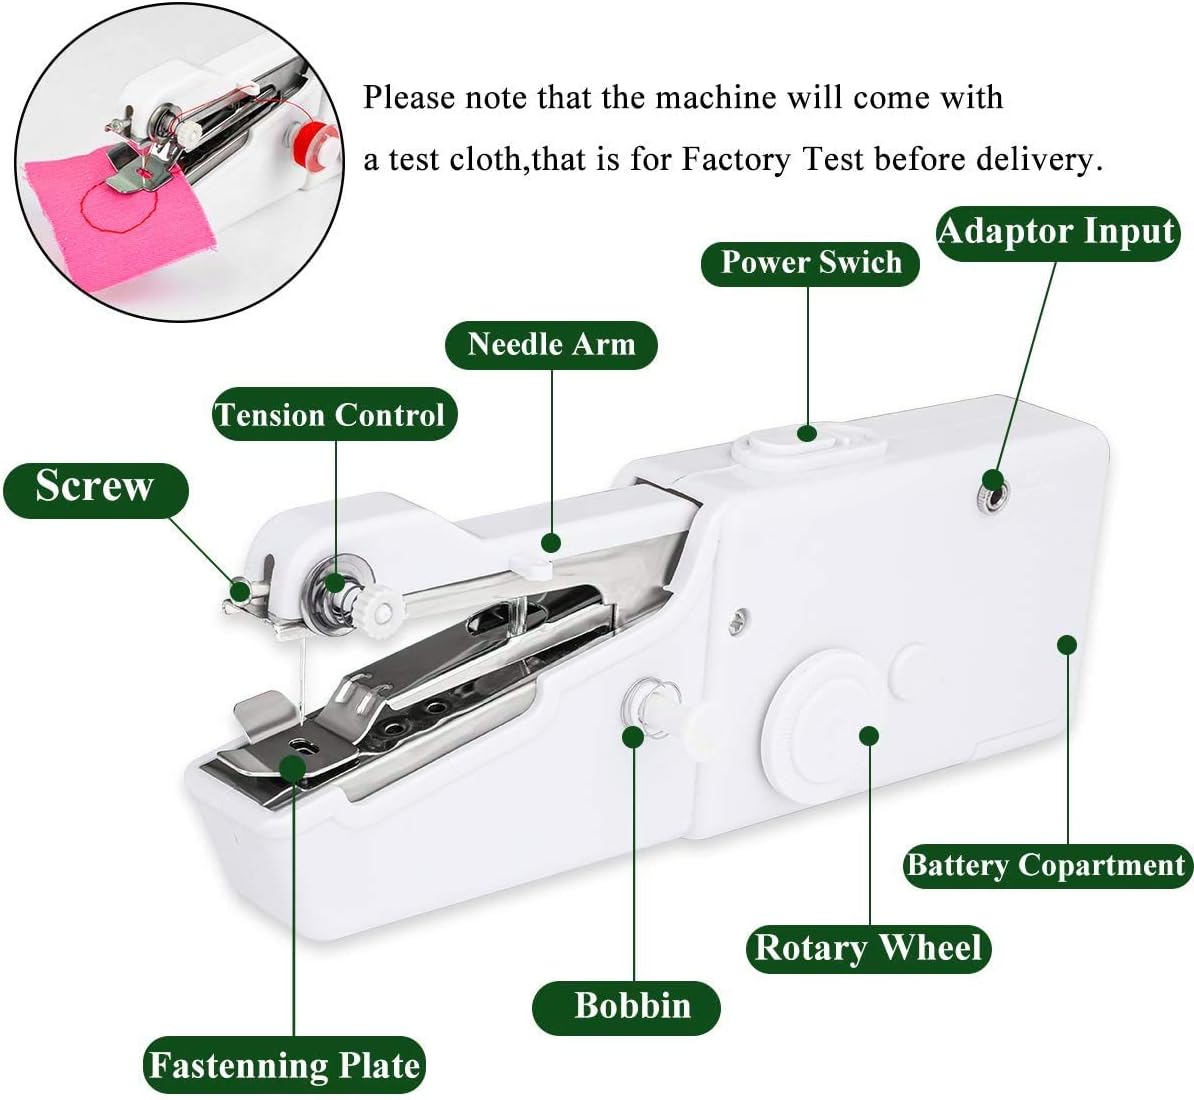
Image: A labeled diagram illustrating the various parts of the portable sewing machine, including the power switch, adapter input, needle arm, tension control, screw, fastening plate, bobbin, rotary wheel, and battery compartment.
3. Threading the Machine:
Proper threading is crucial for smooth operation. Follow the steps below for correct threading.
- Place the thread spool on the extension spindle.
- Guide the thread through the tension control.
- Pass the thread through the needle arm.
- Thread the needle from front to back.
- Ensure the bobbin is correctly placed in its compartment.
Operating Instructions
Follow these steps to operate your Beacon Pet Portable Mini Sewing Machine:
- Prepare the Fabric: Place the fabric under the fastening plate, ensuring it is flat and ready for sewing.
- Lower the Needle: Use the rotary wheel to manually lower the needle into the fabric at the starting point.
- Start Sewing: Press the power switch to begin sewing. The machine will automatically stitch.
- Guide the Fabric: Gently guide the fabric with your hands to ensure a straight seam. Do not pull or push the fabric forcefully.
- Adjust Tension: If stitches are too loose or too tight, adjust the tension control screw.
- Finish Sewing: Once you reach the end of your seam, turn off the power switch. Lift the fastening plate and carefully remove the fabric. Cut the thread.
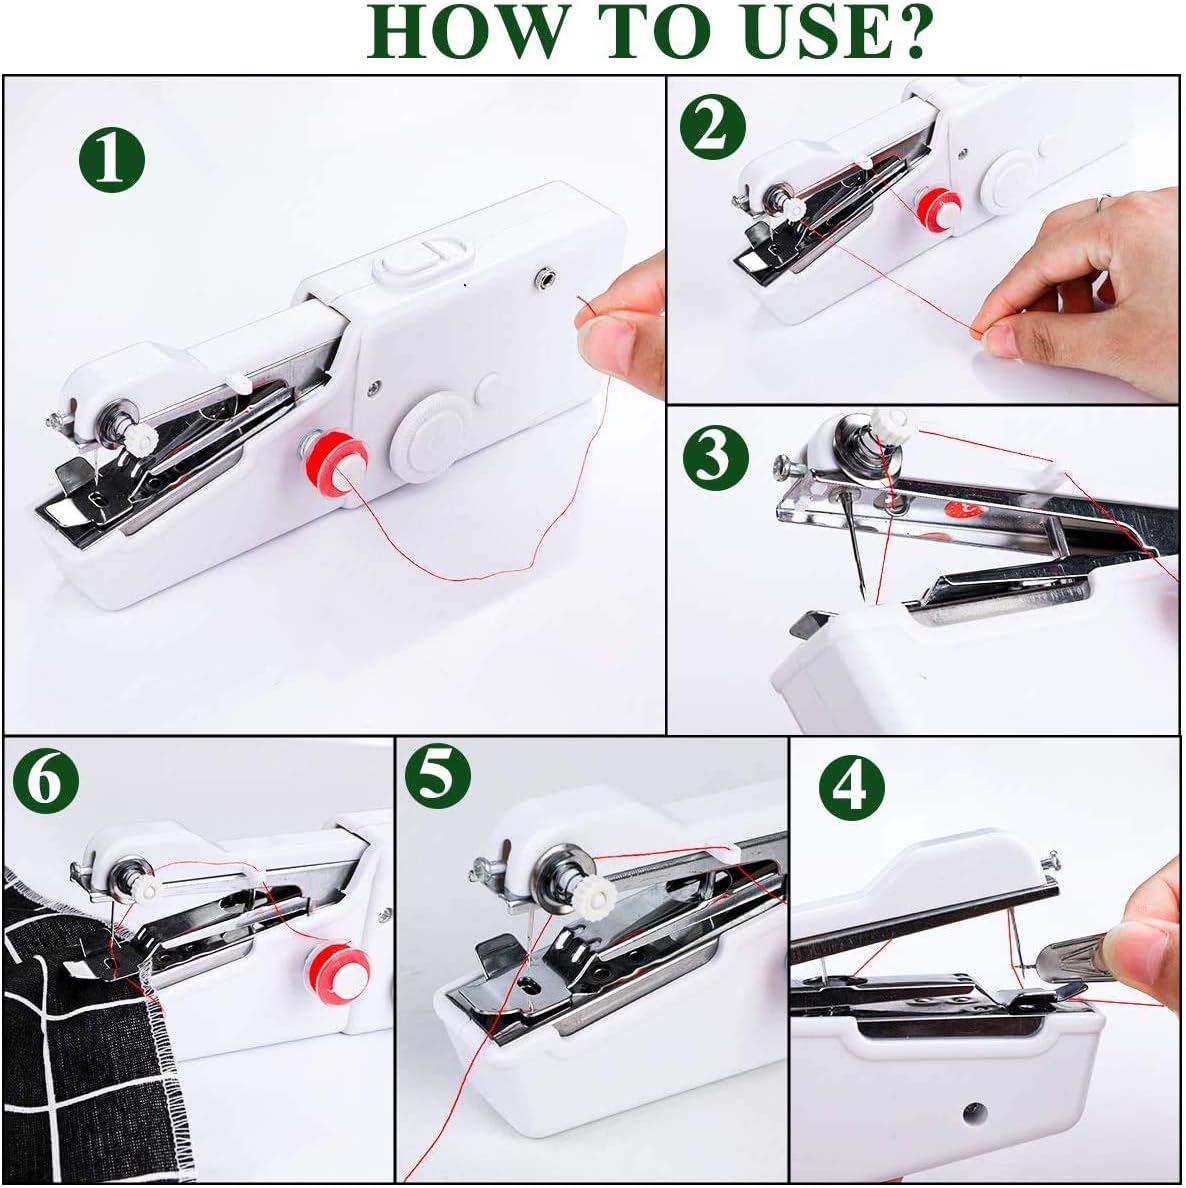
Image: A visual guide showing six steps for operating the sewing machine, including threading, positioning fabric, and starting the stitch.
Practical Applications:
This versatile machine can be used for various projects:
- Repairing curtains without taking them down.
- Mending clothes without removing them.
- Sewing socks, dolls, pet clothes, pillows, and other DIY crafts.

Image: Examples of projects that can be completed with the sewing machine, such as mending socks, creating doll clothes, making pet apparel, and sewing pillows.
Maintenance
To ensure the longevity and optimal performance of your sewing machine, follow these simple maintenance tips:
- Cleaning: Regularly clean the area around the needle and bobbin to remove lint and thread residue. Use a small brush or compressed air.
- Storage: Store the machine in a dry place, away from direct sunlight and extreme temperatures.
- Needle Replacement: Replace the needle if it becomes bent, dull, or breaks. Always use the correct type of needle for your fabric.
- Battery Care: If using batteries, remove them if the machine will not be used for an extended period to prevent leakage.
Troubleshooting
If you encounter issues with your sewing machine, refer to the following common problems and solutions:
- Machine Not Turning On:
- Check if batteries are inserted correctly with the right polarity.
- Ensure batteries are not depleted. Replace if necessary.
- If using an adapter, ensure it is properly connected and the power source is active.
- Skipped Stitches or Loose Stitches:
- Re-thread the machine carefully, ensuring the thread is correctly seated in all guides and tension discs.
- Adjust the tension control screw. Turn clockwise to increase tension, counter-clockwise to decrease.
- Ensure the needle is inserted correctly and is not bent or dull. Replace if needed.
- Thread Breaking:
- Check for proper threading.
- Ensure the thread is not tangled or snagged.
- Reduce tension if it's too high.
- Use good quality thread.
- Machine Jams:
- Turn off the machine immediately.
- Remove any tangled thread from the bobbin area and needle plate.
- Ensure the fabric thickness is within the machine's capacity (max 1.8mm).
Product Specifications
| Brand | Beacon Pet |
| Model Number | Beacon Pet |
| Color | White |
| Material | High-quality Plastic and Metal |
| Product Dimensions | 21 x 6.5 x 3.5 cm (approx. 8.3 x 2.6 x 1.4 inches) |
| Power Source | 4 AA Batteries or DC 6V Power Adapter (not included) |
| Maximum Sewing Thickness | 1.8 mm |
Warranty and Support
This product may be eligible for extended warranty plans offered by third-party providers. Please refer to the original purchase details or contact your retailer for information on available protection plans.
For product support or inquiries, please contact Beacon Pet customer service through the retailer's platform or their official website.
Return Policy:
A 30-day free return policy may apply. Please check your purchase receipt or retailer's return policy for specific terms and conditions.
Ask a question about this manual
Ask about setup, troubleshooting, compatibility, parts, safety, or missing instructions. Manuals+ will review the question and use this page’s manual context to help answer it.