
1. Introduction
The Einhell Professional cordless drill TP-CD 18/50 Li BL Solo is a versatile tool designed for both fast and precise screwing and drilling tasks. It is part of the Power X-Change family, ensuring compatibility with Einhell's high-quality lithium-ion batteries. This model features a brushless motor, which provides enhanced power, extended runtime, and reduced wear compared to traditional carbon brush motors. Its ergonomic design with a soft grip ensures comfortable handling and a secure hold during operation. An integrated LED light illuminates the work area for improved visibility.

Figure 1: Einhell TP-CD 18/50 Li BL Solo Cordless Drill. This image shows the main product, a red and black cordless drill with a grey battery base, highlighting its robust design.

Figure 2: Part of the Power X-Change Family. This image illustrates the drill's compatibility with the Einhell Power X-Change battery system, showing various tools that share the same battery platform.

Figure 3: Brushless Motor Technology. A diagram showing the internal components of a brushless motor, emphasizing its efficiency, increased power, and longer lifespan compared to brushed motors.
2. Safety Instructions
Always adhere to general power tool safety guidelines to prevent injury and damage. Read all safety warnings, instructions, illustrations, and specifications provided with this power tool. Failure to follow all instructions listed below may result in electric shock, fire, and/or serious injury.
2.1 General Safety
- Work Area Safety: Keep the work area clean and well-lit. Cluttered or dark areas invite accidents. Do not operate power tools in explosive atmospheres, such as in the presence of flammable liquids, gases, or dust.
- Electrical Safety: Avoid body contact with earthed or grounded surfaces (e.g., pipes, radiators, ranges, refrigerators). There is an increased risk of electric shock if your body is earthed or grounded.
- Personal Safety: Always wear appropriate personal protective equipment, including safety glasses, hearing protection, and gloves. Dress properly; avoid loose clothing or jewelry. Keep hair and clothing away from moving parts.
2.2 Battery Tool Use and Care
- Recharge only with the charger specified by the manufacturer. A charger that is suitable for one type of battery pack may create a risk of fire when used with another battery pack.
- Use power tools only with specifically designated battery packs. Use of any other battery packs may create a risk of injury and fire.
- When the battery pack is not in use, keep it away from other metal objects, like paper clips, coins, keys, nails, screws, or other small metal objects, that can make a connection from one terminal to another. Shorting the battery terminals together may cause burns or a fire.
- Under abusive conditions, liquid may be ejected from the battery; avoid contact. If contact accidentally occurs, flush with water. If liquid contacts eyes, additionally seek medical help. Liquid ejected from the battery may cause irritation or burns.
3. Product Overview
Familiarize yourself with the components of your Einhell cordless drill for safe and effective operation.
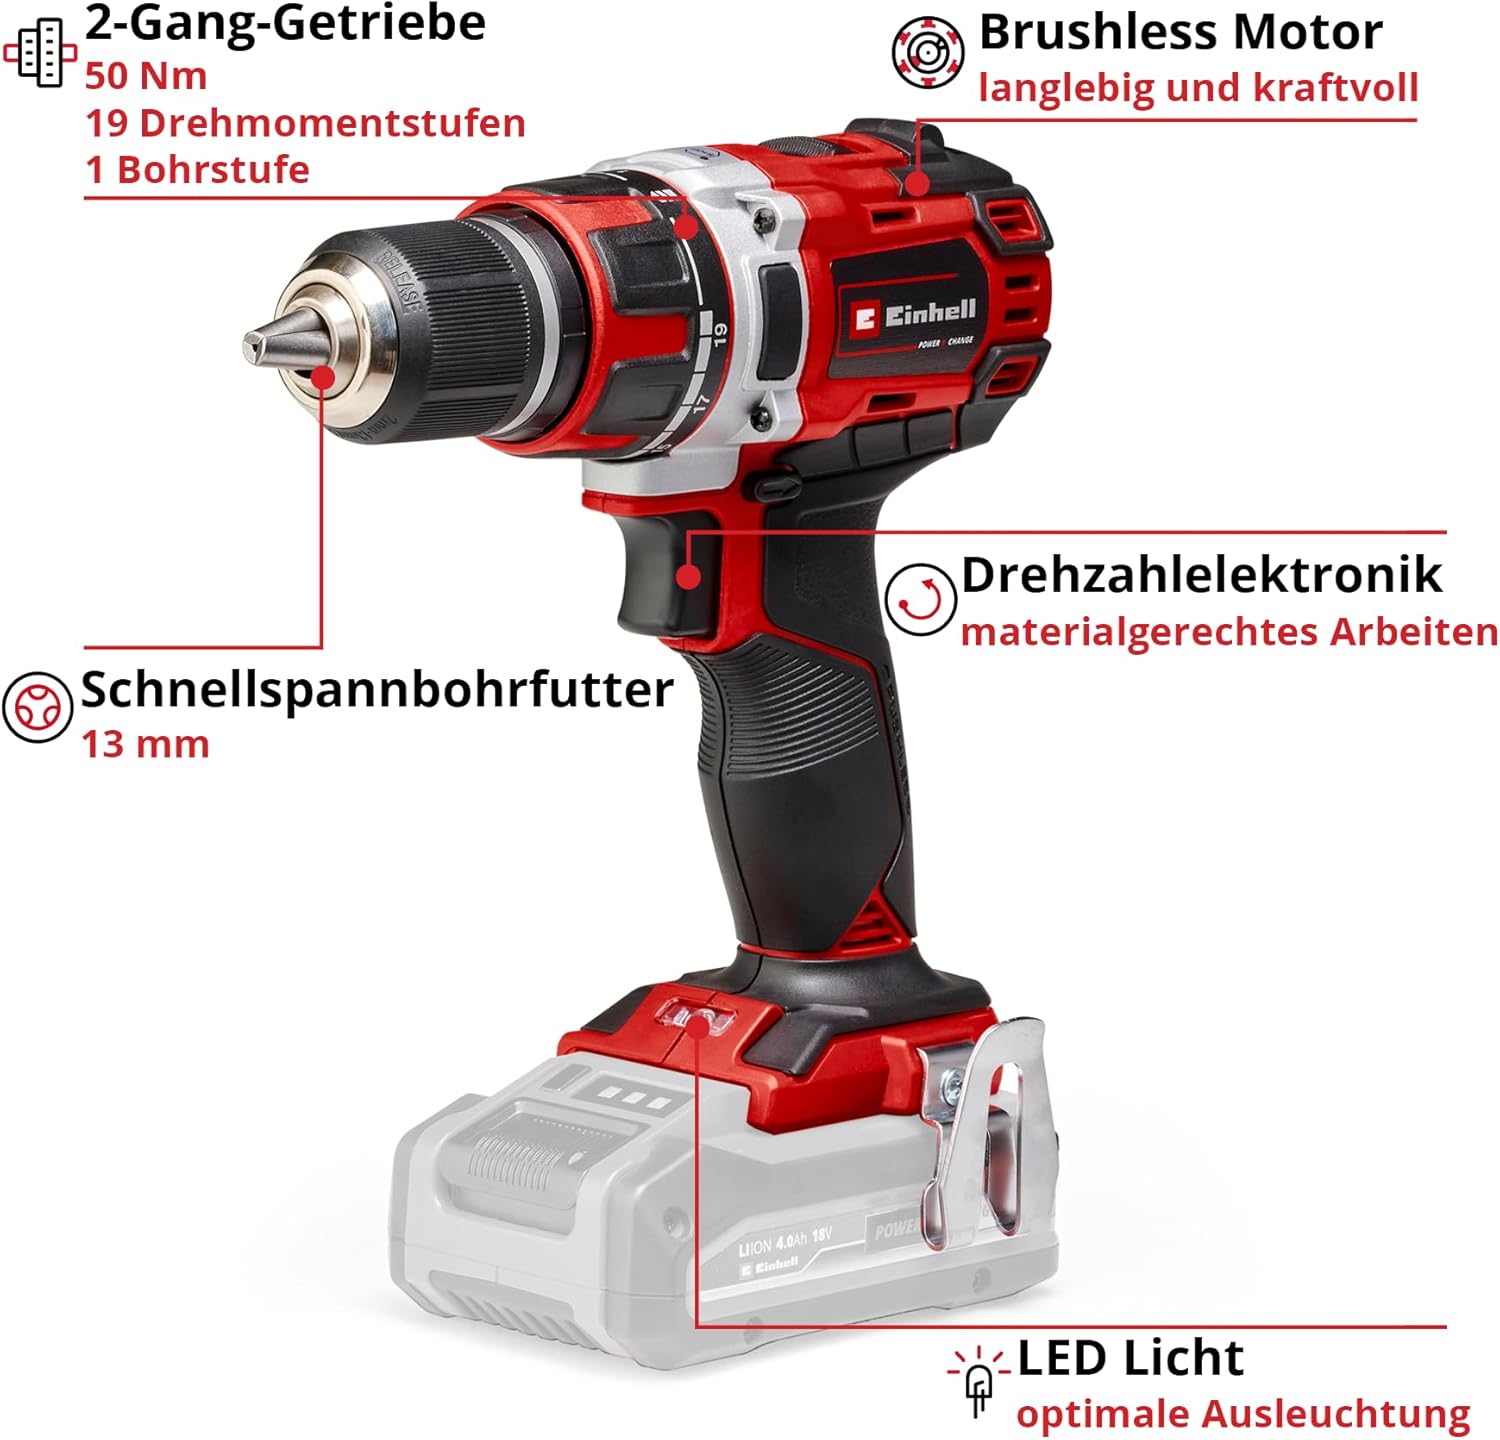
Figure 4: Key Components of the Cordless Drill. This diagram highlights the main parts of the drill, including the 2-speed gearbox, 50 Nm torque, 19 torque settings, 1 drill setting, 13 mm keyless chuck, speed electronics, brushless motor, and LED light.
3.1 Components List
- Keyless Chuck: 13 mm capacity for quick bit changes.
- Torque Selector Ring: Adjusts torque settings (20 levels) and selects drill mode.
- Gear Selector Switch: For 2-speed gearbox (high/low speed).
- Direction Switch: Forward/Reverse rotation.
- On/Off Trigger: Variable speed control.
- Soft Grip Handle: Ergonomic design for comfortable use.
- LED Light: Illuminates the work area.
- Battery Interface: For Power X-Change 18V batteries (battery sold separately).
- Belt Clip: For convenient temporary storage.
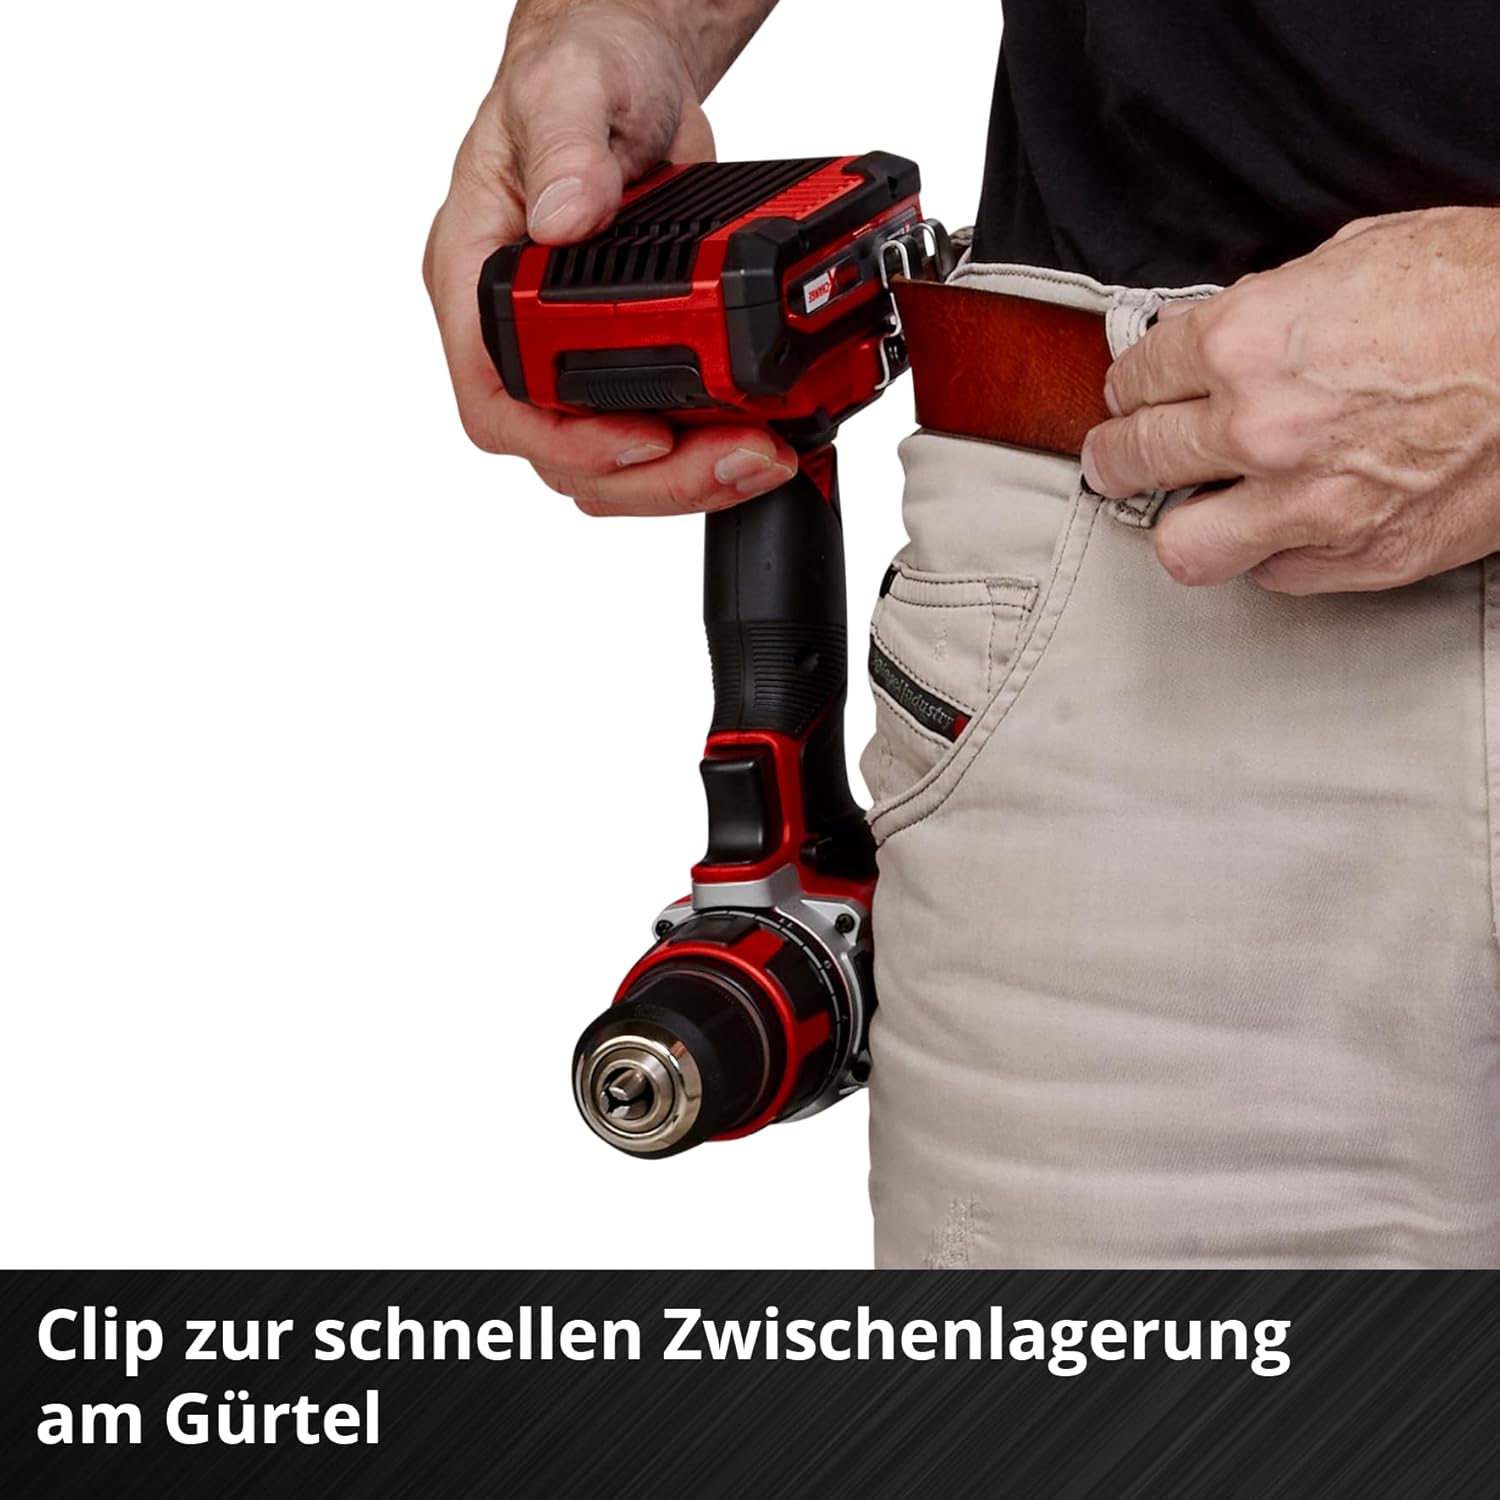
Figure 5: Integrated Belt Clip. This image shows the drill hanging from a user's belt, demonstrating the convenience of the belt clip for quick access and temporary storage.
4. Setup
4.1 Battery Installation and Removal
The Einhell TP-CD 18/50 Li BL Solo operates with an 18V Power X-Change battery (not included). Ensure the battery is fully charged before use.
- Installation: Slide the charged battery pack onto the base of the drill until it clicks securely into place.
- Removal: Press the battery release button (usually located on the sides of the battery) and slide the battery pack off the tool.

Figure 6: Battery and Charger (Sold Separately). This image indicates that the Power X-Change battery and charger are not included with the drill and must be purchased separately.
4.2 Installing Drill Bits or Screwdriver Bits
The drill features a 13 mm keyless chuck for easy bit changes.
- Open Chuck: Rotate the front sleeve of the chuck counter-clockwise until the jaws are wide enough to insert the bit.
- Insert Bit: Insert the desired drill bit or screwdriver bit fully into the chuck jaws.
- Close Chuck: Rotate the front sleeve clockwise to tighten the chuck jaws firmly around the bit. Ensure the bit is centered and secure before operation.

Figure 7: Keyless Chuck Operation. A close-up view of hands inserting a screwdriver bit into the 13 mm keyless chuck, demonstrating the ease of bit installation.
5. Operating Instructions
5.1 Power On/Off and Speed Control
- To Start: Press the On/Off trigger. The speed is variable; the harder you press the trigger, the faster the drill rotates.
- To Stop: Release the On/Off trigger.
5.2 Direction of Rotation
The direction switch (located above the trigger) controls the rotation direction:
- Forward (Clockwise): Push the switch to the left for drilling and screwing.
- Reverse (Counter-clockwise): Push the switch to the right for unscrewing or removing jammed bits.
- Lock Position: Center the switch to lock the trigger and prevent accidental starting.
5.3 Gear Selection
The 2-speed gearbox allows you to select the appropriate speed for your task:
- Gear 1 (Low Speed, High Torque): Ideal for heavy-duty screwing and drilling large holes.
- Gear 2 (High Speed, Low Torque): Suitable for fast drilling and light screwing applications.
Always select the gear when the drill is stopped to prevent damage to the gearbox.
5.4 Torque Setting and Drill Mode
The torque selector ring allows you to adjust the torque output or select the drill mode.
- Torque Settings (1-20): Rotate the ring to select the desired torque level. Lower numbers are for smaller screws or softer materials, while higher numbers are for larger screws or harder materials. The clutch will disengage once the set torque is reached, preventing overtightening or stripping.
- Drill Mode (Drill Symbol): Select this setting for drilling applications where maximum torque is required and the clutch should not disengage.
5.5 LED Work Light
The integrated LED light automatically illuminates the work area when the trigger is pressed, providing better visibility in dimly lit conditions.

Figure 8: LED Light for Optimal Illumination. A close-up showing the LED light on the drill's base, providing clear illumination of the work surface.

Figure 9: Drill in Operation. A user is shown actively drilling into a wooden beam, demonstrating the drill's application in a typical work scenario.
6. Maintenance
Regular maintenance ensures the longevity and optimal performance of your cordless drill.
- Cleaning: Keep the ventilation slots clean to prevent overheating. Use a soft, damp cloth to clean the tool casing. Do not use harsh chemicals or abrasive cleaners.
- Chuck Maintenance: Periodically clean the chuck jaws to ensure proper gripping of bits.
- Battery Care: Store batteries in a cool, dry place. Do not expose them to extreme temperatures. Charge batteries regularly, even if not in use, to maintain their health.
- Storage: Store the drill and battery in a dry, secure location, out of reach of children.
7. Troubleshooting
This section addresses common issues you might encounter with your cordless drill.
| Problem | Possible Cause | Solution |
|---|---|---|
| Drill does not start | Battery not charged or improperly inserted; Direction switch in lock position. | Charge battery and ensure it is securely inserted; Move direction switch out of the center lock position. |
| Loss of power during operation | Battery charge is low. | Recharge the battery. |
| Bit slips in chuck | Chuck not tightened sufficiently; Bit shank is dirty or damaged. | Retighten chuck firmly; Clean or replace the bit. |
| Overheating | Blocked ventilation slots; Prolonged heavy use. | Clean ventilation slots; Allow the tool to cool down. |
8. Specifications
Detailed technical specifications for the Einhell TP-CD 18/50 Li BL Solo Cordless Drill.
| Feature | Specification |
|---|---|
| Brand | Einhell |
| Model Number | 4513887 |
| Power Source | Battery Powered (Power X-Change 18V) |
| Motor Type | Brushless |
| Maximum Rotational Speed | 1800 RPM |
| Voltage | 18 Volts |
| Amperage | 3 Amps |
| Maximum Chuck Size | 13 mm |
| Maximum Torque | 50 Newton Meters |
| Number of Speeds | 2 |
| Torque Levels | 20 + Drill Mode |
| Item Weight | 1.14 Kilograms (2.51 pounds) |
| Product Dimensions | 12.6"L x 3.54"W x 10.04"H |
| Included Components | Cordless drill (battery and charger sold separately) |

Figure 10: Maximum Screws per Battery Charge. This chart illustrates the approximate number of 6x60 mm screws that can be driven into softwood using different capacities of Power X-Change batteries (2.0 AH, 2.5 AH, 3.0 AH, 4.0 AH, 5.2 AH, 6.0 AH, 8.0 AH).
9. Warranty and Support
Einhell provides a 10-year warranty on the brushless motor of this tool upon online registration. For detailed warranty terms and conditions, please refer to the official Einhell website or the warranty card included with your product.
For technical support, spare parts, or service inquiries, please contact Einhell customer service through their official channels. Always provide your product model number (TP-CD 18/50 Li BL Solo) and serial number when seeking assistance.


