
1. Introduction
Thank you for purchasing the Honeywell CL18PE Portable Air Cooler and Humidifier. This manual provides essential information for the safe and efficient operation, maintenance, and troubleshooting of your appliance. Please read this manual thoroughly before use and retain it for future reference.

Image 1.1: Front view of the Honeywell CL18PE Portable Air Cooler and Humidifier. The unit is white with a grey control panel at the top and a large grey fan grille. It stands on four caster wheels.
2. Important Safety Information
Always follow basic safety precautions when using electrical appliances to reduce the risk of fire, electric shock, and injury.
- Read all instructions before using the appliance.
- Do not operate any appliance with a damaged cord or plug.
- Do not run the power cord under carpeting or cover with throw rugs.
- Always unplug the appliance from the power outlet before filling, cleaning, or servicing.
- Do not use the appliance in wet or damp locations.
- Keep the appliance out of reach of children and pets.
- Use only clean water in the water tank.
- Ensure the appliance is placed on a stable, level surface.
3. Product Overview and Components
The Honeywell CL18PE is designed to provide cooling and humidification through evaporative technology. Key components include:
- Control Panel: Located at the top, for adjusting settings.
- Air Outlet: Front grille where cooled air is discharged.
- Water Tank: 18-liter capacity for water, accessible for filling.
- Cooling Pads/Filter: Located at the rear, responsible for evaporation.
- Caster Wheels: For easy portability.
- Remote Control: For convenient operation from a distance.
4. Setup Instructions
- Unpacking: Carefully remove the appliance from its packaging. Retain packaging materials for future storage or transport.
- Placement: Place the air cooler on a firm, level surface in a well-ventilated area. Ensure there is at least 20 cm (8 inches) of space from walls or other objects to allow for proper airflow.
- Filling the Water Tank:
Open the water tank cover, typically located at the top or side of the unit. Pour clean, cool water into the tank. Do not exceed the maximum fill line indicated on the tank. For enhanced cooling, you may add ice packs or ice cubes to the water tank if your model supports it.

Image 4.1: A hand pouring water from a pitcher into the water tank opening of the air cooler. The tank is located at the side of the unit.
- Power Connection: Plug the power cord into a grounded electrical outlet. Ensure the voltage matches the appliance's requirements.
5. Operating Instructions
The CL18PE can be operated using the control panel on the unit or the provided remote control.
5.1 Control Panel and Remote Control Functions
- Power Button: Turns the unit ON or OFF.
- Speed Button: Adjusts fan speed (Low, Medium, High, Sleep).
- Cool/Humidify Button: Activates or deactivates the evaporative cooling/humidification function.
- Swing Button: Activates or deactivates the oscillation function for wider air distribution.
- Timer Button: Sets an operating timer for automatic shut-off.
5.2 Starting Operation
- Press the Power button to turn on the unit.
- Select your desired fan speed using the Speed button.
- To activate cooling and humidification, press the Cool/Humidify button. Ensure the water tank is filled.
- Press the Swing button for automatic oscillation of the air vents.
Note: For optimal cooling performance, ensure the water tank is adequately filled. The cooling effect is most noticeable in dry climates.
6. Maintenance
Regular maintenance ensures the longevity and efficient operation of your air cooler.
6.1 Cleaning the Exterior
- Always unplug the appliance before cleaning.
- Wipe the exterior surfaces with a soft, damp cloth. Do not use abrasive cleaners or solvents.
- Ensure no water enters the control panel or other electrical components.
6.2 Cleaning the Water Tank
- Empty the water tank regularly, especially if the unit will not be used for an extended period.
- Clean the tank with a mild detergent and water. Rinse thoroughly to remove any residue.
- Allow the tank to air dry completely before reassembling.
6.3 Cleaning the Cooling Pads/Filter
The cooling pads (also known as evaporative media or filter) should be cleaned periodically to prevent mineral buildup and maintain efficiency.
- Unplug the unit and remove the rear panel to access the cooling pads.
- Carefully remove the cooling pads.
- Rinse the pads under running water to remove dust and mineral deposits. For heavy buildup, soak them in a solution of water and white vinegar (1:1 ratio) for 30 minutes, then rinse thoroughly.
- Allow the pads to air dry completely before reinstalling.
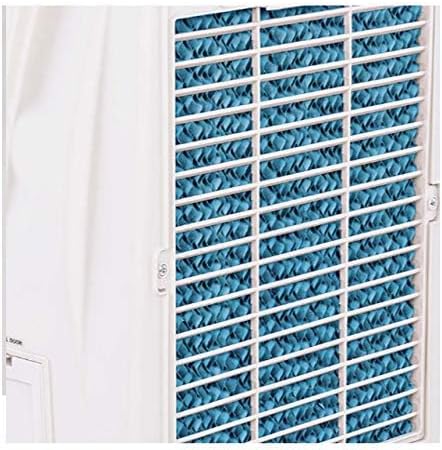
Image 6.1: Close-up view of the blue cooling pads or evaporative filter, visible through a grille on the side of the unit. These pads facilitate the cooling and humidifying process.
7. Troubleshooting Guide
Before contacting customer support, refer to the following table for common issues and solutions.
| Problem | Possible Cause | Solution |
|---|---|---|
| Unit does not turn on. | No power supply. | Check if the power cord is securely plugged into a working outlet. |
| No cooling effect. | Water tank is empty or cooling function is not activated. | Fill the water tank. Press the Cool/Humidify button. Ensure cooling pads are wet. |
| Weak airflow. | Air filter/cooling pads are dirty or blocked. | Clean the air filter and cooling pads as described in the Maintenance section. |
| Unpleasant odor. | Stagnant water or dirty cooling pads. | Empty and clean the water tank. Clean or replace cooling pads. Use fresh water. |
| Water leakage. | Water tank not properly seated or overfilled. | Ensure the water tank is correctly installed and not filled above the MAX line. Check for cracks in the tank. |
8. Product Specifications
| Feature | Detail |
|---|---|
| Model Name | CL18PE |
| Brand | Honeywell |
| Material | Polypropylene, PVC |
| Mounting Type | Freestanding |
| Special Feature | Portable |
| Color | White |
| Control Type | Remote |
| Water Tank Capacity | 18 Liters |
| Recommended Use | Cooling and humidifying indoor spaces, especially for individuals with respiratory issues or those seeking improved air quality. |
| Form Factor | Tower |
| Wattage | 80 watts |
| Operation Mode | Automatic |
| Item Weight | 9.74 Kilograms |
9. Warranty and Support
Honeywell products are manufactured to the highest quality standards. For specific warranty information, please refer to the warranty card included with your product or visit the official Honeywell website. Keep your purchase receipt as proof of purchase.
For technical support, service, or replacement parts, please contact Honeywell customer service. Contact details can typically be found on the product packaging or the official Honeywell website.
- Online Support: www.honeywell.com
- Customer Service: Refer to your regional Honeywell contact information.


