
Skil LT4818-10
SKIL 14-Inch Replacement Rapid Reload String Trimmer Head User Manual
Model: LT4818-10
Introduction
This manual provides essential information for the safe and effective use of your SKIL 14-Inch Replacement Rapid Reload String Trimmer Head. This replacement head is designed for compatibility with SKIL Brushless PWR CORE 40 14 IN. String Trimmers and Brushless PWR CORE 20 13 IN. String Trimmers. Please read all instructions carefully before installation and operation.
Important Safety Information
Always prioritize safety when operating power tools. Failure to follow these instructions may result in serious injury.
- Eye Protection: Always wear safety glasses or goggles that comply with applicable standards (e.g., ANSI Z87.1) when using this product.
- Protective Gear: Wear appropriate protective clothing, such as long pants, sturdy footwear, and hearing protection, to minimize exposure to debris and noise.
- Flying Debris: Be aware that the 'Bump-Feed Head' feature can cause debris to be ejected at high speeds. Keep bystanders, children, and pets at a safe distance (at least 50 feet/15 meters) from the operating area.
- Inspect Before Use: Before each use, inspect the trimmer head for any damage, cracks, or loose parts. Do not use if damaged.
- Proper Installation: Ensure the trimmer head is securely installed according to the instructions to prevent detachment during operation.
Setup and Installation
This section details the steps for installing the replacement trimmer head and loading the trimmer line.
Installing the Trimmer Head
The SKIL Rapid Reload Trimmer Head is designed for quick and easy installation. Refer to your string trimmer's main instruction manual for specific removal procedures of the old head, if applicable.
- Ensure Power is Off: Before beginning, ensure your string trimmer's power source is disconnected (battery removed or cord unplugged) to prevent accidental startup.
- Align and Attach: Align the new SKIL Rapid Reload Trimmer Head with the shaft of your compatible SKIL string trimmer. Push and twist or thread the head onto the shaft as per your trimmer's design until it is securely fastened.
- Verify Security: Gently tug on the installed head to confirm it is firmly attached and does not wobble.

Image: The SKIL 14-Inch Replacement Rapid Reload String Trimmer Head, showing its black and red design. This is the main component to be installed onto your string trimmer.
Loading Trimmer Line (Rapid Reload Feature)
The Rapid Reload feature allows for quick and easy line loading without disassembling the head.
- Prepare Line: Cut a length of trimmer line according to your trimmer's specifications (typically 15-20 feet). Ensure the line diameter matches the head's requirements.
- Align Arrows: Rotate the trimmer head until the arrows on the top of the head align with the eyelets on the side. This opens the internal spool for line insertion.
- Insert Line: Feed one end of the trimmer line through one eyelet and push it straight through the head until it exits the opposite eyelet. Continue feeding until an equal length of line extends from both sides of the head.
- Wind Line: While holding the line ends, rotate the top of the trimmer head in the direction indicated by the winding arrow (usually clockwise). The line will automatically wind onto the internal spool. Continue winding until only about 6-8 inches of line extends from each eyelet.
- Check Line: Ensure the line is securely wound and does not easily pull out.
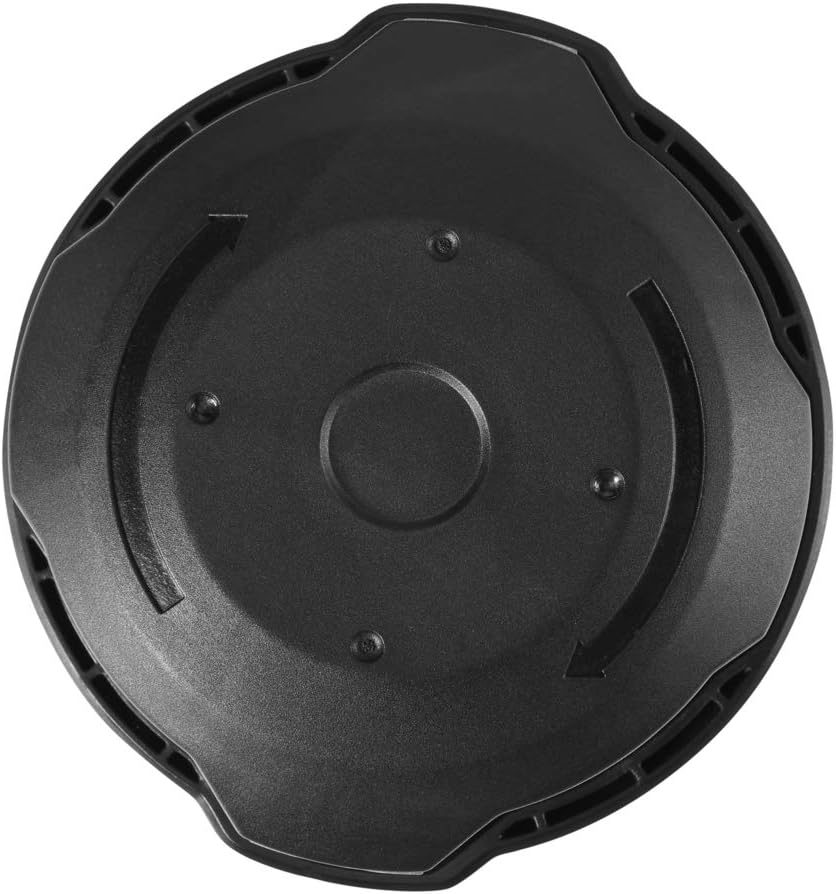
Image: Top view of the SKIL Rapid Reload Trimmer Head, showing the arrows that indicate the direction for aligning and winding the trimmer line.
Operating Instructions
Once the trimmer head is installed and line is loaded, you are ready to operate your string trimmer.
Using the Bump-Feed Feature
The Bump-Feed Head allows you to advance more trimmer line during operation.
- Start Trimmer: Turn on your string trimmer and allow the head to reach full operating speed.
- Bump Gently: While the trimmer is running, gently tap the bottom of the trimmer head on a firm, non-abrasive surface (e.g., grass, dirt). Do not tap on concrete or asphalt excessively, as this can damage the head.
- Line Advance: Each gentle tap should cause a small amount of new line to feed out. The cutting blade on your trimmer's guard will automatically trim the line to the correct length.
- Avoid Over-Bumping: Only bump as needed. Excessive bumping will waste line.
Maintenance
Regular maintenance ensures optimal performance and extends the life of your trimmer head.
- Cleaning: After each use, clean the trimmer head to remove grass clippings, dirt, and debris. Use a damp cloth; do not use harsh chemicals or abrasive cleaners.
- Inspect for Wear: Periodically inspect the trimmer head for signs of wear, cracks, or damage, especially around the eyelets where the line exits. Replace the head if significant wear or damage is observed.
- Line Storage: Store trimmer line in a cool, dry place to prevent it from becoming brittle.
- Storage of Head: When not in use, store the trimmer head in a clean, dry location, away from direct sunlight and extreme temperatures.
Troubleshooting
This section addresses common issues you might encounter with your trimmer head.
| Problem | Possible Cause | Solution |
|---|---|---|
| Line not feeding out (Bump-Feed) | Line is tangled or fused inside the spool; insufficient line remaining; head not bumping correctly. | Remove the head from the trimmer and manually inspect the line spool. Reload fresh line. Ensure the head is tapped gently but firmly on a suitable surface while the trimmer is running at full speed. |
| Line breaks frequently | Incorrect line diameter; old/brittle line; hitting hard objects; worn eyelets. | Use the correct diameter and fresh, high-quality trimmer line. Avoid hitting fences, concrete, or rocks. Inspect eyelets for wear and replace the head if necessary. |
| Trimmer head wobbles after installation | Head not securely tightened; incorrect head for trimmer model. | Ensure the head is fully tightened onto the trimmer shaft. Verify that this replacement head is compatible with your specific SKIL string trimmer model. |
Specifications
| Feature | Detail |
|---|---|
| Brand | Skil |
| Model Number | LT4818-10 |
| Item Weight | 13.8 ounces |
| Product Dimensions | 7.09"L x 7.09"W |
| Cutting Width (Compatible) | 14 inches (for compatible trimmers) |
| Power Source | Manual (as part of powered trimmer) |
| Special Features | Rapid Reload, Bump-Feed Head |
| Compatibility | SKIL Brushless PWR CORE 40 14 IN. String Trimmers & Brushless PWR CORE 20 13 IN. String Trimmers |
Warranty and Support
For information regarding product warranty, returns, or technical support, please visit the official SKIL website or contact SKIL customer service directly. Keep your purchase receipt as proof of purchase.
SKIL Official Website: www.skil.com
Related documentsLT4818-10


Ask a question about this manual
Ask about setup, troubleshooting, compatibility, parts, safety, or missing instructions. Manuals+ will review the question and use this page’s manual context to help answer it.