
1. Introduction
The SPYPOINT LINK-MICRO-LTE is an advanced cellular trail camera designed for remote surveillance and monitoring of wildlife. Its ultra-compact design, fast trigger speed, and LTE connectivity allow for efficient mobile scouting, providing real-time photo transmission directly to your smartphone via the SPYPOINT app. This manual provides detailed instructions for setting up, operating, and maintaining your camera to ensure optimal performance.
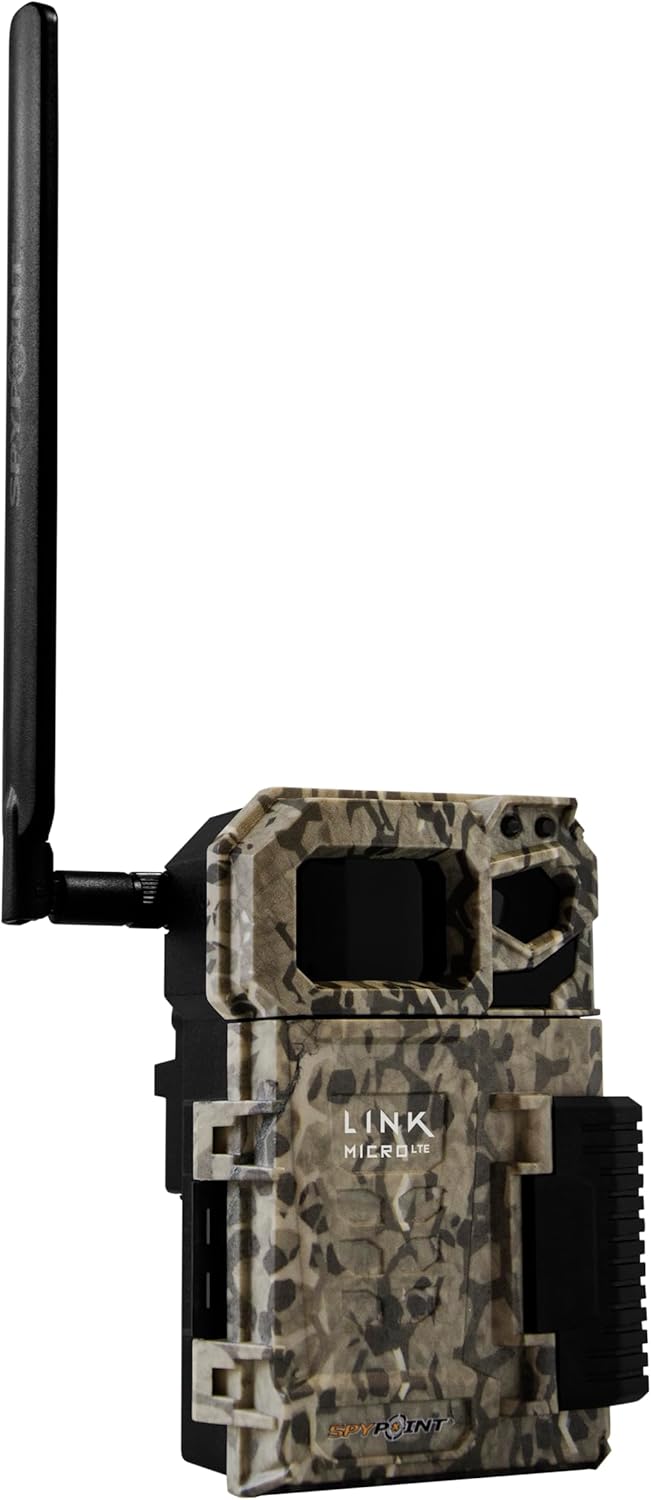
Figure 1: SPYPOINT LINK-MICRO-LTE Trail Camera. This image shows the compact design of the camera with its antenna, ideal for discreet placement in the field.
2. Key Features
- Industry Leading Value: Offers cutting-edge camera performance and access to comprehensive mobile scouting tools.
- Ultra-Compact Design: Remarkably small, making it easy to conceal and less noticeable to wildlife and trespassers.
- Reduced Human Impact: Cellular transmission minimizes the need for physical visits to the camera location, reducing disturbance to the environment.
- Mobile Scouting Solution: Delivers advanced scouting tools through the SPYPOINT app for analyzing data, establishing patterns, and improving hunting efficiency.
- Flexible Photo Transmission Plans: Offers various plans, including a free option and a truly unlimited plan, to suit diverse user needs.
- Fast Trigger Speed: 0.5-second trigger speed ensures minimal delay in capturing images of moving subjects.
- Infrared Flash: Equipped with 4 LED infrared flash for clear night vision without disturbing wildlife.
- Wide Detection Range: Features an 80-foot detection and motion sensor range.
3. Package Contents
Ensure all items are present before proceeding with setup:
- SPYPOINT LINK-MICRO-LTE Camera
- Installation Strap
- Quick Start Guide
- SIM Card (pre-installed)
Note: 8 AA batteries and a Micro SD card (up to 32GB) are required and sold separately.
4. Setup
4.1. Inserting Batteries
The LINK-MICRO-LTE requires 8 AA batteries. For optimal performance and extended battery life, especially in cold weather, lithium batteries are highly recommended. Alternatively, a SPYPOINT rechargeable lithium battery pack (LIT-10) can be used.
- Open the camera's battery compartment by unlatching the side clip.
- Insert 8 AA batteries, ensuring correct polarity (+/-) as indicated inside the compartment.
- Close the battery compartment securely.
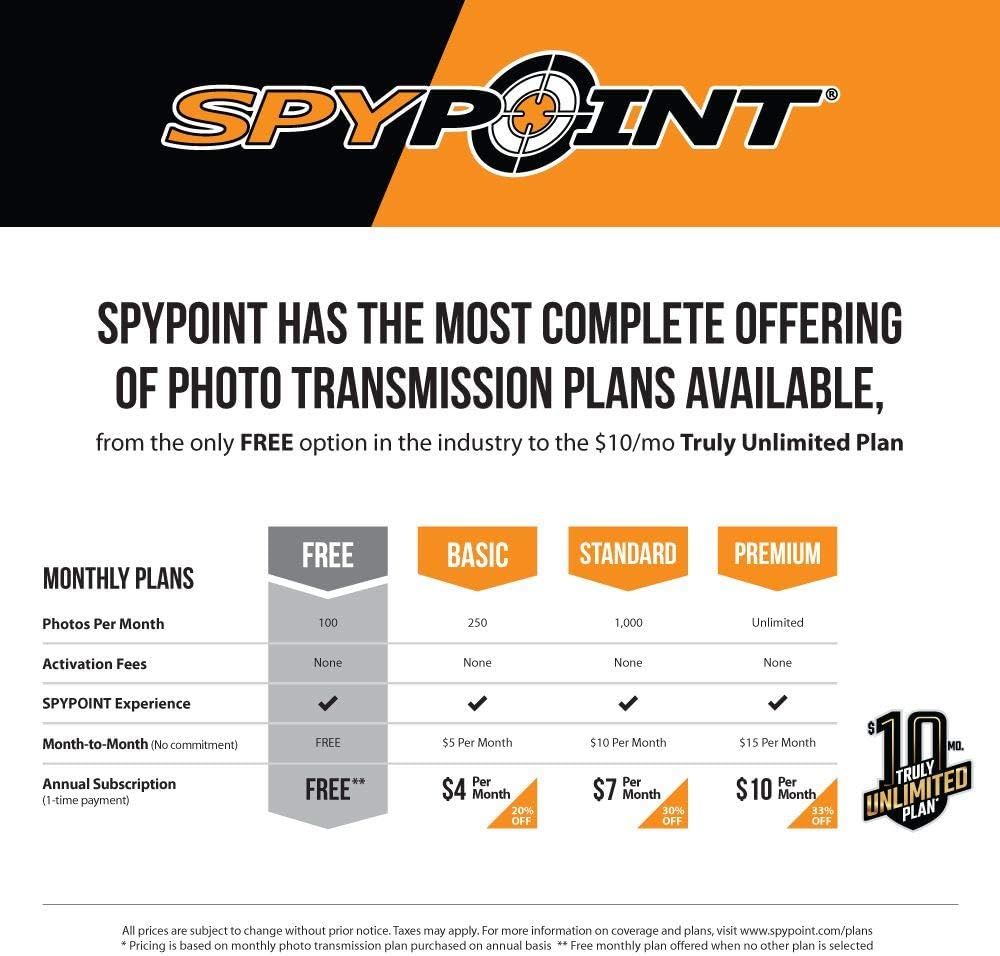
Figure 2: Inserting 8 AA batteries into the camera's battery compartment. Ensure correct polarity for proper function.
4.2. Inserting Micro SD Card
A Micro SD card is essential for storing photos and videos. The camera supports Micro SD cards up to 32 GB.
- Locate the Micro SD card slot inside the camera, typically near the battery compartment.
- Insert the Micro SD card with the metal contacts facing down until it clicks into place.
- It is recommended to format the Micro SD card using the SPYPOINT app or a computer before first use to ensure compatibility and optimal performance.
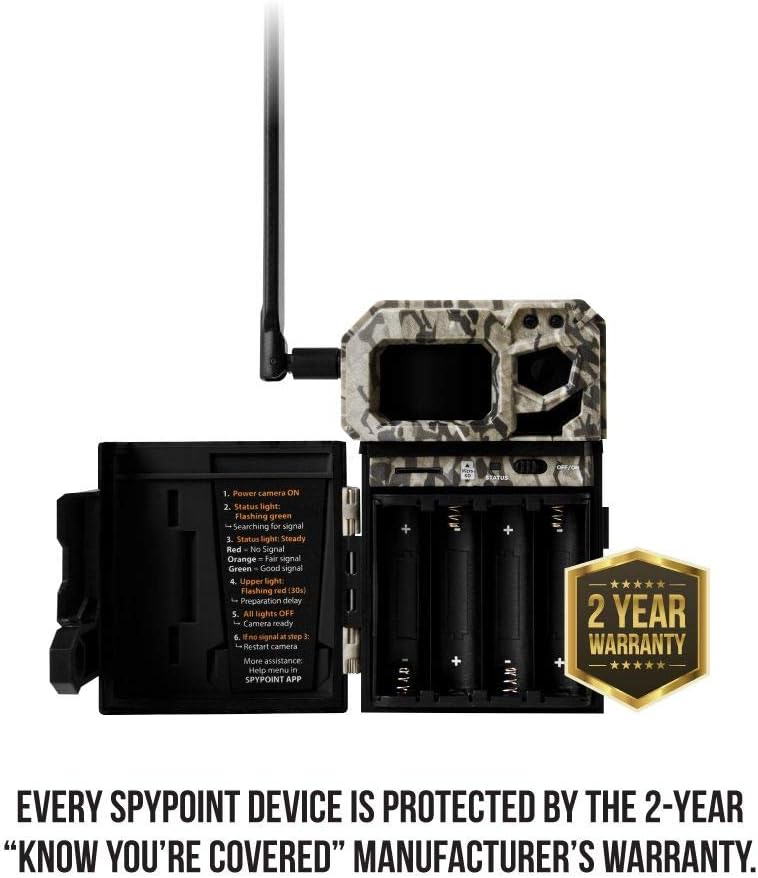
Figure 3: Inserting a Micro SD card into the designated slot. A properly inserted card will click into place.
4.3. Antenna Setup
Ensure the antenna is properly positioned for optimal cellular signal reception.
- Screw the antenna firmly into the designated port on the top of the camera.
- Adjust the antenna to an upright position, or slightly angled if necessary, to maximize signal strength.
4.4. Mounting the Camera
The camera can be mounted using the included installation strap or a screw-in tree mount (sold separately).
- Using the Installation Strap: Thread the strap through the slots on the back of the camera and secure it around a tree or post. Ensure the camera is stable and pointed towards the desired area.
- Using a Screw-in Tree Mount: Attach the camera to a compatible screw-in mount via the threaded insert at the bottom of the camera. This allows for more precise aiming and adjustment.

Figure 4: A user securing the SPYPOINT LINK-MICRO-LTE to a tree using the provided strap. Proper mounting ensures stable image capture.
4.5. App Installation and Activation
The SPYPOINT app is crucial for managing your camera and receiving photos.
- Download the SPYPOINT app from the App Store (iOS) or Google Play Store (Android).
- Create a SPYPOINT account or log in if you already have one.
- Follow the in-app instructions to add your camera by scanning the QR code located inside the battery compartment or manually entering the serial number.
- Select your desired photo transmission plan within the app. SPYPOINT offers a free plan (100 photos/month) and various paid plans, including a truly unlimited option.

Figure 5: The SPYPOINT mobile application interface on a smartphone, showing transmitted images. The app allows for remote management and viewing of photos.
5. Operating Instructions
5.1. Powering On/Off
To power on the camera, slide the ON/OFF switch to the ON position. The status light will illuminate. To power off, slide the switch to the OFF position.
5.2. Understanding Status Lights
The camera's status light provides important information about its operation:
- Green (Steady): Good signal.
- Orange (Steady): Fair signal.
- Red (Steady): No signal.
- Flashing Red (30s): Camera ready to capture.
- All Lights OFF: Camera is off or in photo transmission mode.
5.3. Photo Transmission Plans
SPYPOINT offers flexible photo transmission plans to suit your needs. These plans dictate how many photos your camera can transmit to the app per month.

Figure 6: Overview of SPYPOINT's monthly photo transmission plans, including the free and unlimited options. Users can choose a plan that best fits their usage requirements.
5.4. Using the SPYPOINT App
The SPYPOINT app is your central hub for managing the camera and viewing captured data.
- Viewing Images: Access and browse all transmitted photos and videos.
- Camera Management: Adjust camera settings remotely, including delay, multi-shot, and operating mode.
- Species Filters: Utilize AI filters to sort and identify specific animal species in your photos.
- Mapping Integration: View camera locations on a map and track animal movement patterns.
- Weather Integration: Access local weather forecasts and historical data to correlate with animal activity.
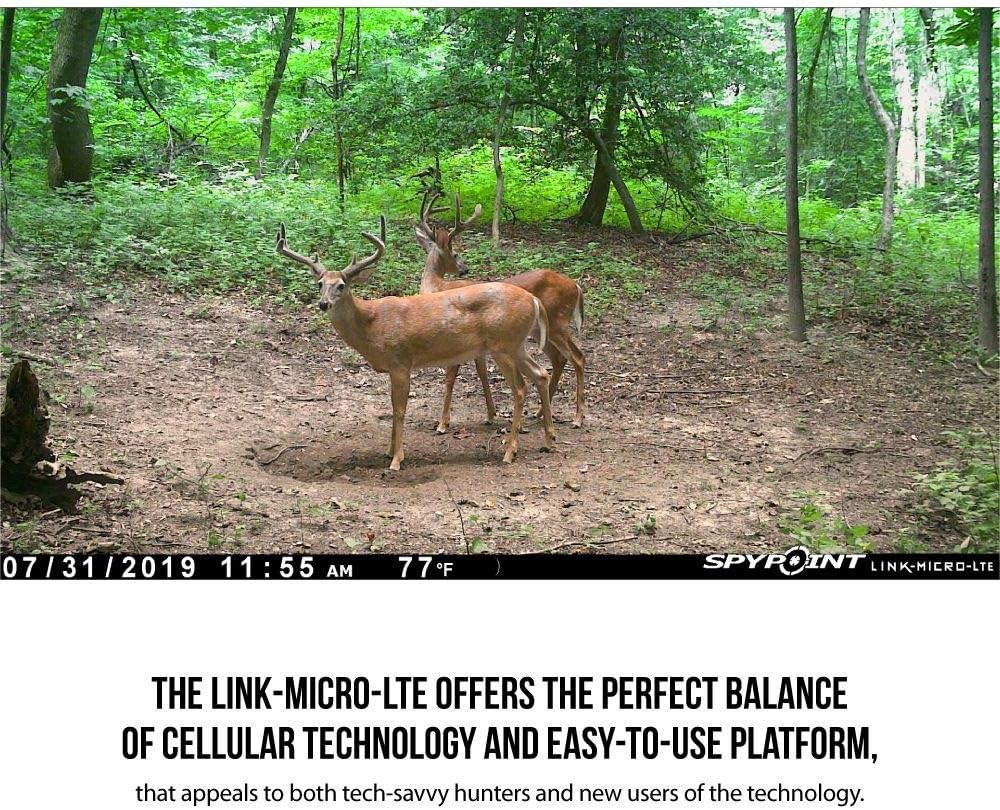
Figure 7: A daytime image of two deer captured by the SPYPOINT LINK-MICRO-LTE camera, demonstrating its image capture capabilities.
6. Maintenance
6.1. Battery Replacement
Monitor battery levels via the SPYPOINT app. Replace all 8 AA batteries simultaneously to ensure consistent power. If using a rechargeable pack, recharge as needed.
6.2. SD Card Management
Regularly check the SD card capacity through the app. It is recommended to periodically format the SD card to prevent data corruption and ensure smooth operation. Back up important photos before formatting.
6.3. Cleaning the Camera
Use a soft, dry cloth to clean the camera lens and housing. Avoid abrasive cleaners or solvents that could damage the unit. Ensure the camera is dry before closing the compartment.
7. Troubleshooting
If you encounter issues with your LINK-MICRO-LTE camera, refer to the following common troubleshooting steps:
- No Photo Transmission: Check cellular signal strength (status light), ensure active photo transmission plan, verify correct SIM card insertion, and confirm sufficient battery level.
- Poor Image Quality: Clean the camera lens. Ensure the camera is mounted securely to prevent movement. Check for obstructions in front of the lens.
- Short Battery Life: Use high-quality lithium batteries. Adjust camera settings (e.g., reduce photo frequency, turn off multi-shot) to conserve power. Ensure good cellular signal, as poor signal can drain batteries faster.
- Camera Not Turning On: Verify batteries are inserted correctly and fully charged. Check the ON/OFF switch position.
For more detailed troubleshooting or persistent issues, contact SPYPOINT customer support.
8. Specifications
| Feature | Detail |
|---|---|
| Model Name | LINK-MICRO-LTE |
| Effective Still Resolution | 10 MP |
| Video Capture Resolution | 1080p |
| Trigger Speed | 0.5 seconds |
| Flash Type | 4 LED Infrared Flash |
| Flash Range | 80 feet |
| Detection Range | 80 feet |
| Wireless Communication | LTE (4G) |
| Compatible Devices | Smartphone (via SPYPOINT App) |
| Flash Memory Type | Micro SD (up to 32GB) |
| Power Source | 8 AA Batteries or LIT-10 Battery Pack |
| Item Weight | 7.2 ounces |
| Dimensions (L x W x H) | 1 x 1 x 1 inches (Note: These dimensions seem generic, actual product dimensions may vary) |
| International Protection Rating | IP54 |
9. Warranty
Every SPYPOINT device is protected by a 2-year manufacturer's warranty. This warranty covers defects in materials and workmanship under normal use. For specific terms and conditions, or to initiate a warranty claim, please refer to the official SPYPOINT website or contact their customer support.
Figure 8: SPYPOINT offers a 2-year manufacturer's warranty, ensuring product reliability and customer confidence.
10. Support
For technical assistance, product inquiries, or customer service, please visit the official SPYPOINT website at www.spypoint.com or contact their support team directly. You can also find additional resources, FAQs, and community forums on their website.