
Maxxter Maxxter Web Cam ACT-BCAM-01 USB
Maxxter Web Cam ACT-BCAM-01 USB User Manual
Model: ACT-BCAM-01 | Brand: Maxxter
Introduction
This user manual provides comprehensive instructions for the Maxxter Web Cam ACT-BCAM-01 USB. This compact and versatile camera is designed for various recording needs, offering high-definition video capture and ease of use. Please read this manual thoroughly before operating the device to ensure proper functionality and safety.
Safety Information
- Do not expose the device to extreme temperatures, humidity, or direct sunlight.
- Avoid dropping or subjecting the device to strong impacts.
- Keep the device away from water and other liquids. It is not waterproof.
- Do not attempt to disassemble or modify the device. This will void the warranty.
- Use only the provided USB cable for charging and data transfer.
Package Contents
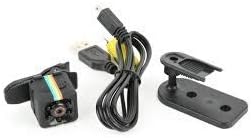
Image: Maxxter Web Cam ACT-BCAM-01 USB, USB cable, and mounting accessories.
Please check the package contents upon unboxing. The standard package should include:
- Maxxter Web Cam ACT-BCAM-01 USB Unit
- USB Cable
- User Manual (this document)
- Mounting Bracket/Clip
Product Overview

Image: Front and side view of the Maxxter Web Cam ACT-BCAM-01 USB, showing the lens and control buttons.

Image: Top-down view of the Maxxter Web Cam ACT-BCAM-01 USB, highlighting the button layout.

Image: Diagram illustrating key features such as 140-degree wide viewing angle, night vision, motion detection, support for storage cards, and the 360-degree adjustable bracket. Dimensions are also shown.
Key Components:
- Lens: High-definition camera lens for video recording.
- USB Port: For charging and data transfer.
- MicroSD Card Slot: For expandable storage (card not included).
- Power/Mode Button: To turn the device on/off and switch between modes.
- Record Button: To start and stop recording.
- Indicator Lights: Provide status feedback (e.g., power, recording, charging).
Setup
1. Charging the Device:
- Connect the small end of the USB cable to the camera's USB port.
- Connect the other end of the USB cable to a USB power adapter (not included) or a computer's USB port.
- The indicator light will show charging status (e.g., solid red while charging, off when fully charged).
2. Inserting a MicroSD Card:
- Ensure the camera is turned off.
- Locate the MicroSD card slot on the side of the camera.
- Gently insert a MicroSD card (Class 10 or higher, up to 32GB recommended) into the slot until it clicks into place.
- To remove, push the card in slightly until it springs out.
Operating Instructions
Power On/Off:
- To Power On: Press and hold the Power/Mode button for 2-3 seconds. The indicator light will illuminate.
- To Power Off: Press and hold the Power/Mode button for 5-6 seconds until the indicator light turns off.
Video Recording:
- Ensure the camera is powered on and a MicroSD card is inserted.
- Press the Record button once to start video recording. The indicator light will flash.
- Press the Record button again to stop recording. The indicator light will stop flashing and return to standby mode.
Motion Detection Recording:
This feature allows the camera to record only when motion is detected, conserving battery and storage space.
- While in standby mode, press the Power/Mode button twice quickly to enter motion detection mode. The indicator light will change (refer to device specific light pattern).
- The camera will automatically start recording when motion is detected and stop when motion ceases.
- To exit motion detection mode, press the Power/Mode button once.
Connecting to Computer:
To access recorded files, connect the camera to your computer using the provided USB cable. The camera will appear as a removable disk drive.
Maintenance
- Cleaning: Use a soft, dry cloth to clean the camera body. For the lens, use a specialized lens cleaning cloth. Do not use liquid cleaners or solvents.
- Storage: Store the camera in a cool, dry place away from direct sunlight and extreme temperatures when not in use.
- Battery Care: For optimal battery life, avoid fully discharging the battery frequently. Charge the device regularly, even if not in use for extended periods.
Troubleshooting
| Problem | Possible Cause | Solution |
|---|---|---|
| Camera does not turn on. | Low battery; Device malfunction. | Charge the camera for at least 2 hours. If still unresponsive, contact support. |
| Cannot record video. | No MicroSD card; Card full or corrupted; Incorrect card format. | Insert a MicroSD card. Check card capacity. Format the card (FAT32) on a computer. Try a different card. |
| Computer does not recognize the camera. | Faulty USB cable; Driver issue; Incorrect connection mode. | Try a different USB port or cable. Restart your computer. Ensure the camera is powered on when connected. |
| Poor video quality. | Low light conditions; Dirty lens; Incorrect settings. | Ensure adequate lighting. Clean the camera lens. |
Specifications
| Feature | Detail |
|---|---|
| Model | Maxxter Web Cam ACT-BCAM-01 USB |
| Brand | Maxxter |
| Connectivity Technology | USB |
| Video Resolution | 720p or 1080p |
| Max Focal Length | 22 Millimeters |
| Special Features | Low light capability, Motion detection |
| Dimensions (L x W x H) | 20 x 30 x 20 cm |
| Weight | 40 grams |
| Supported Storage | MicroSD (SDHC) |
| Video Capture Format | MP4 |
| Audio Format | PCM, AAC |
| Focus Type | Manual Focus |
| Water Resistance | Not waterproof |
Warranty and Support
For warranty information and technical support, please refer to the official Maxxter website or contact your local retailer. Keep your purchase receipt as proof of purchase.
Note: Information regarding spare parts availability and software updates is not available at this time.
Ask a question about this manual
Ask about setup, troubleshooting, compatibility, parts, safety, or missing instructions. Manuals+ will review the question and use this page’s manual context to help answer it.