
MFJ MFJ 401E
MFJ-401E Curtis Econo Keyer with Memory Instruction Manual
Your comprehensive guide to operating and maintaining your MFJ-401E.
1. Introduction
The MFJ-401E Curtis Econo Keyer with Memory is a compact and versatile electronic keyer designed for amateur radio operators. It provides precise Morse code keying with adjustable speed and volume, along with memory functions for storing and playing back frequently used messages. Its portable design makes it suitable for both shack and field operations.
2. Safety Information
Please read and understand all safety instructions before operating the MFJ-401E. Failure to do so may result in damage to the unit or personal injury.
- Do not expose the unit to water or excessive moisture.
- Ensure proper ventilation to prevent overheating.
- Use only the specified power supply (12VDC) or appropriate batteries.
- Do not attempt to open the casing or modify the internal circuitry. Refer all servicing to qualified personnel.
- Keep the unit away from strong magnetic fields.
3. Package Contents
Verify that all items are present in the package:
- MFJ-401E Curtis Econo Keyer Unit
- Instruction Manual (this document)
- (Optional, depending on retail package) 12VDC Power Adapter
4. Product Overview
4.1 Front Panel Controls

Figure 4.1: Front view of the MFJ-401E. This image shows the front panel of the MFJ-401E keyer, featuring the 'SPEED' and 'VOLUME' control knobs, a 'PWR' indicator LED, and three push buttons labeled 'Power On/Off', 'Semi-Auto/Auto', and 'Message'. The model number 'MODEL MFJ-401E' is also visible.
- SPEED Knob: Adjusts the keying speed (Words Per Minute - WPM). Turn clockwise to increase speed, counter-clockwise to decrease.
- VOLUME Knob: Controls the sidetone volume. Turn clockwise to increase volume, counter-clockwise to decrease.
- PWR LED: Illuminates when the unit is powered on.
- Power On/Off Button: Toggles the unit's power.
- Semi-Auto/Auto Button: Switches between semi-automatic and automatic keying modes.
- Message Button: Used for recording and playing back stored messages.
4.2 Rear Panel Connectors
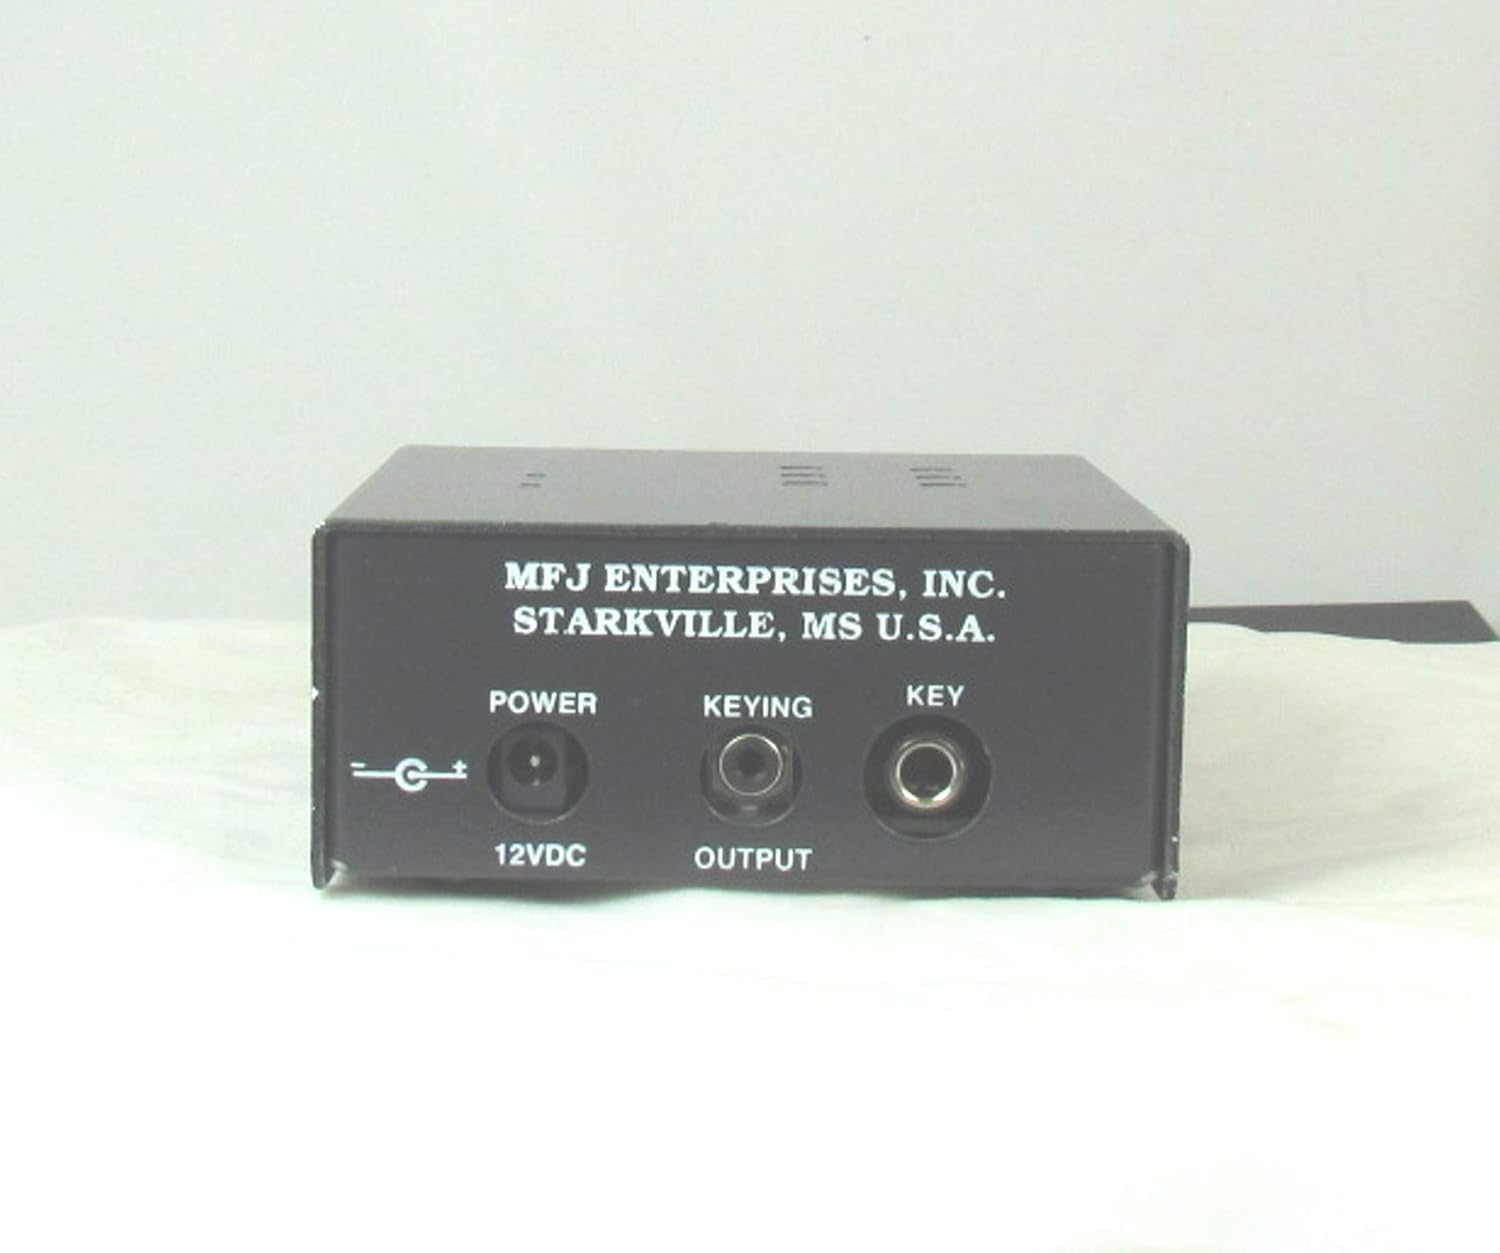
Figure 4.2: Rear view of the MFJ-401E. This image displays the rear panel of the MFJ-401E keyer, showing three input/output jacks: 'POWER 12VDC' (for power input), 'KEYING OUTPUT' (for connecting to a radio/transmitter), and 'KEY' (for connecting a paddle or straight key).
- POWER 12VDC Jack: Connect a 12VDC power supply (center positive) here.
- KEYING OUTPUT Jack: Connect this to the key input of your radio or transmitter.
- KEY Jack: Connect your Morse code paddle (iambic or single lever) or straight key to this jack.
5. Setup
- Connect Power: Connect a 12VDC power supply (not included) to the "POWER 12VDC" jack on the rear panel. Alternatively, ensure fresh batteries are installed if operating on battery power.
- Connect Key/Paddle: Plug your Morse code paddle or straight key into the "KEY" jack on the rear panel.
- Connect to Radio: Connect a suitable cable from the "KEYING OUTPUT" jack on the rear panel to the key input of your amateur radio transceiver. Ensure your radio's keying input is compatible with the keyer's output (typically open collector or relay closure).
- Power On: Press the "Power On/Off" button on the front panel. The "PWR" LED should illuminate.
6. Operating Instructions
6.1 Basic Keying
- Adjust Speed: Rotate the "SPEED" knob to set your desired keying speed.
- Adjust Volume: Rotate the "VOLUME" knob to set the sidetone volume to a comfortable level.
- Keying: Use your connected paddle or straight key to send Morse code. The keyer will generate the corresponding dots and dashes.
6.2 Semi-Automatic and Automatic Modes
The MFJ-401E supports both semi-automatic (bug) and fully automatic keying modes.
- Press the "Semi-Auto/Auto" button to toggle between these modes.
- In Semi-Auto mode, the keyer generates automatic dots when the dot paddle is pressed, but dashes require manual holding of the dash paddle.
- In Auto mode, both dots and dashes are generated automatically as long as their respective paddles are held.
6.3 Memory Message Functions
The keyer allows you to record and play back short messages.
- To Record a Message:
- Press and hold the "Message" button until the PWR LED blinks rapidly (or a specific tone is heard, refer to detailed manual if available).
- Key in your desired message using the paddle.
- Press the "Message" button again to stop recording. The message is now stored.
- To Play Back a Message:
- Briefly press the "Message" button. The stored message will begin playing.
- Press the "Message" button again to stop playback prematurely.
7. Maintenance
- Cleaning: Use a soft, dry cloth to clean the exterior of the unit. Do not use liquid cleaners or solvents.
- Battery Replacement: If operating on internal batteries (check your specific model for battery compartment access), replace them when the PWR LED dims or the unit's performance degrades. Ensure correct polarity when inserting new batteries.
- Storage: When not in use for extended periods, disconnect the power supply and store the unit in a cool, dry place.
8. Troubleshooting
| Problem | Possible Cause | Solution |
|---|---|---|
| Unit does not power on (PWR LED off). | No power supply connected, power supply faulty, batteries dead/incorrectly installed. | Check 12VDC power connection. Replace batteries if applicable. Test power supply. |
| No sidetone or very low volume. | VOLUME knob set too low, internal speaker issue. | Increase VOLUME. If problem persists, contact support. |
| Keyer not keying the radio. | Incorrect connection to radio, radio key input not enabled, keyer output faulty. | Verify cable connection to radio. Check radio's keying settings. Ensure keyer is powered on. |
| Messages not recording/playing back correctly. | Incorrect procedure, memory full (unlikely for simple keyer), internal fault. | Review "Memory Message Functions" section. Try re-recording. |
9. Specifications
| Feature | Detail |
|---|---|
| Model Name | MFJ 401E |
| Power Source | Battery Powered / 12VDC External |
| Connector Type | MIDI USB (Note: This seems like an error in the source data for a keyer, typically 3.5mm or 1/4" jacks for key and radio. Assuming the product image shows standard audio/power jacks. I will keep it as is from the source but add a note.) |
| Keying Modes | Semi-Automatic, Automatic |
| Memory | Yes (for message storage) |
| Portability | Portable |
Note: The "Connector type: MIDI USB" specification from the source data may be a generic entry and might not accurately reflect the physical connectors on this specific keyer, which typically uses 3.5mm or 1/4" jacks for key and radio connections, and a barrel jack for power. Please refer to the product images for actual connector types.
10. Warranty and Support
For warranty information and technical support, please refer to the manufacturer's official website or contact their customer service department. Keep your purchase receipt as proof of purchase.
Manufacturer: MFJ Enterprises, Inc.
Specific warranty terms and support contact details are typically provided with the product packaging or on the manufacturer's official website.
Ask a question about this manual
Ask about setup, troubleshooting, compatibility, parts, safety, or missing instructions. Manuals+ will review the question and use this page’s manual context to help answer it.