1. Product Overview
The Magnasonic FS71 All-in-One Film Scanner is designed to quickly and easily convert various film negatives and slides into high-resolution digital JPEG files. It features a large 5-inch display for direct viewing and editing, built-in memory, and an SD card slot for expanded storage. This device allows you to preserve your old memories without the need for a computer during the scanning process.

Image: The Magnasonic FS71 Film Scanner, showcasing its compact design and large display, with a film strip inserted for scanning.
Key Features:
- Preserve Old Memories: Quickly and easily converts 35mm, 110, 126, and Super 8 film negatives, along with 135, 126, and 110 slides, into high-resolution 24MP digital JPEG files.
- Multiple Ways to View: Utilize the stunning 5-inch LCD screen to view your film, slides, and scanned images directly on the scanner. An HDMI cable (not included) can be used to view content on your TV or monitor.
- Built-in Memory & SD Card Slot: Features a convenient 128MB internal memory and an SD card slot supporting up to 128GB of expandable memory, allowing you to scan and save a lifetime of photos.
- No Computer Needed: No complicated or expensive photo-editing software or driver installation is required. Adjust brightness, RGB color correction, flip, and mirror images directly on the scanner.
- Fast & Easy Scanning: Simple setup for frustration-free operation, enabling effortless scanning of your photos in less than 5 seconds each with the included fast-loading film trays.
2. What's Included
The Magnasonic FS71 Film Scanner package includes the following components:

Image: All components included with the Magnasonic FS71 Film Scanner, such as various film inserts, USB cable, and cleaning brush.
- Magnasonic FS71 Film Scanner
- 110 Film Insert
- 110 Slide Insert
- Super 8 Film Insert
- Slide Adapter
- Negative Film Adapter
- USB Cable
- Cleaning Brush
3. Setup
Follow these steps to set up your Magnasonic FS71 Film Scanner for first use:
- Power Connection: Connect the provided USB cable to the scanner's Mini USB Port and then to a power source (e.g., a computer USB port or a USB wall adapter, not included).
- SD Card Insertion: If you wish to save more photos than the built-in memory allows, insert an SD card (up to 128GB, not included) into the SD Card Slot on the back of the scanner.
- Loading Film/Slides: Select the appropriate film or slide adapter tray for your media type. Carefully insert your film negatives or slides into the tray according to the markings.
- Insert Tray: Slide the loaded tray into the slot on the side of the scanner until it clicks into place.
- Power On: Press the Power button on the scanner to turn it on. The 5-inch LCD display will illuminate.

Image: Rear view of the scanner highlighting the USB, SD Card, and HDMI ports for connectivity.
4. Operating Instructions
Scanning Your Media:
The FS71 makes scanning your old films and slides straightforward:
- Navigate to Scan Mode: Use the navigation buttons on the scanner to select the "Capture" or "Scan" mode on the display.
- Preview Image: Once the film or slide is inserted, the image will appear on the 5-inch LCD display. You can use the left/right arrow buttons to adjust the frame.
- Adjust Settings (Optional): Press the "OK" button to access editing options such as brightness, red, green, and blue color correction. Use the arrow buttons to adjust values and "OK" to confirm.
- Capture Image: Press the camera icon button to capture the image. The scanned image will be saved to the internal memory or the inserted SD card.
- Continue Scanning: Remove the scanned film/slide and insert the next one, repeating the process.

Image: The scanner's display showing options for adjusting brightness and color, demonstrating its standalone editing capabilities.
Viewing and Transferring Scans:
- On-Device Viewing: Use the navigation buttons to browse through your scanned images directly on the 5-inch LCD display.
- TV Output: Connect an HDMI cable (not included) from the scanner's HDMI Output Port to your TV or monitor to view your scanned images on a larger screen.
- Transfer to Computer: Connect the scanner to your computer using the USB cable. The scanner will appear as a removable storage device, allowing you to copy your scanned JPEG files to your computer.

Image: The Magnasonic FS71 scanner connected to a large TV, demonstrating its HDMI output feature for viewing scanned images.

Image: A close-up showing the USB and SD card ports, indicating options for saving and transferring scanned files.
Official Product Video:
Video: An official Magnasonic video demonstrating the features and operation of the FS71 All-in-One Film Scanner, including scanning, viewing, and transferring images.
5. Film and Slide Compatibility
The Magnasonic FS71 Film Scanner is compatible with a wide range of film and slide formats:

Image: A visual guide illustrating the various film and slide types compatible with the FS71 scanner, including 35mm, 126, 110, Super 8 film, and 135, 126, 110 slides.
Film Types:
- 35mm Film Negatives
- 126 Film Negatives
- 110 Film Negatives
- Super 8 Film (photo only)
Slide Types:
- 135 Slides
- 126 Slides
- 110 Slides (2x2 and 1x1)
6. Maintenance
Proper maintenance ensures the longevity and optimal performance of your Magnasonic FS71 Film Scanner:
- Cleaning the Lens/Sensor: Use the provided cleaning brush to gently remove any dust or debris from the film scanning area and the lens/sensor. Avoid using liquid cleaners directly on the lens.
- Exterior Cleaning: Wipe the exterior of the scanner with a soft, dry cloth. Do not use abrasive cleaners or solvents.
- Storage: When not in use, store the scanner in a cool, dry place away from direct sunlight and excessive dust.
7. Troubleshooting
If you encounter issues with your Magnasonic FS71 Film Scanner, consider the following common solutions:
- No Power: Ensure the USB cable is securely connected to both the scanner and a working power source. Try a different USB port or power adapter.
- Image Quality Issues (Dust/Spots): Use the cleaning brush to thoroughly clean the film/slide and the scanner's lens/sensor area. Dust on the media or sensor is a common cause of spots on scanned images.
- Cannot Save Images: Check if an SD card is properly inserted and has sufficient free space. If using internal memory, ensure it is not full. Try formatting the SD card (refer to the full user manual for instructions).
- Cannot Transfer Files to Computer: Ensure the USB cable is connected correctly and the scanner is powered on. On your computer, check if the scanner is recognized as a removable drive. Try a different USB port on your computer.
- Display Issues: If the display is dim or flickering, ensure the power connection is stable.
For more detailed troubleshooting steps, please refer to the complete user manual.
8. Specifications
| Feature | Detail |
|---|---|
| Product Dimensions | 5.43 x 4.44 x 4.91 inches (4.44"D x 5.43"W x 4.91"H) |
| Item Weight | 13.4 ounces (0.84 Pounds) |
| Model Number | FS71 |
| Resolution | 24MP |
| Scanner Type | Film, Photo |
| Media Type | Negatives, Slides (35mm, 126, 110, Super 8) |
| Connectivity Technology | HDMI, USB |
| Wattage | 5 watts |
| Standard Sheet Capacity | 8 (referring to film frames/slides per tray) |
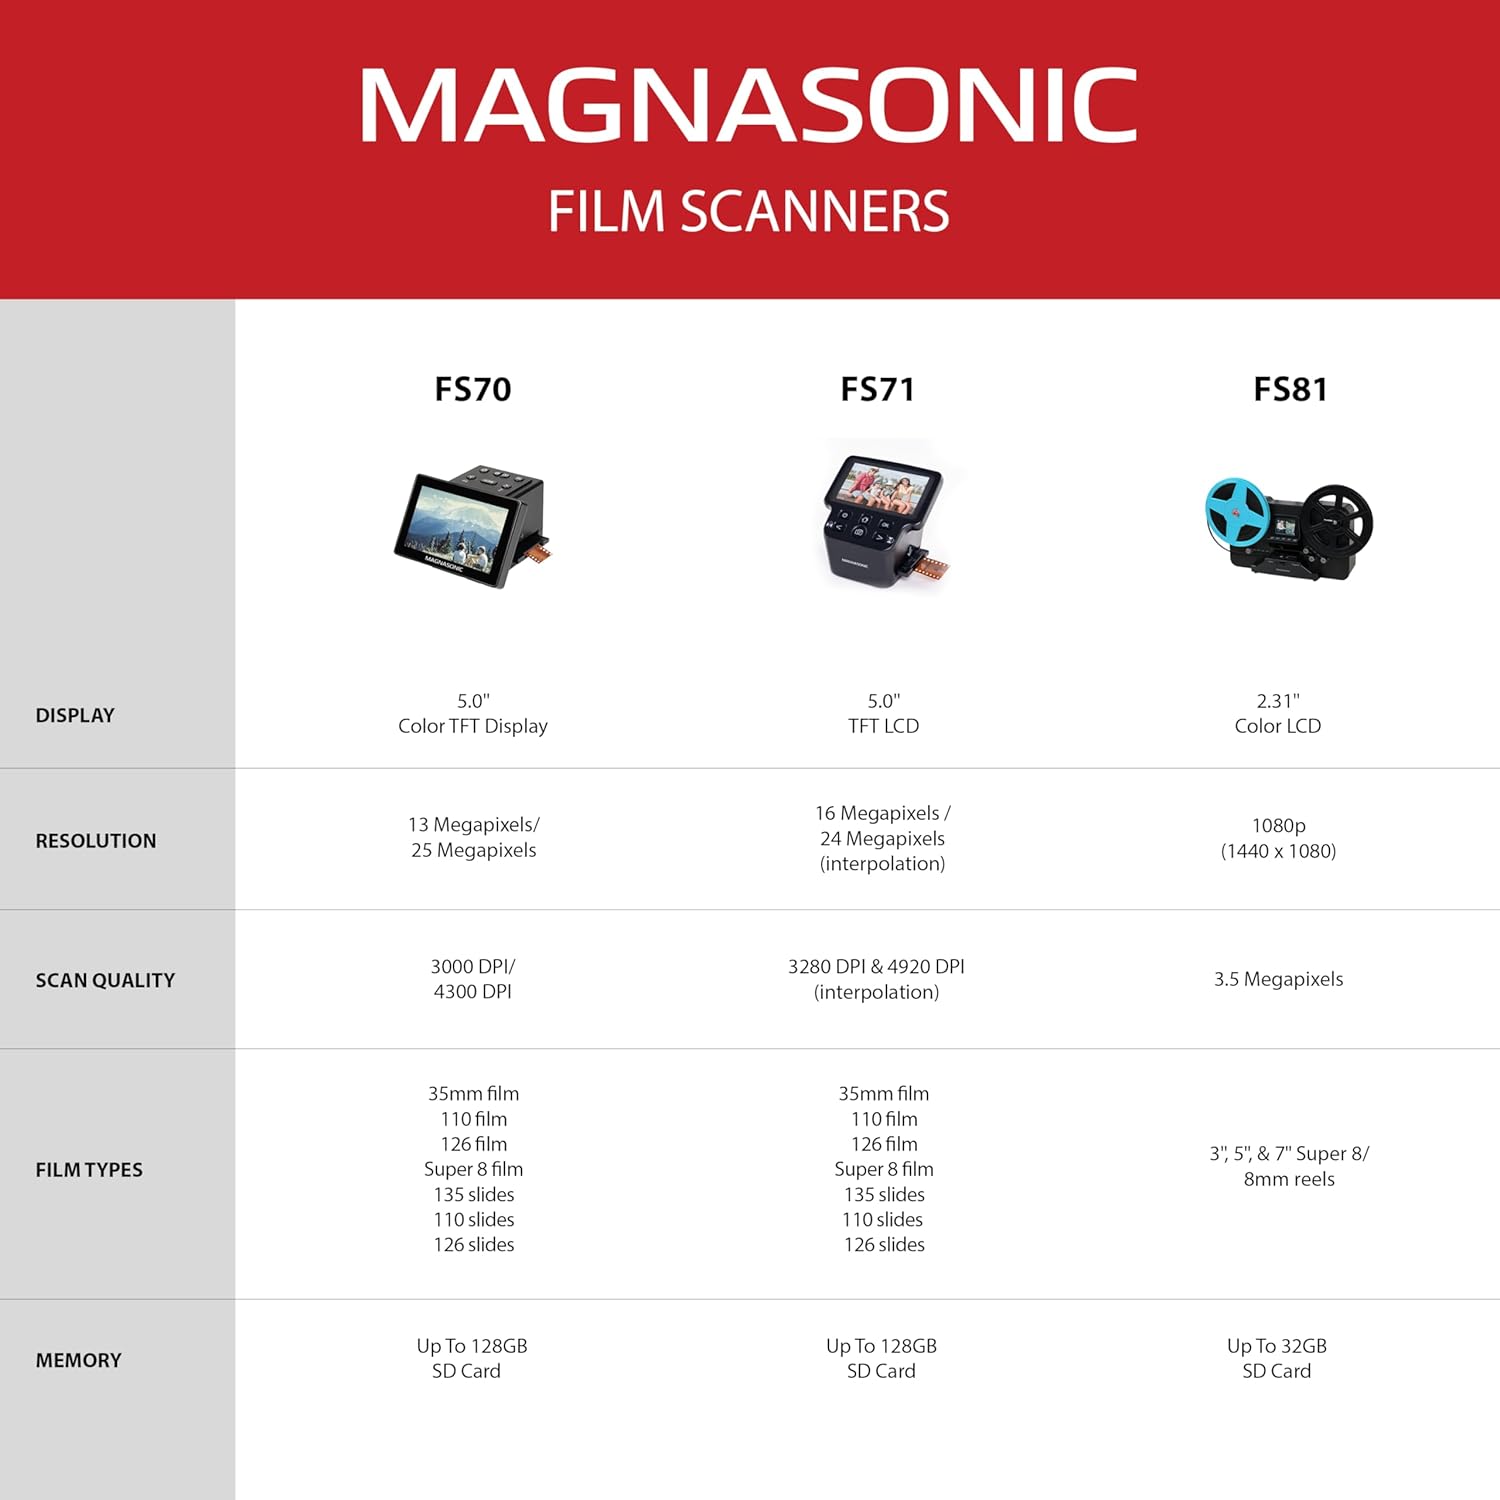
Image: A comparison chart detailing specifications across different Magnasonic film scanner models, including the FS71.
9. Warranty and Support
For detailed warranty information and customer support, please refer to the official Magnasonic resources.
- Full User Manual: A comprehensive PDF user manual is available for download. Download User Manual (PDF)
- Brand Store: Visit the official Magnasonic store for additional product information and support. Magnasonic Brand Store
- Customer Service: For technical assistance or warranty claims, please contact Magnasonic customer support through their official channels.


