
1. Introduction
Thank you for choosing the Arcam SA10 Class A/B Integrated Amplifier. This manual provides essential information for setting up, operating, and maintaining your amplifier to ensure years of high-quality audio enjoyment. The SA10 is designed to deliver class-leading sound quality, bringing your music to life with its powerful 50W per channel output, high-performance ESS9016K2M Sabre DAC, and low noise floor. It offers a listening experience as close to the artist's original performance as possible.
2. Safety Information
Please read all safety instructions carefully before operating the unit. Keep this manual for future reference.
- Do not expose this apparatus to rain or moisture.
- Do not block any ventilation openings. Install in accordance with the manufacturer's instructions.
- Do not install near any heat sources such as radiators, heat registers, stoves, or other apparatus (including amplifiers) that produce heat.
- Protect the power cord from being walked on or pinched, particularly at plugs, convenience receptacles, and the point where they exit from the apparatus.
- Only use attachments/accessories specified by the manufacturer.
- Unplug this apparatus during lightning storms or when unused for long periods of time.
- Refer all servicing to qualified service personnel. Servicing is required when the apparatus has been damaged in any way.
- This product contains chemicals known to the State of California to cause cancer and birth defects or other reproductive harm.
3. Package Contents
Upon opening the box, please ensure all the following items are present:
- Arcam SA10 Integrated Amplifier
- AC Power Cord
- Remote Control (with 2 AAA batteries included)
- User Manual (this document)
4. Product Overview
Familiarize yourself with the front and rear panels of your Arcam SA10 amplifier.
4.1 Front Panel
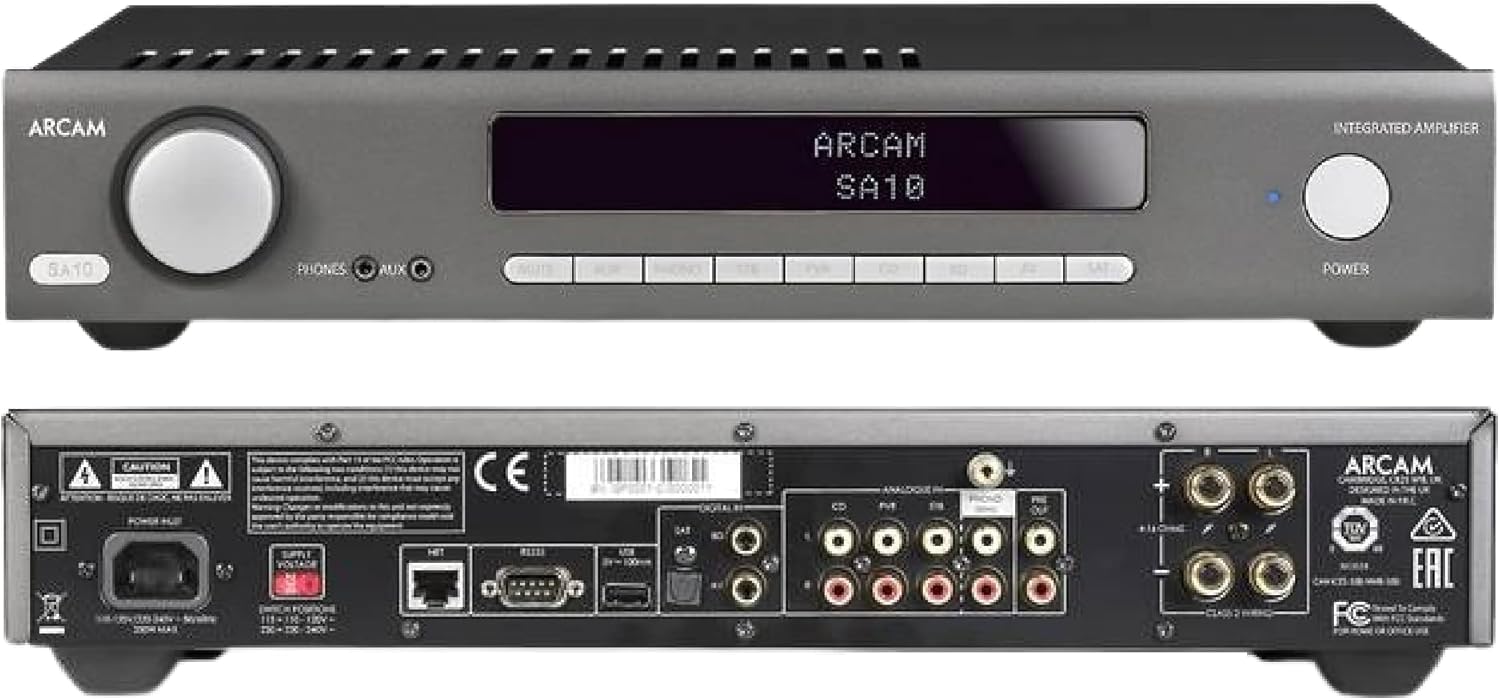
Figure 4.1: Front and Rear Panels of the Arcam SA10. The front panel features a large volume knob on the left, a display screen in the center, input selection buttons below the display, and a power button on the right. Headphone and auxiliary inputs are also present.
- Volume Knob: Adjusts the overall output volume.
- Display Screen: Shows current input, volume level, and other status information.
- Input Selection Buttons: Allows selection between various audio sources (CD, Tuner, AV, SAT, etc.).
- Power Button: Toggles the amplifier between standby and operational modes.
- Headphones Output: 3.5mm jack for connecting headphones.
- Auxiliary Input: 3.5mm jack for connecting portable audio devices.
4.2 Rear Panel
The rear panel provides all the necessary connections for your audio system.
Figure 4.2: Detailed Rear Panel Connections. This view highlights the speaker terminals, analog RCA inputs (including Phono), digital optical and coaxial inputs, and the power inlet.
- Speaker Terminals: Connect your passive speakers (left and right channels).
- Analog Inputs (RCA): Multiple stereo RCA inputs for connecting analog audio sources like CD players, tuners, or other line-level devices.
- Phono Input (RCA): Dedicated input for turntables with moving magnet (MM) cartridges.
- Digital Inputs:
- Optical (Toslink): For digital audio sources like TVs or game consoles.
- Coaxial: For digital audio sources like CD players or network streamers.
- Pre-Out: For connecting to an external power amplifier or powered subwoofer.
- USB Port: For firmware updates or service.
- Ethernet Port: For network control and future updates.
- AC Power Inlet: Connects the amplifier to the mains power supply.
5. Setup
5.1 Placement
Place the Arcam SA10 on a stable, level surface away from direct sunlight, heat sources, and excessive moisture. Ensure adequate ventilation around the unit to prevent overheating. Do not place other components directly on top of the amplifier.
5.2 Connecting Speakers
Connect your passive speakers to the speaker terminals on the rear panel. Ensure correct polarity (+ to + and - to -) for both left and right channels. Use high-quality speaker cables for optimal sound performance.
5.3 Connecting Audio Sources

Figure 5.3: The Arcam SA10 offers convenient connections including Toslink optical, two digital coaxial inputs, and three stereo analog RCA inputs, plus a dedicated phono input.
- Analog Sources: Connect CD players, tuners, or other line-level devices to the RCA analog inputs (CD, Tuner, AV, SAT).
- Turntable: Connect a turntable with a moving magnet (MM) cartridge to the dedicated PHONO input.
- Digital Sources: Connect digital audio sources using either the optical (Toslink) or coaxial digital inputs.
- Portable Devices: Use the 3.5mm AUX input on the front panel for quick connection of portable media players.
5.4 Power Connection
Once all audio connections are made, connect the supplied AC power cord to the AC power inlet on the rear panel of the amplifier and then to a suitable wall outlet.
6. Operating Instructions
6.1 Powering On/Off
Press the POWER button on the front panel or the remote control to switch the amplifier on or into standby mode. The blue LED next to the power button indicates operational status.
6.2 Input Selection
Use the input selection buttons on the front panel or the remote control to choose your desired audio source. The selected input will be displayed on the front panel screen.
6.3 Volume Control
Rotate the large VOLUME knob on the front panel clockwise to increase volume and counter-clockwise to decrease it. Alternatively, use the volume up/down buttons on the remote control.
6.4 Headphone Use
Plug your headphones into the 3.5mm PHONES jack on the front panel. Connecting headphones will automatically mute the main speaker outputs.
6.5 Remote Control & App Control

Figure 6.5: Control your SA10 with the included remote or via UPnP audio and basic functions using the FREE MusicLife App on your iPad, iPhone, or Android device.
The included remote control provides full functionality for the SA10. Ensure the supplied AAA batteries are correctly inserted. For advanced control and UPnP audio streaming, download the free Arcam MusicLife App from your device's app store (available for iOS and Android).
7. Maintenance
To maintain the appearance and performance of your Arcam SA10:
- Wipe the exterior surfaces with a soft, dry, lint-free cloth.
- Do not use abrasive cleaners, waxes, or solvents.
- Ensure the ventilation grilles are free from dust and obstructions.
- Disconnect the power cord from the wall outlet before cleaning.
8. Troubleshooting
If you experience issues with your Arcam SA10, refer to the following common problems and solutions:
| Problem | Possible Cause | Solution |
|---|---|---|
| No power | Power cord not connected; power outlet faulty. | Ensure power cord is securely connected. Try a different power outlet. |
| No sound | Incorrect input selected; speaker cables loose; volume too low; mute activated. | Select correct input. Check speaker cable connections. Increase volume. Deactivate mute. |
| Distorted sound | Source signal too high; speaker impedance mismatch; faulty cables. | Reduce source output level. Ensure speakers are compatible (8 ohms recommended). Check/replace cables. |
| Remote control not working | Batteries depleted or incorrectly inserted; obstruction between remote and amplifier. | Replace batteries. Ensure correct polarity. Remove obstructions. |
If the problem persists, please contact Arcam customer support or your authorized dealer.
9. Specifications
Key technical specifications for the Arcam SA10 Integrated Amplifier:

Figure 9.1: The Arcam SA10 delivers 50 watts per channel, features 5 analog inputs (including phono), 3 digital inputs, a 32-bit DAC, and boasts a low total harmonic distortion + noise of 0.003%.
- Power Output: 50W per channel (8 ohms, 20-20,000 Hz, at 0.5% THD)
- Amplification Type: Class A/B
- Digital-to-Analog Converter (DAC): 32-bit ESS9016K2M Sabre DAC
- Analog Inputs: 5 (including 1 dedicated Phono input for Moving Magnet cartridges)
- Digital Inputs: 3 (1 Optical Toslink, 2 Coaxial)
- Total Harmonic Distortion + Noise: 0.003%
- Dimensions (W x D x H): 17.05 x 12.72 x 3.43 inches (433 x 323 x 87 mm)
- Weight: 2.03 pounds (0.92 kg)
- Control: Full I/P control, Remote Control, MusicLife App compatibility
- Batteries for Remote: 2 AAA (included)
10. Warranty and Support
Arcam products are designed and manufactured to the highest standards. For information regarding warranty coverage, technical support, or service, please refer to the warranty card included with your product or visit the official Arcam website. Keep your proof of purchase for warranty claims.


