
1. Introduction
Thank you for choosing the Ousam Led Solar Flood Lights. This manual provides essential information for the safe and efficient installation, operation, and maintenance of your solar lighting system. Please read this manual thoroughly before use and retain it for future reference.
2. Product Overview
The Ousam Led Solar Flood Light is designed for outdoor and indoor illumination, featuring a separate solar panel connected by a 16-foot cable. It operates automatically from dusk to dawn, providing warm white LED lighting for various applications.
2.1 Components
- Solar Light Unit (with integrated LED beads and intelligent chip)
- Solar Panel (with 16FT/5M cable)
- Support Brackets (2)
- Screws (4 pairs)
- Straps (4)
- User Manual (this document)
2.2 Product Diagram and Dimensions
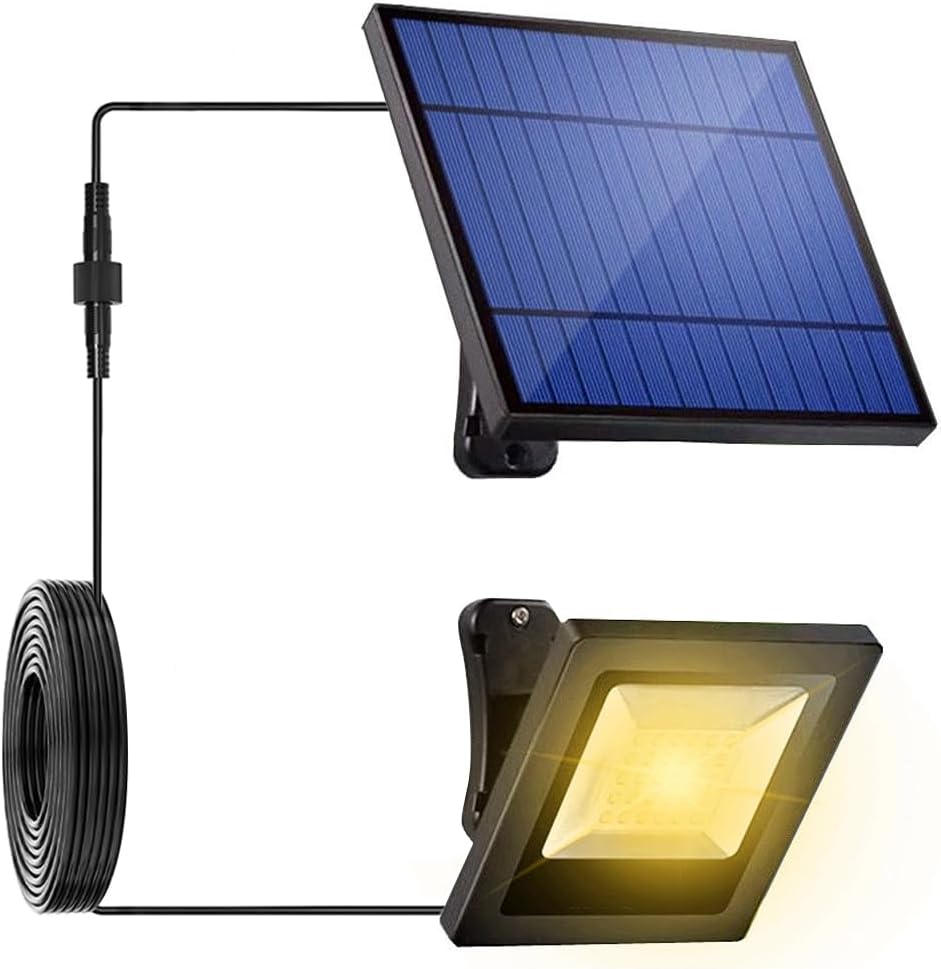
Figure 2.2.1: Main components of the Ousam Led Solar Flood Light system.

Figure 2.2.2: Product dimensions for the solar panel and flood light unit.

Figure 2.2.3: Internal structure and materials of the flood light.
3. Safety Information
- Ensure the product is installed in a location where it receives direct sunlight for optimal charging.
- Do not attempt to disassemble or modify the product, as this may void the warranty and cause damage.
- Keep the solar panel clean from dust, snow, or debris to maintain charging efficiency.
- This product is designed for outdoor use with an IP65 waterproof rating, but avoid submerging it in water.
- Handle the toughened glass with care to prevent breakage.
4. Setup and Installation
Proper installation is crucial for the performance of your solar flood light. The 16-foot cable allows for flexible placement of the solar panel in direct sunlight and the light unit in the desired illumination area.
4.1 Pre-Installation Check
- Unpack all components and ensure they are intact.
- Locate the ON/OFF switch on the back of the solar panel and ensure it is in the 'ON' position for initial charging and automatic operation.

Figure 4.1.1: Location of the ON/OFF switch on the solar panel.
4.2 Installation Steps
The solar flood light can be mounted on walls, posts, or railings. Use the provided screws and support brackets for secure installation. Straps are included for mounting on poles or trees.

Figure 4.2.1: Step-by-step installation guide.
- Assemble Brackets: Tighten the screw connecting the lamp head and its holder to the support bracket.
- Mark and Drill: Choose a suitable location for the solar panel (direct sunlight) and the light unit. Mark the drilling points, drill holes, and insert the expansion rubber plugs.
- Mount Solar Panel: Secure the solar panel bracket to the wall or desired surface using the provided screws. Adjust the angle of the solar panel to maximize sun exposure.
- Mount Light Unit: Secure the light unit bracket to the wall or desired surface. Adjust the angle of the light to illuminate the target area.
- Connect Cable: Connect the 16-foot cable from the solar panel to the light unit. Ensure a secure connection.
- Alternative Mounting: For poles or trees, use the provided straps to secure the light and solar panel. For horizontal railings, use the appropriate bracket configuration.

Figure 4.2.2: Installation accessories and examples.

Figure 4.2.3: Example of flexible indoor/outdoor placement.
5. Operating Instructions
The Ousam Led Solar Flood Light is designed for automatic operation.
- Automatic Dusk-to-Dawn: Once the ON/OFF switch on the solar panel is set to 'ON', the light will automatically charge during the day and turn on at dusk, illuminating until dawn or until the battery is depleted.
- Initial Charge: For optimal performance, allow the solar panel to charge for at least 6.5 hours in direct sunlight before first use.
- Run Time: A full charge can support 16-18 hours of continuous illumination.

Figure 5.1.1: Automatic charging and lighting cycle.
6. Maintenance
Regular maintenance ensures the longevity and optimal performance of your solar flood light.
- Cleaning the Solar Panel: Periodically wipe the solar panel with a soft, damp cloth to remove dust, dirt, leaves, or snow. A clean panel ensures maximum sunlight absorption and charging efficiency.
- Battery Care: The integrated Lithium Ion batteries have an average life of 3 years. No user replacement is required.
- Inspect Connections: Occasionally check the cable connections between the solar panel and the light unit to ensure they are secure and free from damage.
7. Troubleshooting
If your solar flood light is not functioning as expected, refer to the following common issues and solutions:
| Problem | Possible Cause | Solution |
|---|---|---|
| Light does not turn on at night. | 1. ON/OFF switch is in 'OFF' position. 2. Insufficient sunlight for charging. 3. Solar panel is dirty or obstructed. 4. Faulty connection. | 1. Ensure the switch on the back of the solar panel is 'ON'. 2. Relocate the solar panel to an area with direct sunlight. 3. Clean the solar panel surface. 4. Check cable connections for tightness. |
| Light is dim or runs for a short duration. | 1. Insufficient charging due to cloudy weather or poor panel placement. 2. Solar panel is dirty. 3. Battery capacity reduced over time. | 1. Ensure solar panel receives 6.5+ hours of direct sunlight daily. 2. Clean the solar panel surface. 3. Allow several sunny days for full recharge. If problem persists after 3 years, battery performance may naturally decline. |
| Light flickers. | Loose connection or low battery. | Check all cable connections. Ensure the solar panel is receiving adequate sunlight for charging. |
8. Specifications
| Brand | Ousam Led |
| Model Number | [EO] Ousam Led FL-001 |
| Color | Warm White |
| Material | Glass, Metal, Plastic |
| Light Fixture Form | Floodlight |
| Product Dimensions | 7"L x 7"W x 6"H |
| Indoor/Outdoor Usage | Outdoor |
| Power Source | Solar Powered |
| Special Feature | Instant On, Dusk to Dawn Sensor |
| Light Source Type | LED (30 LEDs) |
| Voltage | 3.7 Volts |
| Wattage | 1.53 watts |
| Item Weight | 1.2 Pounds |
| Water Resistance Level | Waterproof (IP65) |
| Brightness | 400 Lumen |
| Cable Length | 16 FT / 5 M |
| Batteries | 2 Lithium Ion batteries (included) |
| Average Battery Life | 3 years |
9. Warranty and Support
9.1 Warranty Information
This Ousam Led product comes with a 1-year manufacturer's warranty from the date of purchase. The warranty covers defects in materials and workmanship under normal use. It does not cover damage caused by misuse, accidents, unauthorized modifications, or improper installation.
9.2 Customer Support
For any questions, concerns, or assistance regarding your Ousam Led Solar Flood Lights, please do not hesitate to reach out to our customer service team. We are dedicated to ensuring your complete satisfaction.
Please refer to the contact information provided with your purchase or visit the official Ousam Led store for support details.