
1. Introduction
This manual provides detailed instructions for the Walfront 37MP 1080P 60FPS USB HDMI Industrial Microscope Camera. This high-definition camera is designed for industrial applications, offering clear imaging and multiple connectivity options for enhanced work efficiency. Please read this manual thoroughly before operating the device to ensure proper usage and optimal performance.
2. Product Overview and Features
The Walfront 37MP Industrial Microscope Camera is a versatile imaging solution featuring dual HDMI and USB 2.0 outputs. It is specifically engineered for industrial use, providing high-resolution images and smooth video capture.
- High Resolution: Offers 37MP image resolution and 1080P 60FPS video recording via HDMI. USB video resolution is 2MP when connected to a computer.
- Dual Output: Equipped with standard HDMI (Type A) and USB 2.0 (Type B) interfaces for flexible connectivity.
- Conversion Adapter: Includes a conversion adapter for easy mounting on various industrial microscopes.
- Multi-functions: Supports digital zoom, automatic/manual brightness control, freeze function, and adjustable R/G/B color balance.
- OSD Menu: On-Screen Display menu available in multiple languages including English, Chinese, French, Spanish, Japanese, and German.

Figure 2.1: Various industrial applications for the microscope camera, such as scientific research, material analysis, SMT industry, maintenance, jewelry inspection, and watch repair.
3. Package Contents
Please verify that all items listed below are included in your package:
- 1 x 37MP Industrial Microscope Camera
- 1 x 30mm Adapter
- 1 x 30.5mm Adapter
- 1 x 0.5X C-Mount
- 1 x Remote Control (Battery Not Included)
- 1 x High Definition Data Cable (HDMI Cable)
- 1 x Power Adapter
- 1 x CD (Software)

Figure 3.1: All components included in the Walfront 37MP Microscope Camera package, laid out for inspection.
4. Specifications
| Feature | Specification |
|---|---|
| Model | Camera with HD USB2.0 Two Output |
| Image Format | JPG |
| Image Resolution | 37MP |
| Video Format (T-F Card) | MP4 |
| Video Recorder | 2K at 30fps, 1080P at 60FPS |
| HD Multimedia Interface Video Resolution | 1920 x 1080 at 60FPS |
| USB Video Resolution | 1920 x 1080 at 30fps; 1280 x 720 at 30FPS; 640 x 480 at 30fps; 320 x 240 at 30fps |
| White Balance | Automatic / Manual |
| Light | Automatic / Manual |
| Exposure | Automatic / Manual, Adjustable Value |
| Color | Colorful |
| Mirror | Left / Right, Up / Down |
| Freeze Function | Support |
| OSD Languages | English / Chinese / French / Spanish / Japanese / German |
| Image Sensor | 37MP CMOS Sensor 1/2.9 Inch |
| Sensor Size | 1.335µm x 1.335µm |
| Frame Rate | 60fps |
| Housing Material | Metal |
| Lens Compatibility | C / CS Mount |
| T-F Card Interface | Maximum 64G (Not Included) |
| HD Multimedia Interface | Standard HD Multimedia Interface Output (Type A) |
| USB Interface | Standard USB2.0 Interface (Type B) |
| Input Voltage | DC 12V |
| Weight | 0.59 Kilograms |
5. Setup
Follow these steps to set up your Walfront 37MP Industrial Microscope Camera:
- Connect Power: Connect the provided power adapter to the camera's DC 12V input port and plug it into a power outlet.
- Connect to Display (HDMI): Use the included HDMI cable to connect the camera's HDMI output port to an external monitor or display.
- Mount on Microscope:
- Attach the appropriate adapter (30mm, 30.5mm, or 0.5X C-Mount) to the camera lens.
- Carefully insert the camera with the attached adapter into the eyepiece tube of your industrial microscope.
- Connect to Computer (USB - Optional): If you intend to use the camera with a computer for image processing or software control, connect the camera's USB 2.0 (Type B) port to your computer using a USB cable (not always included, check package).
- Insert TF Card (Optional): For direct image and video storage without a computer, insert a TF (MicroSD) card (up to 64GB, not included) into the camera's TF card slot.
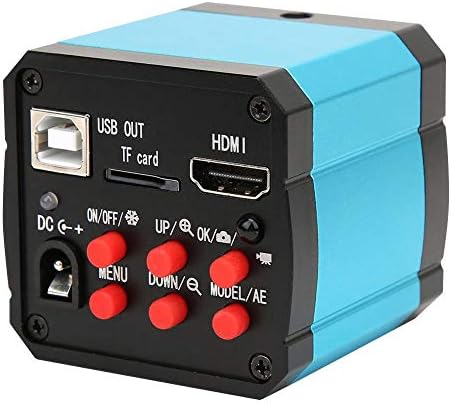
Figure 5.1: Rear view of the camera, emphasizing the arrangement of its ports and control buttons.

Figure 5.2: A visual guide demonstrating the correct method for inserting the camera into a microscope's eyepiece.
Video 5.1: Demonstration of connecting the Walfront 37MP Microscope Camera to a monitor and a microscope, showing live feed and image adjustment.
6. Operating Instructions
Once the camera is set up, you can begin operation using the camera's onboard buttons, remote control, or connected computer software.
6.1 Basic Operation
- Power On/Off: Press the 'ON/OFF' button on the camera or 'POWER' button on the remote control.
- Menu Navigation: Use the 'MENU' button to access the OSD menu. Use 'UP'/'DOWN' and 'LEFT'/'RIGHT' buttons (or remote arrows) to navigate, and 'OK' to select.
- Image Capture: Press the camera icon button on the remote control to take a still picture.
- Video Recording: Press the video camera icon button on the remote control to start/stop video recording.
- Digital Zoom: Use the 'UP'/'DOWN' buttons to adjust digital zoom.
- Mode Selection: Use the 'MODE' button on the remote to switch between different display modes.

Figure 6.1: The remote control unit for the camera, featuring buttons for power, mode, navigation, capture, and menu access.
6.2 Software Operation (via USB)
For advanced features and computer connectivity, install the