
1. Introduction and Overview
The iCharger X6 is a compact and powerful DC smart battery balance charger and discharger designed for various battery types. Featuring a 2.4-inch IPS LCD screen, it provides detailed information and control over charging processes. This manual provides essential information for safe and efficient operation of your iCharger X6.
Key Specifications:
- Display: 2.4" IPS LCD (320x240)
- Supported Battery Types: 6s LiPo, LiLo, LiFe, LiHv, LTO, NiZn, Pb Battery, 1-20s NiMH/NiCd
- Input Voltage: 7-32VDC
- Max Limited Current: <35A
- Max Charging/Discharging Current: 30A
- Digital Power Max Output Voltage/Current: 26.5V/30A
- Max Charging Power: 800W
- Max Discharging Power: 30W
- Max Regenerative Discharging Power: 800W
- Max Extra Discharging Power: 900W@30V/30A
- Max Balance Current: >2.0A
- Weight: Approximately 170g
- Size: Approximately 83*64.5*36.5mm
2. Safety Information
WARNING: Never use the charger unsupervised! Always read the entire operating manual before using this charger. Operate the charger in a well-cooled and ventilated place. Failure to observe safety procedures outlined in the manual may cause serious injury or property damage.
Lithium Polymer (LiPo) batteries pose a severe risk of fire or explosion if not properly handled. Always follow manufacturer guidelines for charging, discharging, and storage. Keep batteries away from flammable materials and surfaces.
Ensure correct battery type and cell count settings before initiating any process. Incorrect settings can lead to overcharging, overheating, and potential hazards.
Keep the charger away from moisture, dust, and extreme temperatures. Do not operate the charger if it appears damaged.

Image: Back view of the iCharger X6, showing the warning label and cooling fins.
3. Product Features
- Compact Design: Small and lightweight, ideal for portability.
- High Power Output: Up to 800W charging power and 30A current.
- Versatile Battery Support: Compatible with a wide range of battery chemistries and cell counts.
- Intuitive LCD Screen: 2.4-inch IPS display for clear data visualization and easy navigation.
- Digital Power Function: Can act as a digital power supply with adjustable output.
- Regenerative Discharge: Efficiently discharges batteries by feeding energy back into the power source.
- Advanced Safety Features: Includes capacity cut-off, safety timer, and temperature cut-off.
4. Setup
Before operating the iCharger X6, ensure you have a stable DC power source (7-32VDC) capable of supplying the required current for your charging needs. The charger does not include an AC power supply and requires an external DC source.
4.1 Connecting the Power Source
- Connect your DC power supply to the input port on the iCharger X6. Ensure correct polarity (positive to positive, negative to negative).
- Verify the input voltage is within the 7-32VDC range.
4.2 Connecting the Battery
- Identify the main discharge lead of your battery and connect it to the main output port (e.g., XT60) on the charger.
- Connect the battery's balance lead to the corresponding balance port on the side of the charger. Ensure the correct pin configuration for your battery's cell count.

Image: Side view of the iCharger X6, highlighting the main output port and the balance port for battery connection.
5. Operating Instructions
The iCharger X6 features a rocker switch for navigation and selection. Press the switch to enter/confirm, and rock it left/right to navigate menus and adjust values.
5.1 Main Menu Navigation
Upon startup, the charger displays the main screen. Use the rocker switch to scroll through different program selections such as LiPo BATT, Li Batt Meter, User Set Program, Pb BATT, NiCd BATT, etc.
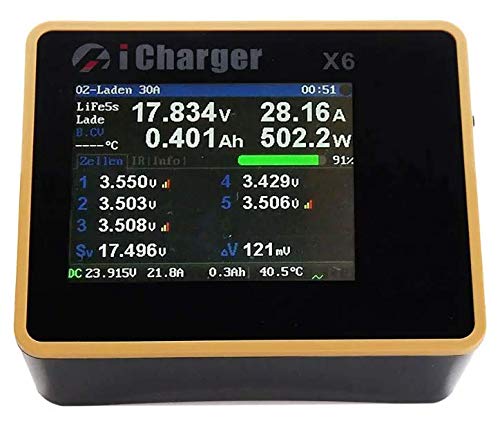
Image: The iCharger X6 LCD screen showing real-time charging data including voltage, current, and cell balance.
5.2 Charging a Battery
- From the main menu, select the appropriate battery type (e.g., LiPo BATT).
- Navigate to the desired charging mode (e.g., LiPo BALANCE for balanced charging, LiPo CHARGE for regular charging, or LiPo FAST CHG for faster charging without full balancing). Balanced charging is recommended for optimal battery health and longevity.
- Adjust the charging current (Amps) and confirm the correct cell count (e.g., 6S for a 6-cell battery). The charger may automatically detect the cell count when the balance lead is connected.
- Press and hold the rocker switch to start the charging process. The screen will display real-time charging data.
- To stop charging, press the rocker switch once and confirm the stop action.
5.3 Discharging a Battery
- Select the battery type and then choose LiPo DISCHARGE.
- Set the desired discharge current and the target discharge voltage per cell.
- Press and hold the rocker switch to begin discharging.
5.4 Storage Charging
Storage charging brings the battery to an optimal voltage level for long-term storage, preserving battery health.
- Select the battery type and choose LiPo STORAGE.
- The charger will automatically set the recommended storage voltage. Adjust the current if necessary.
- Press and hold the rocker switch to start the storage process.
6. Maintenance
Regular maintenance ensures the longevity and safe operation of your iCharger X6.
- Cleaning: Keep the charger clean and free from dust and debris. Use a soft, dry cloth for cleaning. Do not use liquid cleaners.
- Ventilation: Ensure the cooling vents are unobstructed to prevent overheating. Operate in a well-ventilated area.
- Cable Inspection: Periodically inspect all cables and connectors for signs of wear, damage, or corrosion. Replace damaged cables immediately.
- Firmware Updates: Check the manufacturer's website for any available firmware updates to ensure optimal performance and access to new features.
7. Troubleshooting
If you encounter issues with your iCharger X6, refer to the following common troubleshooting steps:
- Charger Not Powering On: Verify the DC input voltage is within the specified range (7-32VDC) and that the power supply is functioning correctly. Check all power connections for secure contact.
- Charging Error/Warning Message: Check the battery type and cell count settings. Ensure the balance lead is correctly connected and all cells are within a healthy voltage range. Refer to the specific error code on the screen for more details.
- Slow Charging: Confirm the charging current setting is appropriate for your battery's capacity. Ensure your power supply can deliver sufficient wattage and current.
- Unbalanced Cells: If cells remain unbalanced after a balance charge, the battery may be damaged or nearing the end of its life cycle. Consider replacing the battery.
- Screen Issues: If the screen is unresponsive or blank, try restarting the charger. If the issue persists, contact customer support.
8. Specifications
| Feature | Specification |
|---|---|
| Display | 2.4" IPS LCD (320x240) |
| Supported Battery Types | 6s LiPo, LiLo, LiFe, LiHv, LTO, NiZn, Pb Battery, 1-20s NiMH/NiCd |
| Input Voltage | 7-32VDC |
| Max Limited Current | <35A |
| Max Charging/Discharging Current | 30A |
| Digital Power Max Output Voltage/Current | 26.5V/30A |
| Max Charging Power | 800W |
| Max Discharging Power | 30W |
| Max Regenerative Discharging Power | 800W |
| Max Extra Discharging Power | 900W@30V/30A |
| Max Balance Current | >2.0A |
| Weight | Approx. 170g (6 ounces) |
| Size (Dimensions) | 83 x 64.5 x 36.5mm (1.44"D x 2.54"W x 1.44"H) |
| Manufacturer | Junsi |
9. Warranty and Support
Specific warranty details are not provided in the product information. Please refer to the manufacturer's official website or contact your retailer for warranty terms and conditions. For technical support, troubleshooting assistance, or service inquiries, please contact iCharger customer service or the authorized distributor from whom you purchased the product.


