
1. Introduction and Overview
This manual provides essential information for the safe and efficient operation of your Nespresso Vertuo Next coffee and espresso maker, bundled with the Aeroccino Milk Frother. The Vertuo Next machine is designed to brew various coffee and espresso sizes, from 5 oz to 18 oz coffee, and single or double espresso. Its intelligent barcode reading system ensures optimal in-cup results for each Nespresso Vertuo capsule. The accompanying Aeroccino 3 milk frother allows for the preparation of smooth hot or cold milk froth, ideal for cappuccino and latte recipes.
2. What's in the Box
Upon unpacking, ensure all components are present:
- Nespresso Vertuo Next Coffee and Espresso Maker (White)
- Aeroccino 3 Milk Frother
- Removable Water Tank (37 oz capacity)
- Drip Tray and Cup Support
- Used Capsule Container
- Complimentary Starter Set of Nespresso Vertuo Capsules (assortment may vary)

Image: Contents of the Nespresso Vertuo Next machine and Aeroccino 3 frother package, including the machine, frother, and a starter set of capsules.
3. Key Features
- One-Touch Brewing: Simple operation for coffee and espresso.
- Capsule Recognition: Barcode scanning technology automatically adjusts brewing parameters for each capsule.
- Versatile Brew Sizes: Prepares 5, 8, 12, 18 oz coffee, and single or double espresso.
- Aeroccino 3 Milk Frother: Creates hot or cold milk froth for various coffee recipes.
- Adjustable Cup Support: Accommodates different cup sizes.
- Removable Water Tank: 37 oz capacity for convenience.
- Recycling Program: Nespresso offers a complimentary recycling program for used aluminum capsules.

Image: Top-down view of the Nespresso Vertuo Next machine highlighting its single-button operation, capsule recognition, and one-touch brewing capabilities.
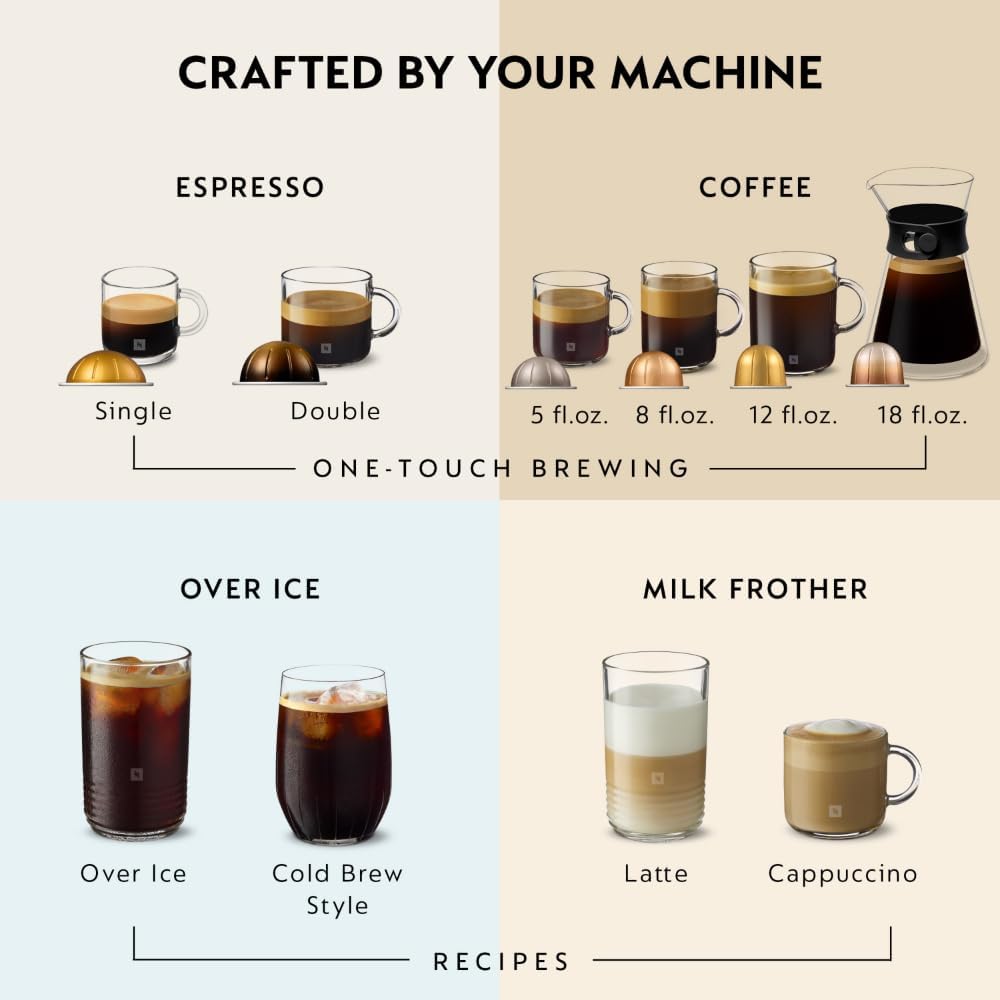
Image: Visual representation of different coffee and espresso sizes (single, double espresso, 5oz, 8oz, 12oz, 18oz coffee) that can be brewed by the machine, including options for iced beverages.

Image: A hand pouring frothed milk from the Aeroccino 3 into a coffee cup, demonstrating its use for cappuccinos and lattes.
4. Setup
- Unpack: Carefully remove all components from the packaging.
- Position: Place the machine on a clean, stable, and level surface. Ensure adequate space around the machine.
- Rinse Water Tank: Remove the water tank, rinse it thoroughly with fresh drinking water, and fill it to the MAX level. Reattach it to the machine.
- Power On: Plug the machine into a grounded power outlet. The indicator light will illuminate.
- First Use / Cleaning Cycle: Before first use, run a cleaning cycle without a capsule. Fill the water tank, place a container under the coffee outlet, and press the brew button. Repeat this process 2-3 times to ensure the system is clean.
5. Operating Instructions
5.1 Brewing Coffee or Espresso
- Power On: Ensure the machine is plugged in and the indicator light is green.
- Fill Water Tank: Check that the water tank is filled with fresh drinking water.
- Place Cup: Position your desired cup on the cup support. Adjust the cup support height if necessary.
- Open Head: Twist the lever counter-clockwise to unlock and lift the machine head. If a used capsule is present, it will be ejected into the used capsule container.
- Insert Capsule: Place a Nespresso Vertuo capsule into the machine, dome side down.
- Close Head: Push the head down and twist the lever clockwise to lock it. The indicator light will turn solid green.
- Brew: Press the brew button once. The machine will automatically read the capsule's barcode and begin brewing.
- Enjoy: Your coffee or espresso is ready.
Video: Espresso in a Click
Video: Demonstrates the simple one-touch brewing process for espresso using the Nespresso Vertuo Next machine.
5.2 Using the Aeroccino 3 Milk Frother
- Prepare Frother: Ensure the frother is clean and the whisk is correctly inserted.
- Add Milk: Pour fresh, cold milk into the frother. Do not exceed the 'MAX' fill line for frothed milk or the 'MAX' fill line for hot milk.
- Select Froth Type:
- For Hot Froth: Press the button briefly. The indicator light will turn red.
- For Cold Froth: Press and hold the button for approximately 2 seconds. The indicator light will turn blue.
- Start: The frother will start automatically. It will stop when the milk is frothed to the desired consistency.
- Pour: Carefully pour the frothed milk into your coffee or espresso.
Video: Vertuo Next Nespresso and Frother Overview
Video: A brief demonstration of using the Nespresso Vertuo Next machine and the Aeroccino frother to prepare a coffee beverage.
5.3 Brew Over Ice
To prepare a concentrated pour over ice, simply press the brew button twice after inserting the capsule. This function is ideal for creating refreshing iced coffee beverages.

Image: A Nespresso Vertuo capsule and a glass of iced coffee, illustrating the 'Brew Over Ice' function by double-clicking the brew button for a concentrated pour.
6. Maintenance
6.1 Cleaning
- Daily: Empty and rinse the drip tray and used capsule container. Wipe the coffee outlet with a damp cloth.
- Weekly: Wash the water tank, drip tray, and used capsule container with mild detergent and rinse thoroughly.
- Aeroccino 3: Clean the inside of the frother and the whisk immediately after each use with a damp cloth. The frother is not dishwasher safe.
6.2 Descaling
Descaling is crucial for maintaining machine performance and coffee quality. The machine will indicate when descaling is required (refer to the full user manual for specific light indicators). Use only the Nespresso descaling kit and follow the instructions provided with the kit and in the full user manual.
6.3 Recycling
Nespresso is committed to sustainability. Used aluminum capsules can be recycled through their complimentary recycling program. Simply collect your used capsules in the provided recycling bag and return them as per Nespresso's instructions.

Image: A person emptying used Nespresso capsules into a branded recycling bag, emphasizing the complimentary recycling program.
7. Troubleshooting
If you encounter issues with your Nespresso Vertuo Next machine or Aeroccino 3 frother, consider the following general steps:
- No Coffee Flow: Check if the water tank is filled and correctly positioned. Ensure no capsule is jammed.
- Leaking: Verify the water tank is properly seated and the drip tray is not overflowing.
- Indicator Light Issues: Refer to the full user manual for specific light patterns and their meanings (e.g., descaling alert, error codes).
- Frother Not Working: Ensure the frother is clean, the whisk is in place, and the correct button press (short for hot, long for cold) is used.
For detailed troubleshooting steps and solutions, please consult the comprehensive user manual provided with your product or visit the official Nespresso support website.
Video: Nespresso Virtuo Next - How's it Work?
Video: An in-depth look at the functionality and operation of the Nespresso Vertuo Next machine, covering various aspects of its use.
8. Specifications
| Feature | Detail |
|---|---|
| Brand | Nespresso |
| Model Number | ENV120WAE |
| Color | White |
| Product Dimensions | 16.9"D x 5.5"W x 12.4"H |
| Item Weight | 8.8 pounds |
| Water Tank Capacity | 37 fl oz |
| Coffee Input Type | Nespresso Vertuo Capsules |
| Operation Mode | Fully Automatic |
| Voltage | 110 Volts |
| Special Feature | Milk Frother (Aeroccino 3) |
| Included Components | Coffee Machine, Milk Frother |
9. Warranty and Support
For information regarding product warranty, please refer to the warranty card included in your product packaging or visit the official Nespresso website. Nespresso also offers optional protection plans for extended coverage.
For customer support, technical assistance, or to order Nespresso capsules and accessories, please contact Nespresso directly through their website or customer service hotline.