1. Introduction
This manual provides comprehensive instructions for the setup, operation, and maintenance of your LIORQUE HM433A Projection Alarm Clock. Please read this manual thoroughly before using the device to ensure proper function and longevity.
The LIORQUE HM433A is a versatile alarm clock featuring a 180° rotatable projection, FM radio, temperature display, and a convenient USB charging port. It is designed for ease of use and enhanced readability.
2. Package Contents
Verify that all items are present in the package:
- 1 x LIORQUE Projection Alarm Clock (Model HM433A)
- 1 x User Manual (This document)
- 1 x Micro USB Cable
- 1 x AC Adapter
3. Product Overview
Familiarize yourself with the main components and controls of your alarm clock.

Figure 3.1: Front view of the LIORQUE HM433A Projection Alarm Clock, showing the digital display, projection, and general design.
3.1. Control Buttons
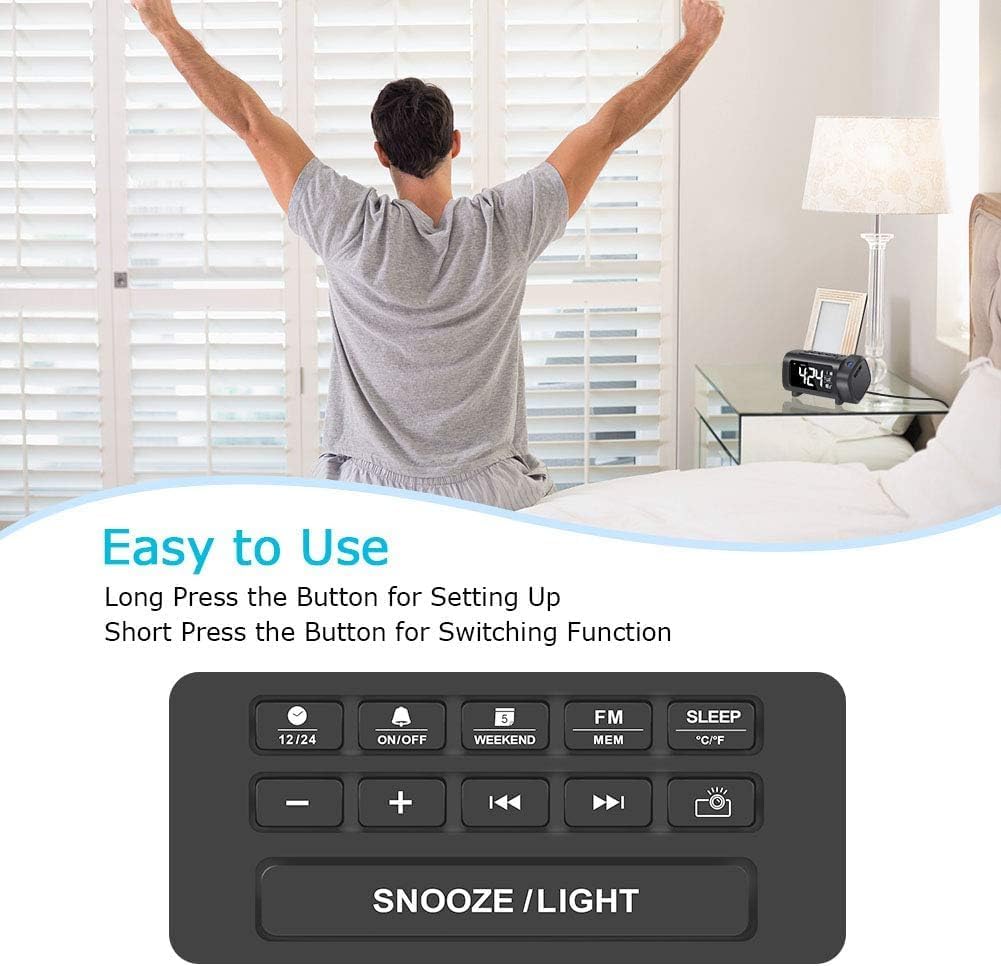
Figure 3.2: Top panel control buttons for various functions.
- 12/24 Button: Toggle between 12-hour and 24-hour time format.
- ON/OFF Button: Power on/off the alarm, or activate/deactivate alarm settings.
- Weekend Button: Enable/disable weekend alarm mode.
- FM/MEM Button: Access FM radio functions and save/recall radio presets.
- SLEEP Button: Set the sleep timer for the FM radio.
- °C/°F Button: Switch temperature display between Celsius and Fahrenheit.
- - / + Buttons: Adjust values (time, volume, frequency) or navigate menus.
- Previous / Next Buttons: Change FM radio stations or navigate tracks.
- Projector Button: Control projection features (on/off, brightness, flip).
- SNOOZE/LIGHT Button: Activate snooze during an alarm, or adjust display brightness.
4. Setup
4.1. Power Connection
- Connect the Micro USB cable to the input port on the back of the alarm clock.
- Plug the AC adapter into a standard wall outlet. The clock display will illuminate.
- Note: The alarm clock requires continuous AC power for full functionality. It is not battery-operated for primary power.
4.2. Battery Backup Installation
The device includes a CR2032 battery for backup. This battery preserves time and alarm settings during a power outage but does not power the display or projection.
- Locate the battery compartment on the bottom of the unit.
- Open the compartment cover.
- Insert one CR2032 battery, ensuring correct polarity (+/-).
- Close the compartment cover securely.
5. Operating Instructions
5.1. Setting Time and Date
- Time Setting: Long press the "12/24" button to enter time setting mode. The hour digits will flash. Use the "+" or "-" buttons to adjust the hour. Press "12/24" again to confirm and move to minute setting. Adjust minutes with "+" or "-" buttons. Press "12/24" to confirm.
- 12/24 Hour Format: Short press the "12/24" button to switch between 12-hour (with AM/PM indicator) and 24-hour formats.
- Date Setting: Long press the "Weekend" button to enter date setting mode. The year will flash. Use "+" or "-" to adjust. Press "Weekend" to confirm and move to month, then day. Adjust each with "+" or "-" and confirm with "Weekend".
- Temperature Unit: Short press the "°C/°F" button to switch between Celsius and Fahrenheit.
5.2. Setting Alarms
The clock supports multiple alarms. Follow these steps for each alarm:
- Set Alarm Time: Long press the "ON/OFF" button to enter alarm setting mode. The alarm hour will flash. Use "+" or "-" to adjust the hour. Press "ON/OFF" to confirm and move to minute setting. Adjust minutes with "+" or "-" and confirm with "ON/OFF".
- Alarm Sound Selection: After setting the time, you can choose between Buzzer or FM Radio as the alarm sound. Use "+" or "-" to select. Press "ON/OFF" to confirm.
- Activate/Deactivate Alarm: Short press the "ON/OFF" button to toggle the alarm on or off. An alarm icon will appear/disappear on the display.
- Snooze Function: When an alarm sounds, press the "SNOOZE/LIGHT" button to activate snooze. The alarm will pause for 9 minutes and then sound again.
- Weekend Mode: Short press the "Weekend" button to activate/deactivate weekend mode. In weekend mode, alarms will not sound on Saturdays and Sundays.
5.3. Projection Features
The projector displays the time on a wall or ceiling.

Figure 5.1: 180° Projection Flip Function.
- Turn On/Off: Short press the "Projector" button to turn the projection on or off.
- 180° Flip: Long press the "Projector" button to flip the projected image 180 degrees, allowing for correct orientation regardless of clock placement.
- Projection Brightness: While projection is active, short press the "Projector" button repeatedly to cycle through 4 brightness levels (Off, Dim, Medium, Bright).

Figure 5.2: Adjusting Projection Brightness.
Optimal Projection Distance: For best clarity, the recommended projection distance is 2-3 meters (7-10 feet). For higher ceilings, projecting onto a wall may yield better results.
5.4. Display Brightness and Color
- 4-Level Dimmer: Short press the "SNOOZE/LIGHT" button in standard time display mode to cycle through 4 brightness levels for the main display (0%, 50%, 75%, 100%).
- Display Color Switch: Long press the "SNOOZE/LIGHT" button to switch the display color between white and blue.

Figure 5.3: Main Display Brightness Levels.

Figure 5.4: Display Color Options (White/Blue).
5.5. FM Radio Operation

Figure 5.5: FM Radio and Sleep Timer Functionality.
- Turn On/Off: Short press the "FM/MEM" button to turn the FM radio on or off.
- Auto Scan: Long press the "FM/MEM" button to automatically scan and save available FM stations (76.0MHz-108.0MHz). The clock can store up to 15 preset stations.
- Manual Tuning: Use the "Previous" or "Next" buttons to manually tune to desired frequencies.
- Adjust Volume: Use the "+" or "-" buttons to adjust the radio volume (15 levels).
- Sleep Timer: While the radio is playing, short press the "SLEEP" button repeatedly to set a sleep timer (5-90 minutes). The radio will automatically turn off after the set duration.
5.6. USB Charging Port

Figure 5.6: USB Charging Port in Use.
The alarm clock features a 5V/1.2A USB output port on the side. This allows you to charge your smartphone or other USB-powered devices conveniently while the clock is connected to AC power.
6. Maintenance
- Cleaning: Use a soft, dry cloth to clean the surface of the alarm clock. Do not use liquid cleaners or abrasive materials.
- Lens Care: Gently wipe the projection lens with a soft, lint-free cloth to maintain clear projection quality.
- Storage: If storing the device for an extended period, disconnect it from power and remove the backup battery.
7. Troubleshooting
| Problem | Possible Cause | Solution |
|---|---|---|
| Clock display is off. | No AC power connection. | Ensure the AC adapter is securely plugged into a working outlet and the clock. |
| Projection is blurry or unclear. | Incorrect projection distance or dirty lens. | Adjust the clock's position for optimal distance (2-3m). Clean the projection lens with a soft cloth. |
| Projection is upside down or reversed. | Projection image needs to be flipped. | Long press the "Projector" button to flip the image 180 degrees. |
| Alarm does not sound. | Alarm is deactivated or weekend mode is on. | Short press "ON/OFF" to ensure alarm is active (icon visible). Check if "Weekend" mode is enabled. |
| FM radio reception is poor. | Antenna position or interference. | Adjust the position of the clock or its antenna for better reception. Avoid placing near other electronic devices. |
| USB charging not working. | Clock not connected to AC power or device incompatibility. | Ensure the clock is powered by AC. Check the charging cable and the device being charged. |
8. Specifications
| Brand | LIORQUE |
| Model | HM433A |
| Display Type | Digital (VA Display) |
| Power Source | Corded Electric (AC Adapter) |
| Battery Backup | 1 x CR2032 (included) |
| Projection Features | 180° Rotatable, 4-Level Brightness |
| Display Dimmer | 4-Level Brightness, 2-Color (White/Blue) |
| FM Radio Frequency | 76.0MHz-108.0MHz (15 preset stations) |
| USB Output | 5V/1.2A |
| Product Dimensions | 9.38 x 3.81 x 9.5 cm |
| Weight | 320 g |
9. Warranty and Support
For warranty information or technical support, please refer to the contact details provided with your purchase or visit the official LIORQUE website. Keep your purchase receipt for warranty claims.


