
Introduction
This manual provides comprehensive instructions for the safe installation, operation, and maintenance of your Utilitech 0.5 HP Cast Iron Shallow Well Jet Pump. This pump is designed to draw water from shallow wells, lakes, or streams, providing reliable water pressure for various applications. It features a durable cast-iron construction, a 20/40-PSI pressure switch, and dual voltage compatibility (115V or 230V).
Important Safety Information
Read and understand all safety warnings and instructions before installing or operating this pump. Failure to follow these instructions could result in serious injury, death, or property damage.
- Always disconnect power before servicing the pump.
- Ensure proper grounding to prevent electrical shock.
- Do not operate the pump in explosive atmospheres or near flammable liquids.
- Protect the pump from freezing temperatures.
- Use only clean water for pumping. Do not pump corrosive or abrasive liquids.
- Ensure all plumbing connections are secure and leak-free.
- Installation should be performed by a qualified professional if you are unsure.
Package Contents
Verify that all components are present and undamaged upon unpacking:
- Utilitech 0.5 HP Cast Iron Shallow Well Jet Pump
- Instruction Manual (this document)
- Quick-start guide
Product Overview
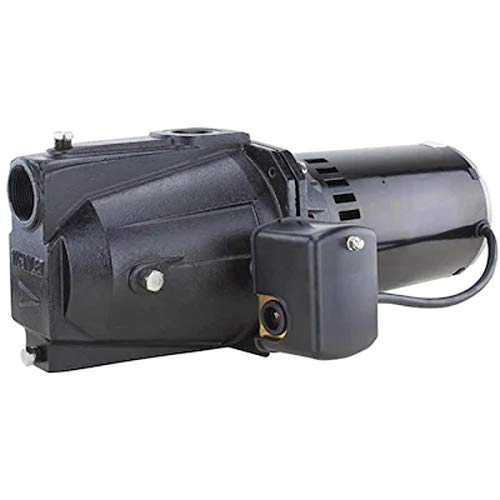
Image: Front view of the Utilitech 0.5 HP Cast Iron Shallow Well Jet Pump, showcasing its black cast-iron body, motor housing, and connection ports.
The image above displays the main components of the Utilitech shallow well jet pump. Key features include the robust cast-iron pump housing, the electric motor, and the integrated pressure switch. The pump is designed for durability and efficient water transfer from shallow sources.
Installation and Setup
Pre-Installation Checklist
- Ensure the installation site is level, dry, and protected from freezing.
- Verify power supply matches pump requirements (115V or 230V). The pump is factory wired for 115V.
- Have necessary plumbing fittings and tools ready.
- Confirm the well depth is within the pump's capacity (up to 25 feet).
Electrical Connection
This pump is dual voltage and can operate on either 115V or 230V. It is factory wired for 115V. If 230V operation is desired, consult the wiring diagram provided on the motor housing or in the quick-start guide for proper re-wiring. Always ensure the power supply is disconnected before making any electrical connections. A dedicated circuit is recommended.
Plumbing Connections
The pump features a 1-1/4 inch NPT suction connection and a 1 inch NPT discharge connection. Use appropriate thread sealant on all pipe connections to prevent leaks. Ensure suction lines are airtight to prevent air from entering the pump, which can cause loss of prime.
Installation Steps
- Mount the pump securely on a solid, level surface to minimize vibration.
- Connect the suction line from the well to the 1-1/4 inch NPT suction port. Ensure a foot valve is installed at the end of the suction line in the well.
- Connect the discharge line to the 1 inch NPT discharge port. Install a pressure gauge and a shut-off valve on the discharge side.
- Prime the pump by filling the pump casing and suction line with water through the priming plug until water overflows. Replace the priming plug securely.
- Connect the pump to the appropriate electrical supply, ensuring proper grounding.
Operation
Initial Start-up
- Ensure the pump is fully primed.
- Open the discharge valve.
- Restore power to the pump. The pump should start and begin to build pressure.
- Allow the pump to run until it reaches the cut-off pressure (typically 40 PSI) and shuts off.
- Check for any leaks in the plumbing system.
Normal Operation
The pump is equipped with a 20/40-PSI pressure switch. This means the pump will automatically turn on when the system pressure drops to 20 PSI and turn off when it reaches 40 PSI. This maintains consistent water pressure in your system. Avoid running the pump dry, as this can cause severe damage.
Maintenance
Regular maintenance ensures the longevity and efficient operation of your pump.
- Winterization: If the pump is in an area subject to freezing, drain all water from the pump casing and plumbing lines to prevent damage.
- Check for Leaks: Periodically inspect all connections for leaks and tighten as necessary.
- Clean Air Vent: Ensure the motor's air vents are clear of debris to allow for proper cooling.
- Pressure Switch Check: Occasionally verify the pressure switch is operating correctly by observing the cut-in and cut-out pressures.
Troubleshooting
This section provides solutions to common issues you might encounter.
| Problem | Possible Cause | Solution |
|---|---|---|
| Pump runs but no water | Loss of prime; air leak in suction line; low water level in well. | Re-prime the pump; check and seal all suction line connections; check well water level. |
| Pump cycles too frequently | Waterlogged pressure tank; small leak in system. | Check pressure tank air charge; inspect plumbing for leaks. |
| Pump does not start | No power; tripped circuit breaker; faulty pressure switch or motor. | Check power supply and breaker; inspect pressure switch; consult a qualified technician. |
| Low water pressure | Partially clogged impeller; restricted suction line; pump losing prime. | Inspect and clean impeller; check suction line for obstructions; re-prime pump. |
Technical Specifications
| Specification | Value |
|---|---|
| Model Number | 148012 |
| Horsepower (HP) | 0.5 HP |
| Pressure Switch Setting | 20/40 PSI |
| Maximum Suction Lift | 25 Feet |
| Flow Rate (GPM) | Up to 11 GPM |
| Voltage | 115V / 230V (Factory wired for 115V) |
| Discharge Connection | 1 inch NPT |
| Suction Connection | 1-1/4 inch NPT |
| Pump Body Material | Cast Iron |
| Item Weight | 35.8 pounds |
| Dimensions (L x W x H) | 21.2 x 12.9 x 9.8 inches |
| UPC | 054757098629 |
Warranty and Customer Support
For warranty information, technical assistance, or to order replacement parts, please contact Utilitech customer support. Refer to the product packaging or the quick-start guide for specific contact details, or visit the official Utilitech website.
Please retain your proof of purchase for warranty claims.


