
1. Important Safety Instructions
When using electrical appliances, basic safety precautions should always be followed to reduce the risk of fire, electric shock, and injury to persons. Read all instructions carefully before operating this appliance.
- Do not touch hot surfaces. Use handles or knobs.
- To protect against electric shock, do not immerse cord, plugs, or the appliance in water or other liquid.
- Close supervision is necessary when any appliance is used by or near children.
- Unplug from outlet when not in use and before cleaning. Allow to cool before putting on or taking off parts.
- Do not operate any appliance with a damaged cord or plug, or after the appliance malfunctions or has been damaged in any manner.
- The use of accessory attachments not recommended by the appliance manufacturer may cause injuries.
- Do not use outdoors.
- Do not let cord hang over edge of table or counter, or touch hot surfaces.
- Do not place on or near a hot gas or electric burner, or in a heated oven.
- Extreme caution must be used when moving an appliance containing hot oil or other hot liquids.
- Always attach plug to appliance first, then plug cord into the wall outlet. To disconnect, turn any control to 'off', then remove plug from wall outlet.
- Do not use appliance for other than intended use.
2. Product Overview and Components
The KURAIDORI BM1403 Breadmaker is designed to simplify the bread-making process with its double kneading blades and user-friendly interface. Familiarize yourself with its components for optimal use.

Image 2.1: The KURAIDORI BM1403 Breadmaker with its lid open, showing the interior cavity. Beside it, the removable bread pan, two kneading blades, a measuring cup, and a measuring spoon are displayed. This image illustrates the main unit and its essential accessories.
Key Components:
- Main Unit: Stainless steel exterior housing the motor, heating element, and control panel.
- Lid: Features a viewing window to monitor the baking process.
- Control Panel: Touch-sensitive panel with LCD display for program selection and settings.
- Bread Pan: Removable non-stick pan for baking, with a handle for easy removal.
- Kneading Blades: Two non-stick blades for efficient dough mixing and kneading.
- Measuring Cup and Spoon: For accurate ingredient measurement.
3. Setup and First Use
3.1 Unpacking and Initial Cleaning
- Carefully remove the breadmaker and all accessories from the packaging.
- Wash the bread pan and kneading blades with warm, soapy water. Rinse thoroughly and dry completely.
- Wipe the exterior of the breadmaker with a damp cloth. Do not immerse the main unit in water.
- Ensure all parts are dry before assembly.
3.2 Assembly
- Place the bread pan into the main unit, ensuring it clicks securely into place.
- Attach the kneading blades onto the shafts at the bottom of the bread pan. Ensure they are firmly seated.
- Close the lid.
3.3 First Use (Burn-in Cycle)
Before baking bread for the first time, it is recommended to run a short 'burn-in' cycle to eliminate any manufacturing odors.
- Plug the breadmaker into a grounded electrical outlet.
- Select the 'Bake' program (Program 10) without any ingredients in the pan.
- Allow the program to run for approximately 10 minutes, then press the 'Start/Stop' button to cancel.
- Unplug the appliance and let it cool completely.
- Wipe the interior of the bread pan with a damp cloth.
4. Operating Instructions
4.1 Control Panel Overview
The touch control panel allows you to select programs, adjust settings, and start/stop the baking process. The LCD display shows the selected program, time remaining, and other relevant information.
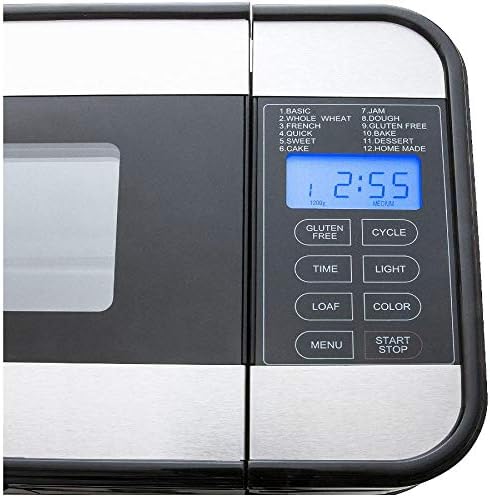
Image 4.1: A detailed view of the KURAIDORI BM1403 Breadmaker's control panel. It features an LCD screen displaying '1000g' and 'MEDIUM' with a time of '2:55'. Below the screen are buttons for 'GLUTEN FREE', 'CYCLE', 'TIME', 'LIGHT', 'LOAF', 'COLOR', 'MENU', and 'START/STOP'. A list of 12 programs is printed on the panel, ranging from 'BASIC' to 'HOME MADE'.
4.2 Basic Operation
- Add Ingredients: Place ingredients into the bread pan in the order specified by your recipe (typically liquids first, then dry ingredients, with yeast last). Ensure the kneading blades are in place.
- Select Program: Press the 'MENU' button repeatedly to cycle through the 12 available programs until your desired program is displayed on the LCD.
- Select Loaf Size: Press the 'LOAF' button to choose the desired loaf size (e.g., 1.5 lb, 2 lb, 3 lb).
- Select Crust Color: Press the 'COLOR' button to select your preferred crust color (Light, Medium, or Dark).
- Start Baking: Press the 'START/STOP' button to begin the baking cycle. The breadmaker will beep, and the timer will start counting down.
- End of Cycle: Once the program is complete, the breadmaker will beep and automatically switch to a 1-hour 'Keep Warm' cycle.
- Remove Bread: Press 'START/STOP' to end the 'Keep Warm' cycle. Using oven mitts, carefully remove the bread pan from the breadmaker. Invert the pan to release the bread onto a wire rack to cool. Remove kneading blades if they remain in the loaf.
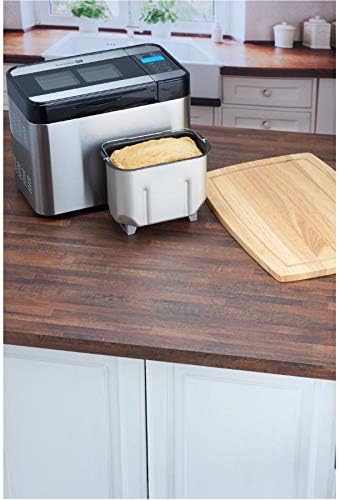
Image 4.2: The KURAIDORI BM1403 Breadmaker positioned on a wooden kitchen counter. Next to it, a freshly baked loaf of bread rests within its pan, ready for removal. A wooden cutting board is also visible, suggesting the next step of slicing the bread.
4.3 Program List (12 Digital Programs)
The KURAIDORI BM1403 offers 12 pre-set programs for various bread types and doughs:
- BASIC: For white and mixed breads, mainly using wheat flour.
- WHOLE WHEAT: For whole wheat bread, which requires a longer kneading and rising time.
- FRENCH: For light breads made from fine flour, requiring longer rising and baking times.
- QUICK: For quick preparation of bread without a long fermentation process.
- SWEET: For breads with high sugar, fats, and proteins.
- CAKE: For mixing and baking cakes and quick breads.
- JAM: For making jams and marmalades.
- DOUGH: For preparing doughs that will be baked in a conventional oven.
- GLUTEN FREE: For gluten-free recipes.
- BAKE: For additional baking of already prepared doughs or for browning.
- DESSERT: For various dessert recipes.
- HOME MADE: Allows for custom setting of kneading, rising, and baking times.
4.4 Delay Timer Function
The 13-hour programmable timer allows you to delay the start of the baking process. This is useful for having fresh bread ready at a specific time.
- Add ingredients to the bread pan.
- Select your desired program, loaf size, and crust color.
- Press the 'TIME' button to adjust the delay time. Each press increases the delay by 10 minutes. The displayed time includes the baking cycle duration.
- Press 'START/STOP'. The timer will count down, and the breadmaker will begin baking when the delay time expires.
5. Maintenance and Cleaning
Proper maintenance ensures the longevity and optimal performance of your breadmaker.
5.1 Cleaning the Bread Pan and Kneading Blades
- After removing the bread, fill the bread pan with warm water and a small amount of dish soap. Let it soak for 10-15 minutes to loosen any stuck-on dough or residue.
- Carefully remove the kneading blades. Clean them with a soft sponge or brush.
- Wash the bread pan with a soft sponge. Avoid abrasive cleaners or scouring pads that can damage the non-stick coating.
- Rinse thoroughly and dry completely before storing or next use. The bread pan and kneading blades are dishwasher-safe.
5.2 Cleaning the Main Unit
- Ensure the breadmaker is unplugged and completely cool.
- Wipe the exterior and interior cavity with a soft, damp cloth.
- Do not use harsh chemicals, abrasive cleaners, or immerse the main unit in water.
- Clean the viewing window on the lid with a soft, damp cloth.
6. Troubleshooting
If you encounter issues with your breadmaker, refer to the following common problems and solutions:
| Problem | Possible Cause | Solution |
|---|---|---|
| Bread does not rise | Expired yeast, incorrect water temperature, too much salt/sugar, incorrect flour type. | Check yeast expiry, use lukewarm water (105-115°F), ensure correct ingredient measurements, use appropriate flour. |
| Bread is too dense | Too much flour, not enough liquid, old yeast. | Measure ingredients accurately, ensure proper liquid-to-flour ratio, use fresh yeast. |
| Bread collapses in the middle | Too much liquid, too much yeast, high humidity. | Reduce liquid slightly, reduce yeast slightly, ensure proper ventilation. |
| Kneading blades stuck in bread | Common occurrence. | Allow bread to cool slightly, then use a non-metallic utensil to carefully remove the blades. |
| Machine makes clunking sounds | Possible issue with drive area or gears. | Ensure bread pan is securely seated. If issue persists, contact customer support. |
7. Specifications
Detailed technical specifications for the KURAIDORI BM1403 Breadmaker:
- Model Number: BM1403
- Brand: KURAIDORI
- Capacity: 3 lb loaf
- Power: 120V / 60Hz / 700 - 800 watts
- Dimensions (Product): 18 x 14.4 x 12.1 inches
- Item Weight: 19.32 pounds
- Kneading Blades: Double
- Exterior Material: Stainless Steel
- Control Panel: Touch control with LCD display
- Programs: 12 digital programs
- Crust Color Selection: Light, Medium, Dark
- Timer: 13-hour programmable delay timer
- Keep Warm Function: 1 hour automatic
- Product Care: Wipe with Damp Cloth (exterior), Dishwasher-safe (bread pan, kneading blades)
- UPC: 822733136838