
1. Introduction
The Blueendless HD05 is a dual-bay docking station designed for 2.5-inch and 3.5-inch SATA HDDs and SSDs. It provides a convenient solution for data transfer, backup, and cloning without the need for a computer connection. Featuring USB 3.0 connectivity, it offers high-speed data transfer rates and supports offline cloning functionality.
2. Package Contents
- Blueendless HD05 Dual Bay Docking Station
- USB 3.0 Data Cable
- Power Adapter (DC 12V/3A)
- User Manual (this document)
3. Product Overview
Familiarize yourself with the components of your HD05 docking station.
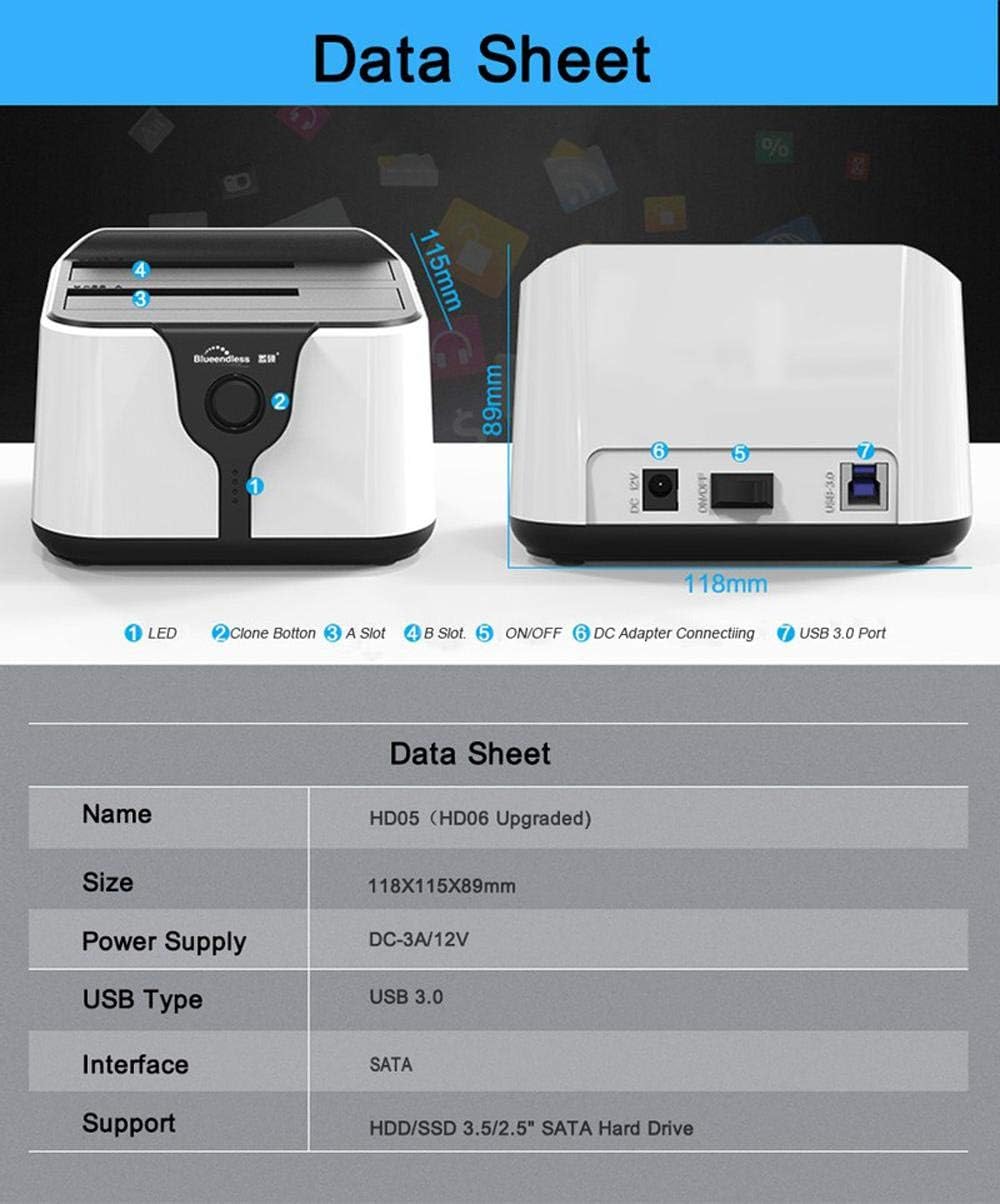
Image 3.1: Front and Rear View with Labeled Components and Dimensions.
- 1. LED Indicator: Shows power and activity status.
- 2. Clone Button: Initiates the offline cloning process.
- 3. A Slot: Bay for Source Drive (HDD/SSD).
- 4. B Slot: Bay for Target Drive (HDD/SSD).
- 5. ON/OFF Switch: Power control for the docking station.
- 6. DC Adapter Connecting Port: Connects to the power adapter.
- 7. USB 3.0 Port: Connects to your computer via USB 3.0 cable.

Image 3.2: Front view of the Blueendless HD05 Docking Station, showing the two drive bays and front panel controls.

Image 3.3: Rear view of the Blueendless HD05 Docking Station, highlighting the DC power input, ON/OFF switch, and USB 3.0 port for computer connection.
4. Setup Instructions
4.1. Installing Hard Drives/SSDs
- Ensure the docking station is powered off and disconnected from your computer.
- Gently insert your 2.5-inch or 3.5-inch SATA HDD/SSD into the desired bay (Slot A or Slot B) until it is firmly seated. Ensure the SATA connector aligns correctly.

Image 4.1: The docking station supports 2.5-inch and 3.5-inch SATA HDDs and 2.5-inch SATA SSDs. It is compatible only with SATA interfaces, not IDE.
Note: This docking station supports SATA drives only. IDE drives are not compatible.
4.2. Connecting to Power and Computer
- Connect the provided power adapter to the DC Adapter Connecting Port (6) on the docking station and then plug it into a power outlet.
- Connect one end of the USB 3.0 data cable to the USB 3.0 Port (7) on the docking station and the other end to an available USB 3.0 port on your computer.
- Flip the ON/OFF Switch (5) to the "ON" position. The LED indicator (1) will illuminate.
5. Operating Instructions
5.1. Data Transfer (Connected to Computer)
Once connected to your computer and powered on, the installed drives will appear as removable storage devices. You can drag and drop files, copy, paste, and manage data as you would with any other external drive.

Image 5.1: The HD05 utilizes USB 3.0 for high-speed data transfer, significantly faster than USB 2.0. It supports SATA III with speeds up to 6Gbps and UASP for optimized performance.
Note: For optimal performance, connect the docking station to a USB 3.0 port on your computer. USB 2.0 ports are compatible but will operate at slower speeds.
5.2. Offline Cloning Function
The HD05 docking station allows you to clone a source drive to a target drive without connecting to a computer. This is ideal for creating exact duplicates of hard drives or SSDs.
Important: All data on the target drive (Slot B) will be erased during the cloning process. Ensure you have backed up any important data from the target drive before proceeding.
- Ensure the docking station is powered off and disconnected from your computer.
- Insert the Source Drive (the drive you want to copy FROM) into Slot A.
- Insert the Target Drive (the drive you want to copy TO) into Slot B. The target drive must be equal to or larger in capacity than the source drive.
- Connect the power adapter and turn on the docking station using the ON/OFF switch. Do not connect the USB cable to the computer.
- Press and hold the Clone Button (2) for approximately 3-5 seconds until the LED indicators begin to flash. This indicates the cloning process has started.
- The LED indicators will show the progress of the cloning process (e.g., 25%, 50%, 75%, 100%).
- Once all LEDs are solid, the cloning process is complete. Turn off the docking station and safely remove the drives.
6. Maintenance
- Keep the docking station clean and free from dust. Use a soft, dry cloth for cleaning.
- Avoid exposing the device to extreme temperatures, humidity, or direct sunlight.
- Do not attempt to disassemble or repair the device yourself. This will void the warranty.
- Always power off the docking station before inserting or removing drives, or disconnecting cables.
7. Troubleshooting
- Drives not detected by computer:
- Ensure the docking station is powered on and the USB cable is securely connected to both the docking station and the computer.
- Try connecting to a different USB port on your computer.
- Verify that the hard drive/SSD is properly seated in the bay.
- Check Disk Management (Windows) or Disk Utility (macOS) to see if the drive is recognized but uninitialized or unformatted.
- Ensure the drive itself is functional by testing it in another enclosure or directly connecting it to a computer if possible.
- Offline cloning fails or does not start:
- Ensure the docking station is disconnected from the computer's USB port during cloning.
- Verify that the target drive's capacity is equal to or larger than the source drive's capacity.
- Ensure both drives are properly inserted and detected by the docking station (LEDs should indicate activity).
- Press and hold the clone button for the specified duration (3-5 seconds).
- Slow transfer speeds:
- Ensure the docking station is connected to a USB 3.0 port on your computer.
- Verify that your computer's USB 3.0 drivers are up to date.
- The actual transfer speed depends on the speed of the installed HDD/SSD.
8. Specifications
| Model | HD05 |
| Brand | Blueendless |
| Interface | USB 3.0 (Host), SATA (Drive) |
| Drive Compatibility | 2.5" / 3.5" SATA HDD/SSD |
| Number of Bays | 2 |
| Max Capacity | Up to 6TB per bay |
| Data Transfer Speed | Up to 5Gbps (USB 3.0), Up to 6Gbps (SATA III) |
| Power Supply | DC 12V/3A |
| Dimensions (L x W x H) | 118mm x 115mm x 89mm |
| Weight | 560 g |
| Compatible Operating Systems | Windows, macOS, Linux (Standard USB storage device support) |
9. Warranty and Support
Blueendless products are designed for reliability and performance. For warranty information and technical support, please refer to the warranty card included with your product or visit the official Blueendless website. Please retain your proof of purchase for warranty claims.
For further assistance, you may contact Blueendless customer support through their official channels.


