1. Introduction
Thank you for choosing the GYMAX Under Desk Treadmill. This manual provides essential information for the safe and efficient use of your new fitness equipment. Please read all instructions carefully before assembly and operation to ensure proper function and to prevent injury.
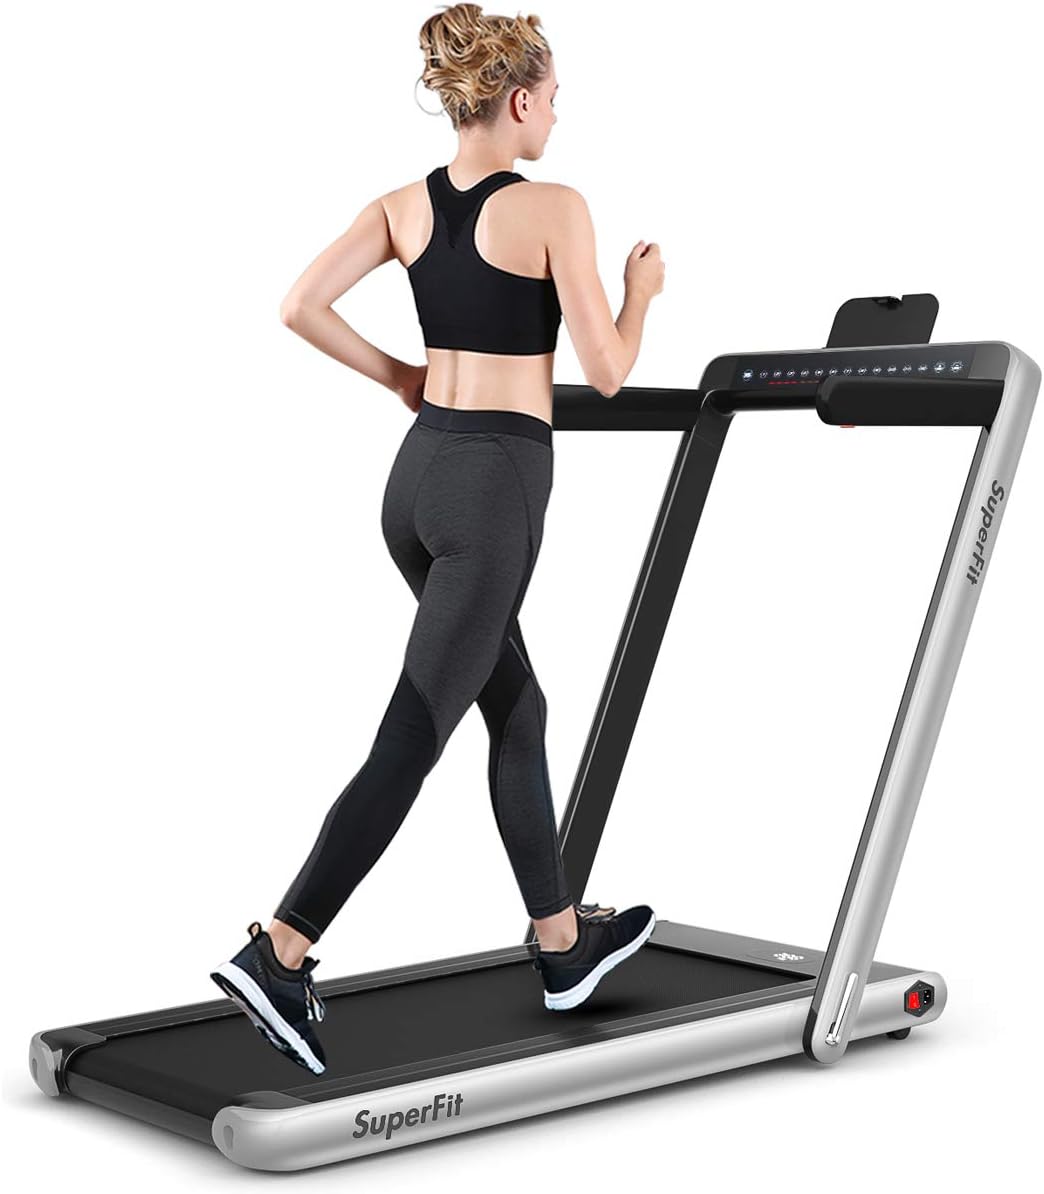
Image 1.1: GYMAX Under Desk Treadmill in running mode.
2. Important Safety Information
To reduce the risk of serious injury, read the following safety instructions before using the treadmill:
- Always attach the safety key clip to your clothing before starting the treadmill. The safety key is designed to stop the machine immediately in an emergency.
- Keep children and pets away from the treadmill during operation.
- Ensure the treadmill is placed on a flat, stable surface with adequate clearance around it.
- Do not exceed the maximum weight capacity of 265 pounds (120 kg).
- Wear appropriate athletic footwear and clothing.
- If you experience dizziness, nausea, chest pain, or any other abnormal symptoms, stop your workout immediately and consult a physician.
- Unplug the treadmill from the power outlet when not in use or before cleaning and maintenance.

Image 2.1: The safety key is crucial for emergency stops.
3. Package Contents
Verify that all components are present before beginning assembly:
- GYMAX Under Desk Treadmill Unit
- Remote Control
- Safety Key
- Phone Holder
- Power Cord
- Instruction Manual (this document)
4. Setup and Assembly
The GYMAX Under Desk Treadmill features an installation-free design for quick setup. Follow these steps:
- Unpacking: Carefully remove the treadmill from its packaging. Place it on a flat, stable surface.
- Unfolding the Riser (for Running Mode): If you intend to use the treadmill in running mode, gently lift the riser (handlebar assembly) until it locks into an upright position. Ensure it is securely locked.
- Installing Armrests (Optional): If desired, attach the armrests to the riser using the provided hardware. Refer to the included diagram for proper attachment points.
- Power Connection: Plug the power cord into the treadmill's power input, then into a grounded electrical outlet.
- Placement: Position the treadmill in your desired location. The integrated transport wheels allow for easy movement.

Image 4.1: Treadmill in its upright, running configuration.

Image 4.2: Transport wheels for easy relocation.
5. Operating Instructions
Your treadmill offers two primary modes of operation: Walking Mode and Running Mode.
5.1 Powering On/Off
- To power on, press the main power switch located near the front of the treadmill. The display will illuminate.
- To power off, press the main power switch again.
5.2 Walking Mode (Riser Folded)
In this mode, the riser is folded down, allowing the treadmill to be used under a desk. The maximum speed in walking mode is 2.5 MPH (4 km/h).
- Ensure the riser is fully folded down.
- Attach the safety key to your clothing and insert it into the designated slot.
- Use the remote control to start and adjust the speed.
5.3 Running Mode (Riser Up)
For higher intensity workouts, raise the riser to its upright, locked position. The maximum speed in running mode is 7.5 MPH (12 km/h).
- Ensure the riser is securely locked in the upright position.
- Attach the safety key to your clothing and insert it into the designated slot.
- Use the control panel on the armrest or the remote control to start and adjust the speed.

Image 5.1: Illustration of Running Mode (left) and Walking Mode (right).
5.4 Control Panel and Remote Control
- Dual Display: The treadmill features an LED display on the base and a touch screen on the armrest (when raised) to show time, speed, distance, and calories.
- Remote Control: Use the remote to start, stop, and adjust speed. Keep it accessible during your workout.

Image 5.2: Treadmill remote control.
5.5 Bluetooth Speaker and Phone Holder
- Bluetooth Speaker: Connect your device via Bluetooth to the treadmill's integrated speaker to play audio during your workout.
- Phone Holder: Place your smartphone or tablet in the designated holder on the armrest for entertainment or to monitor your workout.

Image 5.3: Phone holder on the treadmill.
5.6 App Control
The treadmill supports app control for an enhanced user experience. Download the GYMAX app from your device's app store.
- Download and install the "GYMAX" app.
- Open the app and follow the on-screen instructions to connect to your treadmill via Bluetooth.
- The app allows you to track exercise data, participate in training courses, and manage settings.

Image 5.4: GYMAX App interface for treadmill control and tracking.
6. Maintenance
Regular maintenance ensures the longevity and optimal performance of your treadmill.
6.1 Lubrication
The running belt requires periodic lubrication to reduce friction and wear. Use silicone oil specifically designed for treadmills.
- Turn off and unplug the treadmill.
- Carefully lift one side of the running belt.
- Apply a small amount of silicone oil evenly along the center of the deck, underneath the belt.
- Repeat on the other side.
- Plug in the treadmill and run it at a low speed (e.g., 1-2 MPH) for a few minutes to distribute the lubricant.

Image 6.1: Lubrication points for the running belt.
6.2 Cleaning
- Wipe down the treadmill surfaces with a damp cloth after each use. Avoid abrasive cleaners.
- Periodically vacuum underneath the motor cover to remove dust and debris. (Note: This may require partial disassembly; consult a qualified technician if unsure).
6.3 Belt Adjustment
If the running belt feels loose, slips, or drifts to one side, it may need adjustment. Refer to the detailed instructions in the full product manual or contact customer support for guidance.
7. Troubleshooting
This section addresses common issues you might encounter with your treadmill.
| Problem | Possible Cause | Solution |
|---|---|---|
| Treadmill does not power on | Power cord not connected; Power switch off; Outlet issue | Ensure power cord is securely plugged in; Turn on power switch; Test outlet with another device. |
| Running belt pauses or slips | Belt too loose; Insufficient lubrication; User weight exceeds capacity | Adjust belt tension (refer to full manual); Lubricate the belt; Ensure user is within weight limit. |
| Unusual noises (squeaking, rattling) | Lack of lubrication; Loose components; Debris under motor cover | Lubricate the belt; Check for and tighten any loose screws; Clean under motor cover (if comfortable, otherwise contact support). |
| Remote control not working | Dead battery; Remote not paired | Replace remote control battery; Refer to full manual for pairing instructions. |
| Error Code E01 | Communication error, often related to motor sensor | Turn off and unplug the treadmill for 5 minutes, then restart. If the error persists, contact customer support. |
8. Specifications
| Feature | Detail |
|---|---|
| Product Dimensions (L x W x H) | 132.08 x 68.58 x 106.68 cm (52 x 27 x 42 inches) |
| Folded Dimensions (L x W x H) | 132.08 x 68.58 x 12.7 cm (52 x 27 x 5 inches) |
| Item Weight | 33.6 kg (74 lbs) |
| Maximum Weight Capacity | 265 Pounds (120 kg) |
| Motor Horsepower | 2.25 HP |
| Speed Range (Walking Mode) | 0.6 - 2.5 MPH (1 - 4 km/h) |
| Speed Range (Running Mode) | 0.6 - 7.5 MPH (1 - 12 km/h) |
| Running Area | 40 x 16 inches |
| Material | Alloy Steel Frame, ABS |
| Display Type | LED, Touch Screen (on armrest) |
| Special Features | Compact Design, Foldable, Bluetooth Speaker, App Control |

Image 8.1: Treadmill dimensions in various configurations.
9. Warranty and Customer Support
For warranty information, technical assistance, or to report any issues with your GYMAX Under Desk Treadmill, please contact GYMAX customer support through the retailer where the product was purchased or visit the official GYMAX website. Please have your model number (B08423CNCR) and purchase date available when contacting support.


