
1. Introduction
This document serves as an instruction manual for the Hydra Fitness Exchange Latch Housing Insert Knob, part number 222260. This component is designed as a replacement part for specific treadmill models, primarily from NordicTrack. It is essential to ensure compatibility before attempting installation.
2. Product Overview
The Latch Housing Insert Knob (Part # 222260) is a critical component used in the folding mechanism or frame adjustment of compatible treadmills. Its primary function is to secure or release parts of the treadmill frame, allowing for storage or adjustment. This part is manufactured by ICON Health & Fitness.

Figure 1: The Hydra Fitness Exchange Latch Housing Insert Knob 222260. This image shows the circular, black plastic knob with a central opening and two smaller holes for alignment or attachment.
3. Compatibility
This Latch Housing Insert Knob (Part # 222260) is compatible with the following NordicTrack treadmill models. Please verify your treadmill's model name and number against this list to ensure proper fitment.
- NordicTrack A2050: 831.295070, NTL10851
- NordicTrack A2250: 831.246770, 831.246771, 831.246772, NTL778060, NTL778061, NTL778062
- NordicTrack APEX 6000: NTL210050, NTL210051
- NordicTrack APEX 8000: NTL270050
- NordicTrack C2100: 831.295770, 831.295771, NTL10750, NTL10751
- NordicTrack C2150: 831.296070, 831.296071, 831.296072, 831.296073, 831.296074, NTL108050, NTL108051, NTL108052, NTL108053, NTL108054
- NordicTrack C2200: 831.293090, 831.296270, 831.296271, 831.296272, 831.296273, 831.306000, NTL109050, NTL109051, NTL109052, NTL109053
- NordicTrack C2255: 831.246670, 831.246671, 831.246672, 831.246673, 831.246674, 831.246675, 831.307020, NTL078060, NTL078061, NTL078062, NTL078063, NTL078064, NTL078065
- NordicTrack C2300: 831.294990, 831.296090, 831.296091, 831.296092, 831.296093, 831.296094, 831.296095, 831.306010, NTL129050, NTL129051, NTL129052, NTL129053, NTL129054, NTL129055
- NordicTrack Viewpoint 2800: 831.306020
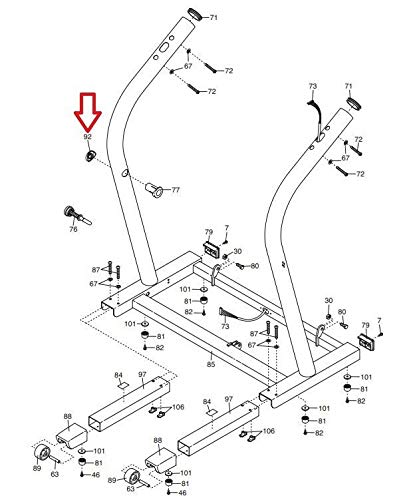
Figure 2: An exploded diagram of a treadmill frame, highlighting part number 92 with a red arrow. This indicates the typical location of the Latch Housing Insert Knob within the treadmill's structure.
4. Installation and Setup
Replacing treadmill parts requires careful attention to detail. If you are uncomfortable with diagnosing or replacing parts, it is recommended to consult a qualified fitness technician.
General Installation Steps:
- Safety First: Always unplug the treadmill from the power source before beginning any maintenance or installation.
- Identify the Part: Locate the existing latch housing insert knob on your treadmill. Refer to your treadmill's specific user manual or exploded diagrams for precise location (similar to Figure 2).
- Removal: Carefully remove the old or damaged knob. This may involve unscrewing, prying, or releasing a spring mechanism, depending on your treadmill model.
- Installation of New Knob: Align the new Latch Housing Insert Knob (Part # 222260) with the corresponding slot or mechanism. Ensure it fits securely and operates smoothly.
- Test Functionality: Once installed, manually test the folding or adjustment mechanism to ensure the knob properly engages and disengages.
- Power On: Plug the treadmill back into the power source and perform a final functional check.
5. Maintenance
The Latch Housing Insert Knob generally requires minimal maintenance. However, regular inspection can prolong its lifespan and ensure safe operation of your treadmill.
- Visual Inspection: Periodically check the knob for any signs of wear, cracks, or damage.
- Cleanliness: Keep the area around the knob free from dust and debris, which could impede its function.
- Lubrication (if applicable): If the mechanism associated with the knob feels stiff, consult your treadmill's main manual for recommendations on lubrication. Do not apply lubricants directly to the knob unless specified.
6. Troubleshooting
If you encounter issues with the Latch Housing Insert Knob or the treadmill's folding mechanism after installation, consider the following:
- Knob Does Not Engage/Disengage: Ensure the knob is correctly aligned and fully inserted. Check for any obstructions in the housing.
- Loose Fit: If the knob feels loose, re-check the installation steps. Ensure all associated fasteners (if any) are tightened appropriately.
- Damage: If the knob itself is damaged, it may need replacement.
- Professional Assistance: For complex issues or if you are unsure about the problem, it is best to contact a qualified fitness technician.
7. Specifications
| Attribute | Detail |
|---|---|
| Part Number | 222260 |
| Product Dimensions | 6 x 8 x 1 inches |
| Item Weight | 1 Pound |
| Brand | Icon Health & Fitness, Inc. |
| Manufacturer | ICON Health & Fitness |
| UPC | 826770947419 |
8. Warranty and Support
For specific warranty information regarding this replacement part, please refer to the original purchase documentation or contact the seller, Hydra Fitness Exchange. If you require assistance with diagnosis or installation and are uncomfortable performing the work yourself, Hydra Fitness Exchange can recommend a fitness technician in your area based on your zip code.
For further inquiries, please contact your point of purchase or the manufacturer, ICON Health & Fitness.