
Introduction
Thank you for choosing the Sanford Meat Grinder SF5851MG. This appliance is designed for efficient and convenient meat grinding in your home kitchen. To ensure safe operation and optimal performance, please read this instruction manual thoroughly before first use and retain it for future reference.
Important Safety Instructions
- Always ensure the appliance is unplugged from the power outlet before assembling, disassembling, or cleaning.
- Keep hands and utensils away from moving parts during operation to prevent injury. Use the food pusher provided.
- Do not operate the meat grinder continuously for more than 10 minutes. Allow it to cool down for at least 30 minutes before resuming use.
- This appliance is for household use only. Do not use it outdoors or for commercial purposes.
- Do not immerse the motor unit in water or any other liquid. Clean with a damp cloth.
- Ensure the power cord is not damaged. If the cord or plug is damaged, do not use the appliance and contact qualified service personnel.
- Keep the appliance out of reach of children. Close supervision is necessary when any appliance is used by or near children.
- Do not process bones, nuts, or other hard foods, as this may damage the appliance.
- Always place the appliance on a stable, flat, and dry surface during operation.
Product Components
Familiarize yourself with the parts of your Sanford Meat Grinder SF5851MG:
- Motor Unit (Main Body)
- Food Tray
- Food Pusher
- Grinding Head (Housing)
- Feeding Screw (Auger)
- Cutting Blade (2 blades included)
- Grinding Plates (Fine, Medium, Coarse)
- Fixing Ring
- On/Off/Reverse Switch
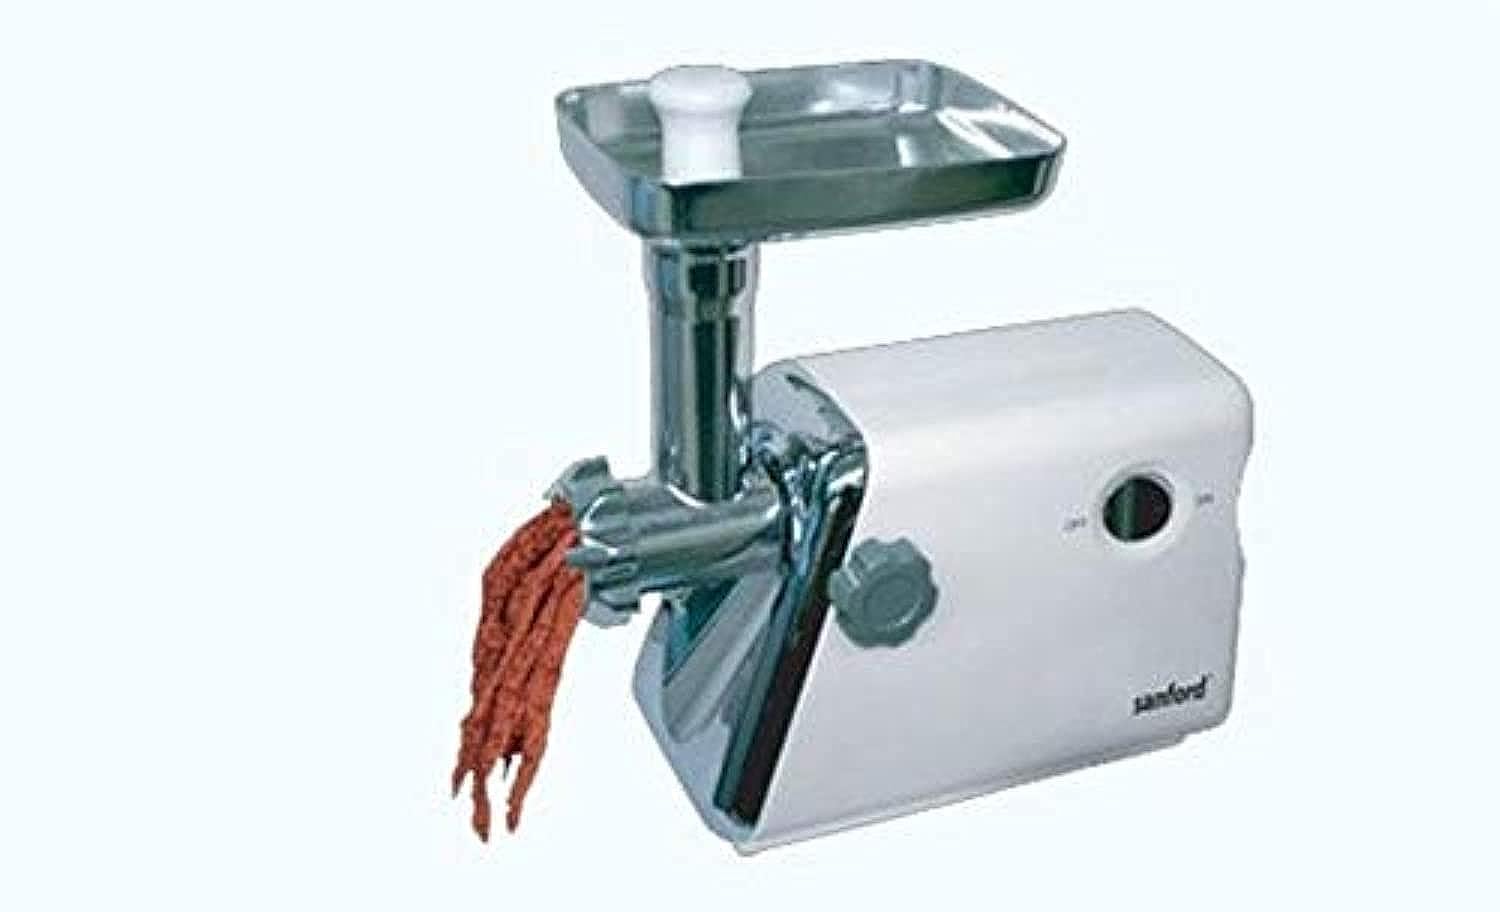
Image: The Sanford Meat Grinder SF5851MG showing the main motor unit, grinding head, food tray, and food pusher. This illustration helps identify the various parts of the appliance for assembly and operation.
Setup and Assembly
- Unpack: Carefully remove all components from the packaging. Check for any damage.
- Clean: Before first use, wash all parts that will come into contact with food (food tray, grinding head, feeding screw, cutting blade, grinding plates, food pusher) in warm, soapy water. Rinse thoroughly and dry immediately.
- Assemble Grinding Head:
- Insert the feeding screw into the grinding head.
- Place the cutting blade onto the shaft of the feeding screw, ensuring the sharp edges face outwards towards the grinding plate. (Note: Two cutting blades are included; use one at a time).
- Select the desired grinding plate (fine, medium, or coarse) and place it over the cutting blade, aligning the notch with the pin on the grinding head.
- Screw the fixing ring onto the grinding head until it is hand-tight. Do not overtighten.
- Attach Grinding Head to Motor Unit: Insert the assembled grinding head into the motor unit's opening, ensuring it is securely locked in place. Some models may require a twist or click mechanism.
- Place Food Tray: Position the food tray on top of the grinding head.
- Position Appliance: Place the assembled meat grinder on a stable, flat, and dry surface. Ensure there is adequate ventilation around the unit.
Operating Instructions
- Prepare Meat: Cut meat into small pieces (approximately 2-3 cm cubes) that will easily fit into the feeding tube. Remove any bones, gristle, or tough tendons.
- Plug In: Ensure the appliance is correctly assembled and then plug it into a suitable power outlet.
- Start Grinding: Turn the On/Off switch to the "On" position.
- Feed Meat: Place the prepared meat into the food tray. Use the food pusher to gently guide the meat down the feeding tube. Never use your fingers or other utensils to push meat into the grinder.
- Reverse Function: If the grinder becomes jammed, turn the switch to the "Reverse" position. This will rotate the feeding screw in the opposite direction to clear blockages. Once cleared, switch back to "Off" and then "On" to resume grinding.
- Continuous Use: Do not operate the grinder for more than 10 minutes continuously. Allow a 30-minute rest period between uses to prevent overheating.
- Finish: Once grinding is complete, turn the switch to the "Off" position and unplug the appliance from the power outlet.
Cleaning and Maintenance
Regular cleaning ensures the longevity and hygienic operation of your meat grinder.
- Unplug: Always unplug the appliance before cleaning.
- Disassemble: Disassemble the grinding head components (fixing ring, grinding plate, cutting blade, feeding screw, grinding head, food tray).
- Wash Parts: Wash all removable parts in warm, soapy water. Use a brush to remove any meat residue. Rinse thoroughly.
- Dry Immediately: It is crucial to dry all metal parts immediately after washing to prevent rust, especially the stainless steel components. A thin layer of cooking oil can be applied to the grinding plates and cutting blade before storage for added protection.
- Clean Motor Unit: Wipe the motor unit with a damp cloth. Never immerse the motor unit in water.
- Storage: Store the clean and dry appliance in a cool, dry place, out of reach of children.
Troubleshooting
| Problem | Possible Cause | Solution |
|---|---|---|
| Grinder does not start. | Not plugged in; power switch off; power outage. | Check power connection; turn switch to "On"; check household power. |
| Meat is not grinding or grinding slowly. | Meat pieces too large; gristle/bones blocking; grinding plate clogged; incorrect assembly. | Cut meat smaller; use reverse function to clear blockage; clean grinding plate; reassemble correctly. |
| Unusual noise or vibration. | Loose parts; foreign object inside; motor overload. | Turn off and unplug, check assembly; use reverse function; allow motor to cool. If problem persists, contact support. |
| Rust spots on metal parts. | Parts not dried immediately after washing. | Ensure all metal parts are thoroughly dried after washing. Apply a thin layer of cooking oil for protection. |
Product Specifications
- Brand: Sanford
- Model Number: SF5851MG
- Power Consumption: 2000 Watts
- Material: Stainless Steel
- Item Weight: Approximately 2 Kilograms (4.41 Pounds)
- Shipping Dimensions: 20 x 15 x 15 cm
- Reverse Function: Yes
- Number of Cutting Blades: 2
- Sausage Setting Available: No
- Recommended Use: Grinding
- Style: Modern
- First Available Date: January 15, 2020
Warranty and Support
Specific warranty details for the Sanford Meat Grinder SF5851MG are not provided in this manual. Please refer to the warranty card included with your product packaging or contact Sanford customer service for information regarding warranty coverage and support.
For technical assistance, spare parts, or service inquiries, please contact the manufacturer or your local authorized service center. Keep your purchase receipt as proof of purchase for warranty claims.