
1. Important Safety Instructions
Please read all instructions carefully before using the appliance. Keep this manual for future reference. Failure to follow these instructions may result in electric shock, fire, or serious injury.
- Ensure the washing machine is installed on a firm, level surface to prevent vibration and noise.
- Do not install the machine in areas exposed to direct sunlight, rain, or excessive moisture.
- Connect the machine to a properly grounded electrical outlet. Do not use extension cords or adapters.
- Keep children and pets away from the machine during operation.
- Do not wash items that are soiled with flammable substances such as gasoline, kerosene, or paint.
- Always unplug the machine before cleaning, maintenance, or if it will not be used for an extended period.
- Do not open the spin tub lid until the spin cycle has completely stopped.
- If the power cord is damaged, it must be replaced by the manufacturer, its service agent, or similarly qualified persons to avoid a hazard.
2. Product Overview
The Haier HTW70-178 is a 7 kg semi-automatic top-loading washing machine designed for efficient and convenient laundry care. It features a twin-tub design with separate wash and spin compartments.

Figure 2.1: Overall view of the Haier HTW70-178 Semi-Automatic Washing Machine. This image shows the compact design with two top-loading compartments.
Key Components:
- Wash Tub: For washing and rinsing clothes. Equipped with a Vortex Pulsator for effective cleaning.
- Spin Tub: For drying clothes by spinning.
- Control Panel: Features push buttons and rotary knobs for wash programs, wash timer, and spin timer.
- Transparent Toughened Lids: Durable lids with Softfall Technology to prevent sudden drops.
- Water Inlet: Connection point for the water supply hose.
- Drain Hose: For discharging wastewater.
- Anti Rat Mesh: Protects the machine from rodents.

Figure 2.2: View of the washing machine with both transparent lids open, revealing the wash tub on the left and the spin tub on the right.
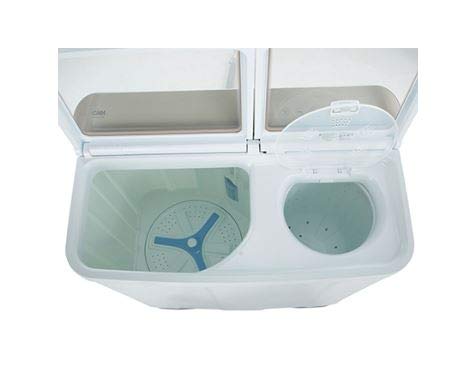
Figure 2.3: Detailed view inside the wash tub, showing the Vortex Pulsator at the bottom, and the perforated spin tub.

Figure 2.4: Close-up of the control panel, displaying the various knobs for wash program selection, wash timer, and spin timer.
3. Setup and Installation
3.1 Unpacking
Carefully remove the washing machine from its packaging. Check for any damage during transit. Ensure all included components are present: user's manual, water inlet hose components, tapping screw, and warranty card.
3.2 Placement
- Place the machine on a flat, stable, and non-slippery surface. Adjust the leveling feet if necessary to ensure stability.
- Allow adequate space around the machine for ventilation and ease of use. Avoid placing it too close to walls or furniture.
- Do not install in areas where the temperature may drop below freezing, as residual water can freeze and damage components.
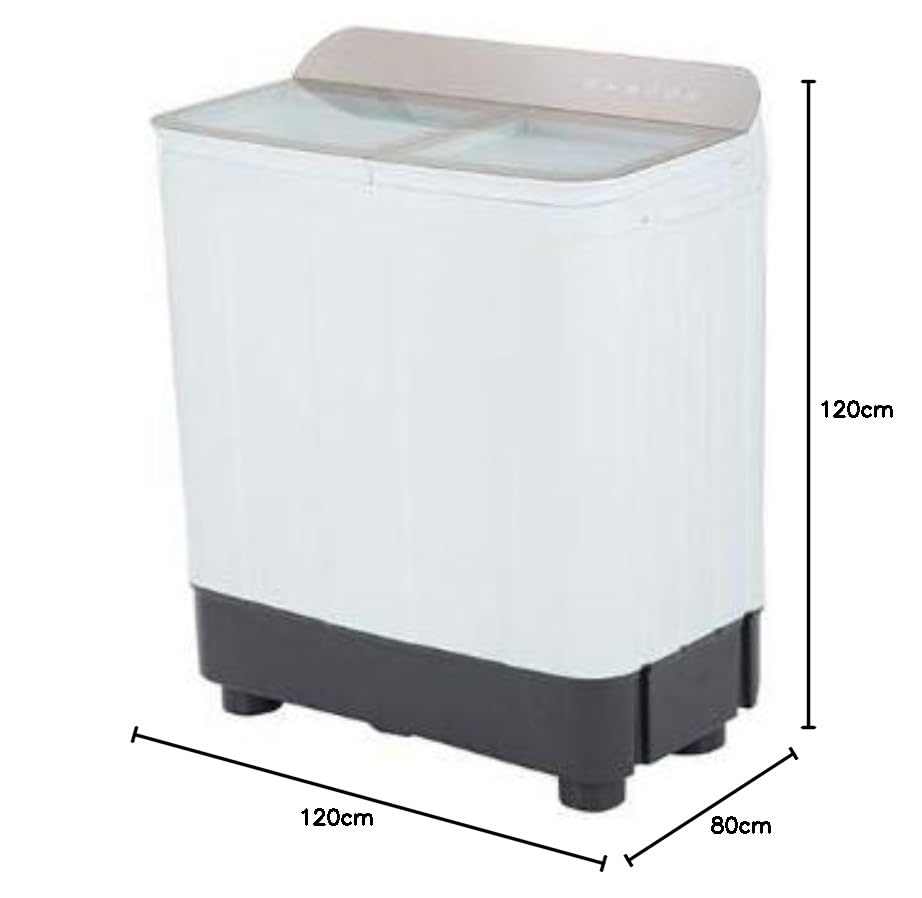
Figure 3.1: Product dimensions of the Haier HTW70-178. The machine measures approximately 45 cm (depth) x 80 cm (width) x 93 cm (height).
3.3 Water Connection
- Connect the water inlet hose to a cold water tap. Ensure the connection is secure to prevent leaks.
- Place the other end of the water inlet hose into the water inlet opening on the washing machine.
- Turn on the water supply and check for any leaks.
3.4 Drainage
Position the drain hose to ensure proper water discharge. The drain hose should be placed in a sink or a standpipe, ensuring it is not kinked or blocked. The height of the drain hose should be between 80-100 cm from the floor.
3.5 Power Connection
Plug the power cord into a dedicated, grounded 230V, 50Hz electrical outlet. Do not share the outlet with other high-power appliances.
4. Operating Instructions
Follow these steps for effective washing and spinning of your laundry.
4.1 Washing Clothes
- Load Laundry: Open the wash tub lid and place sorted clothes loosely into the wash tub. Do not overload the machine (maximum 7 kg).
- Add Water: Fill the wash tub with water to the desired level, considering the amount of laundry.
- Add Detergent: Add the appropriate amount of detergent directly into the wash tub.
- Select Wash Program: Turn the 'Wash Program' knob to select one of the 2 available wash programs (e.g., Gentle, Normal).
- Set Wash Timer: Turn the 'Wash Timer' knob to set the desired washing time (e.g., 0-15 minutes). The machine will start washing.
- Drain Water: Once the wash cycle is complete, turn the 'Drain' knob to drain the water from the wash tub.
4.2 Rinsing Clothes
- After draining the wash water, refill the wash tub with clean water.
- You may add fabric softener at this stage if desired.
- Set the 'Wash Timer' for a short period (e.g., 3-5 minutes) to rinse the clothes.
- Drain the rinse water. Repeat rinsing if necessary.
4.3 Spinning Clothes
- Carefully transfer the rinsed clothes from the wash tub to the spin tub. Distribute them evenly to prevent imbalance.
- Close the spin tub lid securely.
- Turn the 'Spin Timer' knob to set the desired spinning time (e.g., 0-5 minutes). The spin cycle will begin.
- Wait for the spin tub to come to a complete stop before opening the lid and removing the clothes.
5. Maintenance and Cleaning
Regular maintenance ensures the longevity and optimal performance of your washing machine.
5.1 Cleaning the Exterior
Wipe the exterior of the machine with a soft, damp cloth. Do not use abrasive cleaners, solvents, or harsh chemicals, as these can damage the surface.
5.2 Cleaning the Lint Filter
The lint filter collects lint and debris during washing. It should be cleaned regularly (after every 2-3 washes) to maintain washing efficiency.
- Locate the lint filter inside the wash tub (usually on the side wall).
- Remove the filter by pulling it upwards or unlatching it.
- Clean the collected lint and debris under running water.
- Reinsert the lint filter securely into its position.
5.3 Cleaning the Drain Filter (if applicable)
Some models may have a drain filter to prevent foreign objects from entering the drain pump. Refer to your specific model's design for its location and cleaning instructions.
5.4 Winterization (for cold climates)
If the machine is to be left in an unheated area during winter, drain all water from the machine to prevent damage from freezing. Disconnect water hoses and run a short spin cycle to remove residual water.
6. Troubleshooting
Before contacting customer service, please refer to the following table for common issues and their solutions.
| Problem | Possible Cause | Solution |
|---|---|---|
| Machine does not start | Power cord not plugged in; Power outage; Lid not closed properly; Timer not set. | Ensure power cord is securely plugged in; Check household fuse/circuit breaker; Close lids firmly; Set the wash/spin timer. |
| Water does not fill | Water tap is off; Water inlet hose is kinked or blocked. | Turn on the water tap; Straighten the water inlet hose; Check for blockages. |
| Water does not drain | Drain hose is kinked or blocked; Drain hose is too high. | Straighten the drain hose; Clear any blockages; Ensure drain hose is at the correct height. |
| Excessive vibration/noise during spin | Machine is not level; Laundry is unevenly distributed in spin tub. | Adjust leveling feet to ensure stability; Redistribute clothes evenly in the spin tub. |
| Poor washing performance | Overloading; Insufficient detergent; Lint filter clogged. | Reduce laundry load; Use appropriate amount of detergent; Clean the lint filter. |
7. Specifications
Technical details for the Haier HTW70-178 Semi-Automatic Washing Machine.
| Feature | Detail |
|---|---|
| Brand | Haier |
| Model | HTW70-178 |
| Type | Semi-Automatic Top Loading |
| Capacity | 7 Kilograms |
| Wash Programs | 2 Standard Cycles |
| Maximum Rotational Speed | 1300 RPM |
| Wattage | 380 Watts |
| Special Features | Anti Rat Mesh, Waterfall Technology, Transparent Toughened Lid, Softfall Technology, Vortex Pulsator |
| Control Console | Push Button / Rotary Knobs |
| Item Weight | 30 kg |
| Product Dimensions (LxWxH) | 45 x 80 x 93 Centimeters (approximate) |
| Included Components | User's manual, Components of the water Inlet hose, Tapping Screw, Warranty Card |
8. Warranty and Support
8.1 Warranty Information
This Haier HTW70-178 washing machine comes with a comprehensive warranty:
- 2 years on the product from the date of purchase.
- 5 years on the motor from the date of purchase.
Please retain your purchase receipt and the warranty card provided with the product for any warranty claims. The warranty covers manufacturing defects under normal use conditions.
8.2 Customer Support
For any service, repair, or technical assistance, please contact Haier customer service. Refer to the contact details provided in your warranty card or visit the official Haier website for the most up-to-date support information.
When contacting support, please have your model number (HTW70-178) and purchase details ready.


