
1. Introduction
The Fat Shark Dominator HDO2 FPV Goggles (FSV1123) are designed for immersive First Person View (FPV) experiences, particularly in drone racing and aerial photography. These goggles feature 1280x960 OLED displays, offering a clear and vibrant image. This manual provides essential information for the proper setup, operation, maintenance, and troubleshooting of your HDO2 goggles.

Front view of the Fat Shark Dominator HDO2 FPV Goggles.
2. Package Contents
Verify that all items are present in your package:
- Fat Shark Dominator HDO2 FPV Goggles
- 18650 Headset Battery Case (batteries not included)
- Carrying Case
- Head Strap
- Power Cable
- Lens Cleaning Cloth
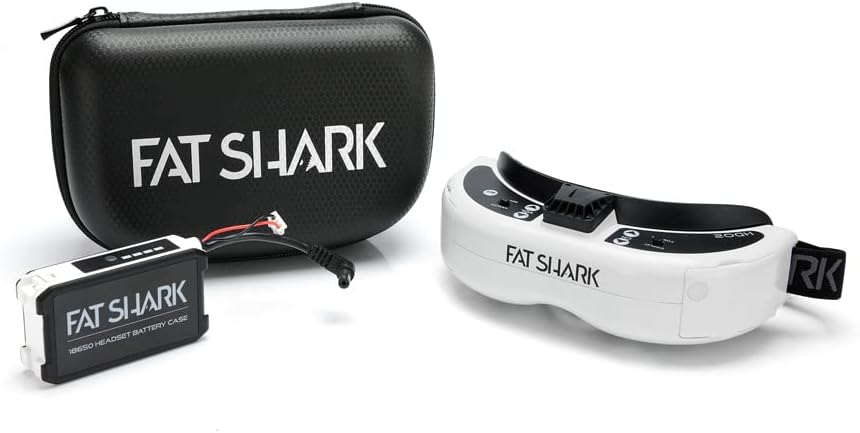
Included components: Goggles, battery case, and carrying case.
3. Components and Controls
Familiarize yourself with the various components and controls of your HDO2 goggles.

Figure 3.1: Top View Controls
This diagram illustrates the controls located on the top surface of the goggles, including the Head Tracking (HT) button, Digital Video Recorder (DVR) 5-way switch, volume controls, and display/channel selection 5-way switch.

Figure 3.2: Bottom, Side, and Internal Components
This diagram highlights the Inter-Pupillary Distance (IPD) and focus adjusters, power and fan controls, receiver switch, audio and video ports, expansion bays, and the SD card slot for DVR functionality.
- IPD Adjusters: Adjust the distance between the two display lenses to match your eye spacing.
- Focus Adjustment: Fine-tune the focus for each eye individually.
- Power/Fan Button: Powers the goggles on/off and controls the integrated fan.
- DVR 5-way Switch: Controls Digital Video Recorder functions (record, playback).
- Display 5-way Switch: Navigates display settings and menu options.
- Channel Selection: Changes video channels when a receiver module is installed.
- Volume Level: Adjusts audio output volume.
- Mini HDMI Port: For connecting external video sources.
- Power Port (7-13V): Connects to the battery or external power source.
- AV Input/Output: For analog video and audio signals.
- VRx Modular Bay: Slot for installing compatible Fat Shark receiver modules (module not included).
- SD Card Slot: For DVR recording storage.
4. Setup
4.1 Battery Connection
- Insert two 18650 Li-ion batteries (not included) into the provided 18650 Headset Battery Case, ensuring correct polarity.
- Connect the battery case cable to the Power Port (7-13V) on the goggles.
4.2 Receiver Module Installation (Optional)
The HDO2 goggles feature a modular bay for compatible Fat Shark receiver modules (e.g., RapidFire, True-D). A receiver module is required for wireless FPV video reception.
- Carefully slide the receiver module into the VRx Modular Bay until it clicks into place.
- Ensure the module is seated securely.
- Attach appropriate antennas to the receiver module's antenna ports.

The VRx Modular Bay for receiver module installation.
4.3 Head Strap Adjustment
Adjust the elastic head strap for a comfortable and secure fit. The goggles should sit snugly on your face without excessive pressure.
4.4 IPD and Focus Adjustment
Proper adjustment of Inter-Pupillary Distance (IPD) and focus is crucial for a clear image.
- Place the goggles on your head.
- Adjust the IPD sliders (located on the top of the goggles) until the two display images merge into a single, comfortable view.
- Use the focus adjustment dials (located on the top of the goggles, near the IPD sliders) to achieve the sharpest possible image for each eye individually.
5. Operation
5.1 Powering On/Off
Press and hold the Power/Fan button (located on the left side of the goggles) for approximately 2 seconds to power the goggles on or off.
5.2 Channel Selection
If a receiver module is installed, use the Channel Selection 5-way switch (right side, bottom) to navigate through available video channels. Press up or down to change channels.
5.3 Volume Control
Use the Volume Level 5-way switch (left side, bottom) to adjust the audio output volume. Press up for louder, down for quieter.
5.4 Digital Video Recorder (DVR)
The integrated DVR allows you to record your FPV flights. Ensure an SD card (up to 32GB, Class 10 recommended) is inserted into the SD Card Slot.
- Recording: Briefly press the DVR 5-way switch (left side, bottom) to start/stop recording. The DVR Indicator LED will illuminate when recording.
- Playback: Use the DVR 5-way switch to navigate recorded files and initiate playback.
5.5 Display Settings
Use the Display 5-way switch (right side, bottom) to access and adjust display settings such as brightness, contrast, and aspect ratio.
5.6 Fan Operation
Briefly press the Power/Fan button to cycle through fan speeds or turn the fan off. The fan helps prevent lens fogging.
5.7 HDMI Input
Connect an external video source (e.g., computer, game console) to the Mini HDMI Port using a compatible HDMI cable. The goggles will automatically switch to HDMI input when a signal is detected.
6. Maintenance
6.1 Cleaning
- Lenses: Use the provided lens cleaning cloth or a soft, lint-free cloth specifically designed for optics. Do not use abrasive materials or chemical cleaners.
- Casing: Wipe the exterior casing with a soft, damp cloth. Avoid getting moisture into ports or openings.
- Face Foam: The face foam can be gently cleaned with a mild soap solution and allowed to air dry completely before reattaching.
6.2 Storage
Store the goggles in their protective carrying case when not in use to prevent dust accumulation and physical damage. Avoid exposing the goggles to extreme temperatures or direct sunlight for extended periods.
6.3 Battery Care
If using 18650 Li-ion batteries, follow manufacturer guidelines for charging and storage. Do not overcharge or fully discharge batteries. Remove batteries from the case if storing the goggles for an extended period.
7. Troubleshooting
If you encounter issues with your HDO2 goggles, refer to the following common problems and solutions:
- No Image/Black Screen:
- Ensure the goggles are powered on and the battery is charged.
- Verify the receiver module is correctly installed and powered on (if applicable).
- Check that the video transmitter on your drone is powered on and transmitting on the correct channel.
- If using HDMI, ensure the cable is securely connected and the external source is active.
- Blurry Image:
- Adjust the IPD sliders to match your eye spacing.
- Adjust the focus dials for each eye until the image is sharp.
- Clean the lenses if smudges are present.
- No Audio:
- Increase the volume using the Volume Level switch.
- Ensure your video source is transmitting audio.
- Check headphone connection if using external headphones.
- Goggles Not Powering On:
- Verify the battery is fully charged and correctly inserted into the battery case.
- Ensure the battery case is securely connected to the goggles' power port.
- DVR Not Recording:
- Ensure an SD card is inserted and formatted correctly.
- Check if the SD card has sufficient free space.
- Verify the SD card is Class 10 or higher.
8. Specifications
| Model Name | Dominator HDO2 |
| Display Type | OLED |
| Resolution | 1280x960 |
| Field Of View (FOV) | 46 Degrees |
| Connectivity Technology | HDMI |
| Power Input | 7-13V (2S-3S LiPo compatible) |
| Item Weight | 7.3 ounces (approximately 207 grams) |
| Product Dimensions | 6 x 6 x 5 inches |
| Special Feature | Microphone Included (for DVR audio recording) |
| Compatible Devices | Fat Shark FPV systems, HDMI sources |
9. Safety Information
- Do not operate FPV equipment in areas where it is prohibited or unsafe.
- Always be aware of your surroundings when using FPV goggles. It is recommended to have a spotter.
- Avoid direct exposure of the lenses to sunlight, as this can damage the OLED displays.
- Use only recommended power sources and batteries.
- Keep the device away from water and moisture.
- Do not attempt to disassemble or modify the goggles, as this will void the warranty and may cause damage.
10. Warranty and Support
Fat Shark products are covered by a limited warranty against manufacturing defects. For specific warranty terms and conditions, please refer to the official Fat Shark website or contact your retailer.
For technical support, troubleshooting assistance beyond this manual, or warranty claims, please visit the official Fat Shark support portal or contact their customer service department. Contact information can typically be found on the Fat Shark website.


