
1. Introduction
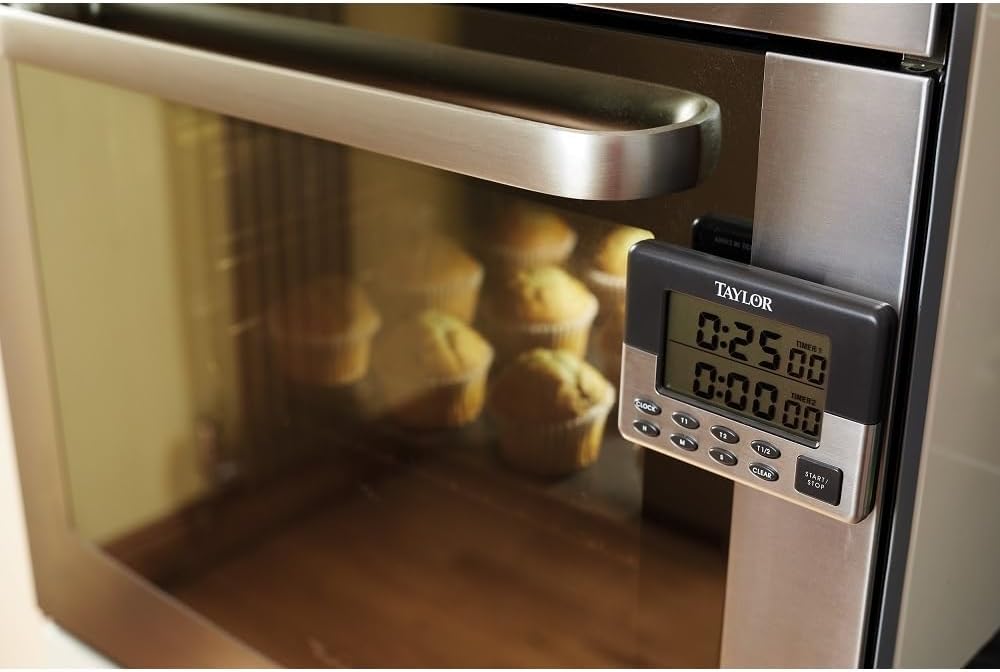
The Taylor Pro Dual Digital Kitchen Timer is designed for precise timing in various kitchen tasks. This versatile timer features two independent countdown timers (T1 and T2), a stopwatch function, and a 24-hour clock display. Its dual functionality allows for simultaneous tracking of different cooking times, making it an essential tool for busy kitchens. The timer is equipped with a large LCD display for easy readability, distinct alarms for each timer, and multiple placement options for convenience.
2. Setup
2.1. Battery Installation
The timer requires one (1) AAA battery (not included). To install the battery:
- Locate the battery compartment on the back of the timer.
- Open the battery compartment cover.
- Insert one AAA battery, ensuring correct polarity (+/-).
- Close the battery compartment cover securely.
Note: If the display does not light up or appears dim, ensure the battery is correctly inserted or replace it with a fresh one.
2.2. Placement Options
The timer offers flexible placement options:
- Flip-Out Stand: Extend the integrated stand on the back of the timer to place it upright on any flat surface, such as a countertop or table.
- Magnetic Back: The timer features a magnetic back, allowing it to be securely attached to metallic surfaces like refrigerators or oven doors for easy visibility.

3. Operating Instructions
3.1. Setting the Clock
When not in timer mode, the top display shows the current time. To set the clock:
- Press the 'CLOCK' button to enter clock setting mode.
- Use the 'H' (Hour) and 'M' (Minute) buttons to adjust the time.
- Press 'CLOCK' again to confirm and exit setting mode.
3.2. Setting Countdown Timers (T1 and T2)
The timer features two independent countdown timers, T1 and T2, each capable of timing up to 23 hours and 59 minutes. Each timer has a distinct alarm sound.
- Select Timer: Press 'T1' to set the first timer or 'T2' to set the second timer. The selected timer's display will flash.
- Set Time: Use the 'H' (Hour), 'M' (Minute), and 'S' (Second) buttons to set the desired countdown duration.
- Start Timer: Press the 'START/STOP' button to begin the countdown.
- Pause/Resume: Press 'START/STOP' again to pause or resume the countdown.
- Clear Timer: To clear a set timer, press the 'CLEAR' button while the timer is paused or stopped. To clear both timers simultaneously, press 'T1/2 CLEAR'.
- Alarm: When a timer reaches zero, it will sound a distinct alarm. Press 'START/STOP' to silence the alarm.
3.3. Stopwatch Function
The timer can also function as a stopwatch to count up from zero.
- Ensure both T1 and T2 are cleared (displaying 0:00:00).
- Press the 'START/STOP' button. The timer will begin counting up from 0:00:00.
- Press 'START/STOP' again to pause or resume the stopwatch.
- Press 'CLEAR' to reset the stopwatch to zero.
3.4. Memory Recall Function
The timer includes a memory recall function to quickly access previously set times. Consult the specific instructions on the back of the device or the full manual for detailed steps on how to save and recall custom timer settings.
4. Maintenance
4.1. Cleaning
To clean the timer, simply wipe it with a damp cloth. Do not immerse the timer in water or use abrasive cleaners, as this may damage the device.
4.2. Battery Replacement
When the display becomes dim or the timer functions erratically, it is time to replace the AAA battery. Follow the battery installation steps in Section 2.1.
5. Troubleshooting
| Problem | Possible Cause | Solution |
|---|---|---|
| Timer not working or display is blank/dim. | Incorrectly installed or depleted battery. | Reinsert the AAA battery, ensuring correct polarity. If the issue persists, replace with a new battery. |
| Magnet detaches from the timer. | Adhesive failure. | Reattach the magnet using a strong adhesive suitable for plastic and metal. |
| Loud chirp sound with each button press. | This is a normal operational characteristic of the timer. | No action required. This sound indicates button presses are registered. |
6. Specifications
- Model Number: TYPTIM100DUAL
- Brand: Taylor
- Color: Grey/Silver
- Material: Plastic, Stainless Steel
- Product Dimensions: 1"D x 4"W x 3"H (approximately 10.5 x 8 x 3 cm)
- Power Source: 1 x AAA Battery (not included)
- Maximum Countdown: 23 Hours, 59 Minutes
- Features: Dual Timers (T1, T2), Stopwatch, 24-Hour Clock, Magnetic Back, Flip-Out Stand, Memory Recall
- Item Weight: 2.82 ounces
7. Warranty and Support
7.1. Warranty Information
The Taylor Pro Dual Digital Kitchen Timer comes with a 5-year guarantee, ensuring reliability and quality. Please retain your proof of purchase for warranty claims.
7.2. Customer Support
For further assistance, technical support, or warranty inquiries, please visit the official Taylor website or contact their customer service department. Contact details can typically be found on the product packaging or the manufacturer's website.


