
Product Overview
The Renogy Rover Elite series of MPPT charge controllers offers highly efficient charging solutions for various 12V and 24V off-grid solar applications. This controller is compatible with a wide range of battery types, including Gel, Sealed, Flooded, and Lithium batteries. It incorporates advanced Maximum Power Point Tracking (MPPT) technology to optimize solar energy harvesting for your battery system. Additionally, the Rover Elite MPPT includes multiple protection features for the battery, controller, and solar array, ensuring system safety and reliability.
- 12V /24V Automatic System Recognition: Automatically detects and adapts to 12V or 24V battery systems.
- Backlit LCD Display: Provides clear system information and identifies error codes for easy monitoring.
- Advanced MPPT Technology: Achieves up to 99% high tracking efficiency and 96% conversion efficiency, featuring a Lithium-reawakening function for dormant lithium batteries.
- 4 Deep Cycle Battery Pre-Sets: Supports Gel, Flooded, Lithium-Iron Phosphate (12.8V), and Sealed/AGM battery types with optimized charging parameters.
- Multiple Electronic Protection Features: Includes safeguards against overcharging, over-discharging, reverse polarity, and over-temperature conditions to prevent damage.
- Power Source Type: Designed for solar-powered systems.

Figure 1: Renogy Rover Elite 40A MPPT Solar Charge Controller with LCD display and connection ports.
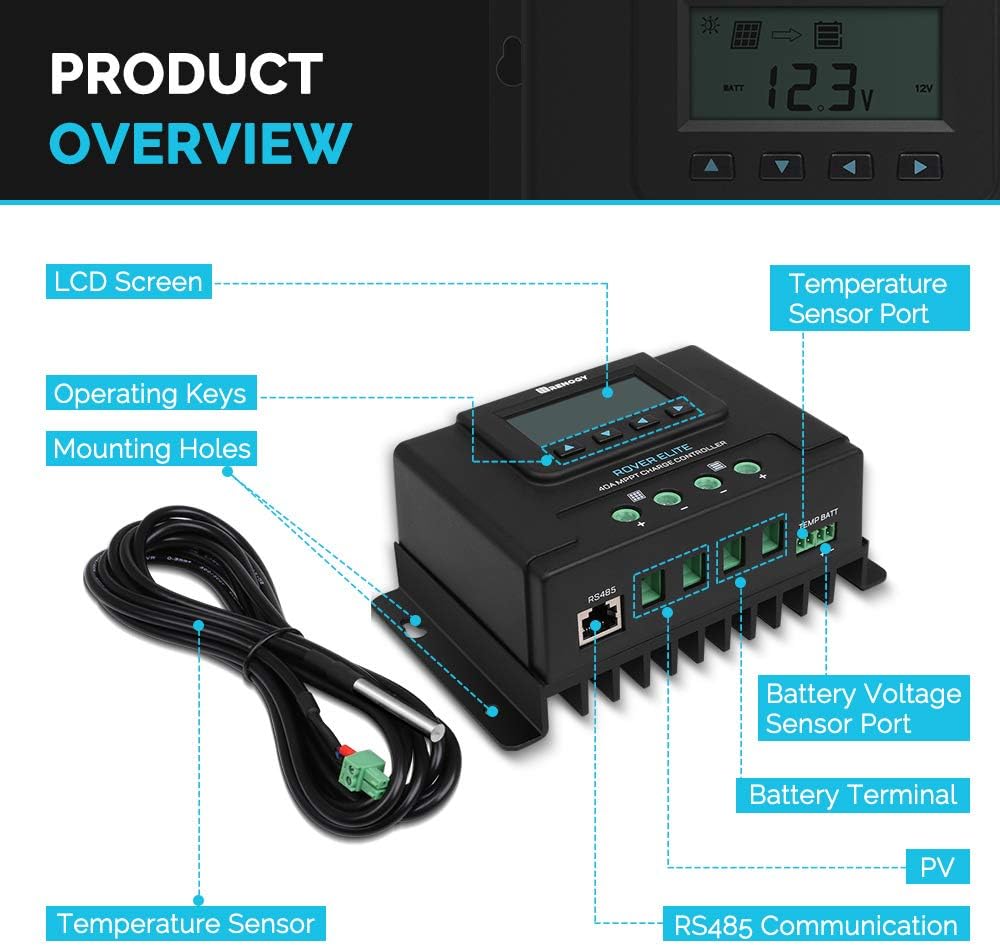
Figure 2: Diagram showing key components of the Renogy Rover Elite controller, including LCD screen, operating keys, mounting holes, temperature sensor port, battery voltage sensor port, battery terminal, PV input, and RS485 communication port.
Setup and Installation
Before beginning installation, ensure all power sources are disconnected. This includes solar panels and batteries. Always connect the battery first, then the solar panels.
1. Mounting the Controller
Choose a dry, well-ventilated location away from direct sunlight and heat sources. Mount the controller vertically on a flat surface to allow for proper heat dissipation. Ensure there is sufficient space around the controller for wiring and cooling.

Figure 3: Physical dimensions of the Renogy Rover Elite controller (7.9 in x 5.1 in x 3.0 in) and its compatibility with AGM, Gel, Flooded, and Lithium battery types.
2. Wiring Connections
- Battery Connection: Connect the battery cables to the controller's battery terminals. Ensure correct polarity (positive to positive, negative to negative). The controller will automatically detect the system voltage (12V or 24V).
- Solar Panel Connection: Connect the solar panel cables to the controller's PV terminals. Again, observe correct polarity.
- Temperature Sensor (Optional): For accurate battery temperature compensation, connect the included temperature sensor to the "TEMP BATT" port and attach the sensor to the battery. This helps prolong battery lifespan.
- RS485 Communication Port: This port (RJ45) is used for connecting accessories like the Renogy BT-2 Bluetooth module for remote monitoring via the Renogy DC Home app.

Figure 4: Illustration of the Lithium Battery Activation feature, where the controller sends a low current to activate a dormant Lithium Battery Management System (BMS).
Operating Instructions
1. LCD Display and Navigation
The backlit LCD displays real-time system data such as battery voltage, charging current, solar panel voltage, and error codes. Use the arrow buttons to navigate through different display screens and settings.
2. Battery Type Selection
It is crucial to select the correct battery type in the controller's settings to ensure optimal charging and prolong battery life. The controller supports Gel, Sealed, Flooded, and Lithium-Iron Phosphate (12.8V) batteries. Refer to your battery's specifications for the recommended charging parameters.
3. Charging Stages
The MPPT charge controller utilizes intelligent multi-stage charging to ensure efficient and safe battery charging:
- Bulk Charge: Delivers maximum current to rapidly charge the battery.
- Boost Charge: Charges the battery to a higher voltage to ensure full charge.
- Float Charge: Maintains the battery at a constant voltage to prevent self-discharge.
- Equalization (for Flooded batteries): Periodically overcharges the battery to balance cell voltages and prevent sulfation.

Figure 5: Highlighting the advanced MPPT technology of the Rover Elite, boasting 99% tracking efficiency and 96% conversion efficiency.
Maintenance
Regular maintenance ensures the longevity and optimal performance of your Renogy charge controller and solar system.
- Check Connections: Periodically inspect all wiring connections for tightness and corrosion. Loose connections can lead to power loss or overheating.
- Clean Controller: Keep the controller clean and free from dust and debris. Use a dry cloth for cleaning. Ensure ventilation openings are not blocked.
- Monitor Performance: Regularly check the LCD display or the Renogy DC Home app for system performance data and any error codes. Consistent monitoring helps identify potential issues early.
- Battery Maintenance: Follow the maintenance guidelines for your specific battery type. For flooded batteries, check water levels occasionally.

Figure 6: The controller measures battery temperature to provide accurate temperature compensation, which helps extend battery lifespan.
Troubleshooting
If you encounter issues with your charge controller, refer to the following common problems and solutions:
- No Display/No Power: Check battery connections and ensure they are secure and correctly polarized. Verify battery voltage is within the operating range.
- No Charging: Ensure solar panels are connected correctly and receiving sufficient sunlight. Check for any shading on the panels. Verify PV input voltage is within the controller's specifications.
- Error Codes: The LCD display will show specific error codes. Refer to the full user manual (PDF) for a detailed explanation of each code and its corresponding troubleshooting steps.
- Overcharging/Over-discharging: Verify the correct battery type is selected in the controller settings. Ensure the battery capacity matches the system requirements.

Figure 7: The controller is equipped with multiple electronic protection features, including overcharging, over-discharging, reverse polarity, and over-temperature protection.
Specifications
| Feature | Value |
|---|---|
| Display Type | LCD |
| UPC | 810009714057 |
| Manufacturer | Renogy |
| Model | 40 amp |
| Item Weight | 3 pounds |
| Product Dimensions | 7.85 x 5.12 x 3.02 inches |
| Item model number | RCC40RVRE-G1 |
| Manufacturer Part Number | RCC40RVRE-G1 |
| Color | With Lcd Display |
| Brand | Renogy |
| Voltage | 1E+2 Volts |
Warranty Information
Renogy products are designed for durability and performance. For detailed warranty information and to register your product for warranty online, please refer to the E-warranty Card included with your purchase or visit the official Renogy website.
For any warranty claims or service requests, please retain your proof of purchase.
Support and Resources
For further assistance, detailed guides, or to explore other Renogy products, please use the following resources:
- Official User Manual (PDF): For in-depth information and advanced settings, download the comprehensive user manual: Download User Manual
- Renogy Brand Store: Explore the full range of Renogy products and solutions: Visit Renogy Store
- Customer Support: For technical support or service inquiries, please contact Renogy customer service through their official website.


