1. Introduction
This manual provides essential information for the safe and effective operation of the Aexit S-75-24 DC 24V 3A Regulated Switching Power Supply. Please read this manual thoroughly before installation and use, and retain it for future reference.
The S-75-24 is a single output switching power supply designed for various applications including industrial automation, LED displays, and communication systems. It features protections against short circuit, overload, and over voltage.
2. Safety Information
WARNING: HIGH VOLTAGE INSIDE. DO NOT REMOVE THIS COVER. ONLY QUALIFIED SERVICE PERSONNEL SHOULD PERFORM MAINTENANCE.
To ensure safe operation and prevent damage to the unit or injury, observe the following precautions:
- Ensure the AC input voltage range is correctly selected via the switch before connecting power. Incorrect voltage selection can cause severe damage.
- Do not operate the power supply in wet or damp environments.
- Ensure proper ventilation to prevent overheating. Do not block ventilation holes.
- All wiring should be performed by a qualified electrician in accordance with local electrical codes.
- Disconnect power before performing any installation, maintenance, or troubleshooting.
- This unit is designed for indoor use only.
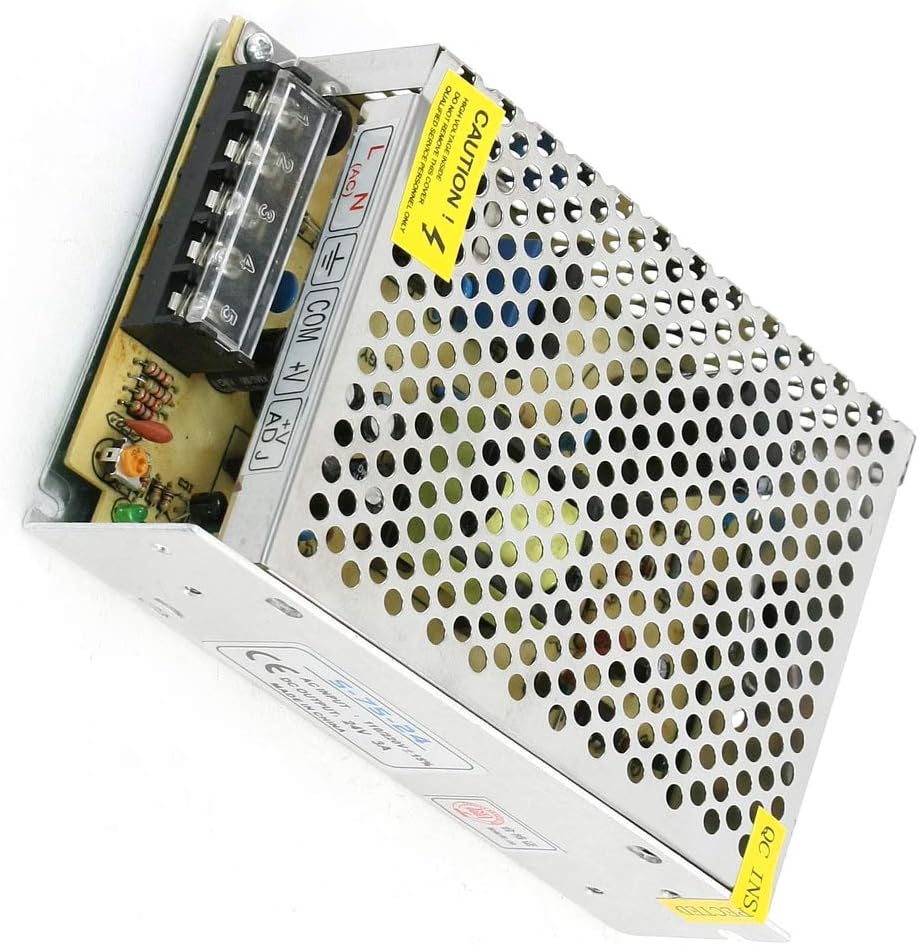
Image: The Aexit S-75-24 switching power supply, showing the input/output terminals and the prominent yellow "CAUTION" label indicating high voltage inside and restricting cover removal to qualified personnel.
3. Product Features
- Model: S-75-24
- Input Voltage: AC 110V/220V ±15% (selectable by switch)
- Output Voltage: DC 24V
- Output Current: 3A
- Power Output: 75W
- Protections: Short Circuit, Overload, Over Voltage
- Cooling: Free air convection
- Case Material: Metal, Plastic
- Dimensions: 16 x 9.7 x 4.2 cm / 6.3" x 3.8" x 1.7" (L*W*T)
- Net Weight: 311g
4. Specifications
| Parameter | Value |
|---|---|
| Product Model | S-75-24 |
| Input Voltage Range | AC 110V/220V ±15% (Switch Selectable) |
| Output Voltage | DC 24V |
| Output Current | 3A |
| Rated Power | 75W |
| Protections | Short Circuit, Overload, Over Voltage |
| Cooling Method | Free Air Convection |
| Dimensions (L*W*T) | 16 x 9.7 x 4.2 cm / 6.3" x 3.8" x 1.7" |
| Weight | 311g |
| Case Material | Metal, Plastic |
5. Setup and Installation
Before installation, ensure the power supply is disconnected from any power source. Follow these steps for proper setup:
- Mounting: Securely mount the power supply in a well-ventilated area using appropriate screws. Ensure adequate clearance around the unit for air circulation.
- Input Voltage Selection: Locate the AC input voltage selector switch (usually a small red switch) on the side of the unit. Carefully select either 110V or 220V to match your local mains voltage. Incorrect selection will damage the unit.
- Input Wiring (AC): Connect the AC input wires to the terminal block.
- Connect the Live (L) wire to the 'L' terminal.
- Connect the Neutral (N) wire to the 'N' terminal.
- Connect the Ground (⏚) wire to the '⏚' (Ground) terminal.
- Output Wiring (DC): Connect your DC load to the output terminals.
- Connect the positive (+) wire of your load to the '+V' terminal.
- Connect the negative (-) wire of your load to the 'COM' terminal.
- Ensure correct polarity to avoid damage to your connected devices.
- Voltage Adjustment (Optional): The '+V ADJ' potentiometer allows for fine adjustment of the output voltage within a small range. Use a small screwdriver to turn it clockwise to increase voltage or counter-clockwise to decrease voltage. Adjust only if necessary and with a multimeter to verify output.
Image: A detailed view of the terminal block on the S-75-24 power supply, showing the 'L', 'N', '⏚', 'COM', '+V', and '+V ADJ' labels for wiring connections.
6. Operating Instructions
Once the power supply is correctly installed and wired:
- Power On: Connect the AC input cable to the mains power outlet. The power supply will begin to operate.
- Indicator Light: A power indicator light (if present) will illuminate, indicating the unit is receiving power and operating.
- Load Connection: Ensure your load is properly connected to the DC output terminals.
- Monitoring: For critical applications, it is recommended to monitor the output voltage and current with external meters to ensure stable operation within specified limits.
- Power Off: To turn off the unit, disconnect the AC input cable from the mains power outlet.
7. Maintenance
The S-75-24 power supply is designed for reliable operation with minimal maintenance. However, periodic checks can extend its lifespan:
- Cleaning: Periodically clean the exterior of the unit with a soft, dry cloth. Do not use liquid cleaners or solvents. Ensure ventilation holes are free from dust and debris.
- Connections: Periodically check all wiring connections to ensure they are secure and free from corrosion. Loose connections can lead to poor performance or damage.
- Ventilation: Ensure the operating environment allows for adequate airflow around the unit to facilitate cooling by free air convection.
- Inspection: Visually inspect the unit for any signs of physical damage, discoloration, or unusual odors. If any issues are observed, disconnect power immediately and consult qualified personnel.
Note: Do not attempt to open the power supply casing. There are no user-serviceable parts inside, and dangerous high voltages are present.
8. Troubleshooting
If you encounter issues with your S-75-24 power supply, refer to the following common problems and solutions:
| Problem | Possible Cause | Solution |
|---|---|---|
| No output voltage / Unit not powering on |
|
|
| Output voltage is unstable or too low |
|
|
| Unit is overheating |
|
|
If the problem persists after attempting these solutions, contact qualified service personnel.
9. Warranty and Support
Information regarding warranty coverage for the Aexit S-75-24 power supply is typically provided at the point of purchase or within the product packaging. Please refer to your purchase documentation for specific warranty terms and conditions.
For technical support, service, or inquiries about replacement parts, please contact the vendor or manufacturer directly using the contact information provided with your purchase.


