
1. Important Safety Information
Please read all instructions carefully before using this appliance and retain for future reference. Failure to follow these instructions may result in electric shock, fire, or serious injury.
- This appliance is for indoor use only.
- Ensure the power supply matches the rating label on the unit.
- Do not operate the unit with a damaged cord or plug. If the supply cord is damaged, it must be replaced by the manufacturer, its service agent, or similarly qualified persons to avoid a hazard.
- Always unplug the unit before cleaning or servicing.
- Do not block air inlets or outlets. Maintain at least 30 cm (12 inches) clearance around the unit.
- Do not insert objects into the air outlets.
- This appliance contains R290 refrigerant. R290 is a flammable refrigerant. Do not use means to accelerate the defrosting process or to clean, other than those recommended by the manufacturer.
- The appliance shall be stored in a room without continuously operating ignition sources (e.g., open flames, an operating gas appliance, or an operating electric heater).
- Do not pierce or burn the unit. Be aware that refrigerants may not contain an odor.
- Keep the unit upright during transport and operation.
2. Product Overview
The SHINCO 7000 BTU Portable Air Conditioner is a versatile 3-in-1 unit designed for cooling, dehumidifying, and ventilation. It features an eco-friendly R290 refrigerant and an auto-evaporation system for efficient operation.
Key Features:
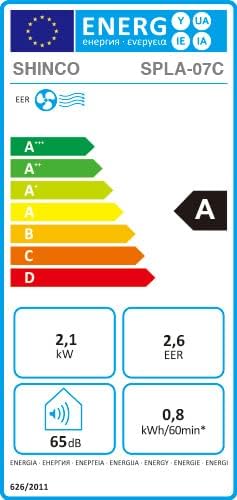
- Cooling Capacity: 7000 BTU (2.1 KW) suitable for rooms up to 18 m² (60 m³).
- 3-in-1 Functionality: Cooling, Fan (two speeds, 360 m³/h airflow), and Dehumidifier (16.8 L/day).
- Temperature Range: Adjustable from 16°C to 30°C.
- Timer: 24-hour programmable timer.
- Control: LED display and remote control.
- Refrigerant: Eco-friendly R290 (Propane, GWP 3).
- Auto-Evaporation System: Utilizes condensed water to cool the condenser, eliminating the need for a water tank in most conditions.
Included Accessories:
- Window sealing kit
- Window adapters
- Exhaust hose (up to 1.50m)
- Remote control
Product Views and Features:


3. Setup and Installation
Proper installation is crucial for the efficient operation of your portable air conditioner.
3.1 Unit Placement
- Place the unit on a firm, level surface in a location that can support its weight.
- Ensure there is at least 30 cm (12 inches) of space around the unit for proper airflow.
- Avoid placing the unit near heat sources, direct sunlight, or where it might be exposed to water.
3.2 Exhaust Hose Installation
The exhaust hose expels hot air outside, which is essential for cooling efficiency.
- Attach one end of the exhaust hose to the air outlet on the back of the air conditioner. Twist clockwise until secure.
- Attach the window adapter to the other end of the exhaust hose.
- Extend the exhaust hose to the desired length (maximum 1.50m), avoiding sharp bends or kinks that could restrict airflow.
3.3 Window Sealing Kit Installation
The window sealing kit helps to prevent hot air from re-entering the room.
- Open the window and place the window sealing plate into the window opening. Adjust its length to fit the window securely.
- Close the window to hold the sealing plate in place.
- Insert the window adapter of the exhaust hose into the opening of the window sealing plate.
- Ensure all gaps are sealed to maximize cooling efficiency.

3.4 Power Connection
Plug the power cord into a grounded electrical outlet (220-240V, 50Hz). Do not use extension cords or multi-plugs.
4. Operating Instructions
Your SHINCO portable air conditioner can be operated via the control panel on the unit or the remote control.
4.1 Control Panel and Remote Control
The control panel features touch controls for Power, Mode, Fan Speed, Temperature Adjustment, and Timer. The remote control offers the same functions for convenient operation from a distance.
4.2 Operating Modes
- Cooling Mode: Press the 'Mode' button until the snowflake icon appears. Use the 'Up' and 'Down' arrows to set your desired temperature (16-30°C).
- Fan Mode: Press the 'Mode' button until the fan icon appears. Use the 'Fan Speed' button to select between low and high fan speeds.
- Dehumidifier Mode: Press the 'Mode' button until the water drop icon appears. The unit will operate to remove moisture from the air. The fan speed is typically fixed in this mode.
4.3 Timer Function
The 24-hour timer allows you to program the unit to turn on or off automatically.
- To set Auto-OFF: With the unit running, press the 'Timer' button. Use the 'Up' and 'Down' arrows to select the desired number of hours (1-24) before the unit turns off.
- To set Auto-ON: With the unit off, press the 'Timer' button. Use the 'Up' and 'Down' arrows to select the desired number of hours (1-24) before the unit turns on.

4.4 Auto-Evaporation System
This unit features an auto-evaporation system that recycles condensed water to cool the condenser, improving efficiency and reducing the need for manual drainage. In very humid conditions, some water may accumulate in the internal tank. If the tank becomes full, the unit will stop operating and display an error code (e.g., 'FL' for Full Water). In such cases, refer to the 'Maintenance' section for drainage instructions.
5. Maintenance
Regular maintenance ensures optimal performance and extends the lifespan of your air conditioner.
5.1 Cleaning the Air Filter
The air filter should be cleaned every two weeks or more frequently depending on usage and air quality.
- Unplug the air conditioner from the power outlet.
- Locate the air filter panel (usually at the back or side of the unit).
- Remove the filter.
- Wash the filter with warm water (below 40°C) and a mild detergent. Rinse thoroughly.
- Allow the filter to air dry completely before reinstalling it. Do not expose to direct sunlight.
5.2 Cleaning the Unit Exterior
Wipe the exterior of the unit with a soft, damp cloth. Do not use harsh chemicals, abrasives, or solvents, as these can damage the surface.
5.3 Water Drainage (If Necessary)
While the unit has an auto-evaporation system, manual drainage may be required in high humidity or if the 'FL' (Full Water) indicator appears.
- Unplug the air conditioner.
- Place a shallow pan or tray under the drainage port (usually located at the bottom rear of the unit).
- Remove the drain plug/cap. Water will begin to flow out.
- Once all water has drained, replace the drain plug/cap securely.
5.4 Storage
If storing the unit for an extended period:
- Drain any accumulated water completely.
- Clean the air filter and reinstall it.
- Store the unit in an upright position in a dry, cool place, away from direct sunlight.
6. Troubleshooting
Before contacting customer support, please refer to the following troubleshooting guide for common issues.
| Problem | Possible Cause | Solution |
|---|---|---|
| Unit does not turn on. | No power supply; Power cord unplugged; Full water tank ('FL' error). | Check power outlet and plug; Drain water tank if 'FL' error is displayed. |
| Unit is running but not cooling. | Air filter clogged; Exhaust hose blocked or disconnected; Room temperature too low; Doors/windows open. | Clean air filter; Check exhaust hose for blockages and ensure it's properly installed; Set desired temperature lower; Close all doors and windows. |
| Unit is noisy. | Unit not on a level surface; Air filter clogged. | Place unit on a flat, stable surface; Clean air filter. |
| Water leaks from the unit. | Drain plug not securely closed; Unit tilted. | Ensure drain plug is tightly closed; Place unit on a level surface. |
| Remote control not working. | Batteries dead or incorrectly inserted; Obstruction between remote and unit. | Replace batteries; Ensure clear line of sight to the unit's receiver. |
7. Specifications
Detailed technical specifications for the SHINCO 7000 BTU Portable Air Conditioner.
| Specification | Value |
|---|---|
| Model Number | 4022104019548 |
| Dimensions (L x W x H) | 37.9 x 32.2 x 67.5 cm |
| Weight | 20.5 kg |
| Cooling Capacity | 7000 BTU / 2.1 KW |
| Dehumidification Capacity | 16.8 L/Day |
| Airflow Volume | 360 m³/h |
| Voltage | 220-240 Volts |
| Power (Cooling) | 2200 Watts |
| Refrigerant | R290 (Propane, GWP 3) |
| Energy Efficiency Class | A |
| Noise Level | 65 dB (from energy label) |
| Filter Type | Pre-filter |
| Control Type | Touch Control, Remote Control |

8. Warranty and Support
SHINCO is committed to providing high-quality, user-friendly home appliances. For any questions, technical assistance, or warranty claims, please contact SHINCO customer support through your retailer or the official SHINCO website. Please have your model number (4022104019548) and purchase date available when contacting support.


