1. Introduction
This manual provides detailed instructions for the safe and effective use of the ANENG V01B Digital Multimeter. This device is a battery-powered, true-RMS, auto-ranging digital multimeter featuring a 4000-count LCD display with backlight and flashlight functions. It is designed for measuring various electrical parameters in automotive and general electrical applications.
2. Safety Information
Read all safety warnings and instructions carefully before using this multimeter. Failure to follow these instructions may result in electric shock, fire, or damage to the instrument.
- Do not input voltage at the Current Mode, Resistance Mode, Diode Mode, Continuity Mode, or Temperature Mode.
- Do not input voltage exceeding 36V DC or 25V AC when you are in the setting of measuring current.
- Always ensure the test leads are properly connected and the function switch is set to the correct range before making any measurements.
- Disconnect power to the circuit and discharge all high-voltage capacitors before measuring resistance, continuity, diodes, or capacitance.
- Use caution when working with voltages above 30V AC RMS, 42V peak, or 60V DC. These voltages pose a shock hazard.
- Replace batteries when the low battery indicator appears to ensure accurate readings.
- Do not operate the meter if it appears damaged or if the case is open.
3. Product Overview
The ANENG V01B is a compact and versatile digital multimeter.
3.1. Product Dimensions

The multimeter measures approximately 119.5mm (4.70in) in length, 61.7mm (2.43in) in width, and 31.9mm (1.25in) in thickness. Note: Manual measurement may have an error of 10-20 mm.
3.2. Back Panel Features

The back of the multimeter features a battery slot for easy access and a retractable bracket for convenient positioning. It also includes a high-brightness flashlight to assist in measurements in low-light conditions.

The back of the product also houses the NCV (Non-Contact Voltage) sensing point and the LED lighting for the flashlight function.
4. Setup
4.1. Battery Installation
The ANENG V01B multimeter requires batteries for operation.
- Locate the battery slot cover on the back of the multimeter.
- Use a screwdriver to remove the screw securing the battery cover.
- Carefully remove the battery cover.
- Insert the required batteries (typically AAA, refer to the battery compartment for specific type and polarity) ensuring correct polarity.
- Replace the battery cover and secure it with the screw.
5. Operating Instructions
5.1. Panel Function Introduction

The front panel of the ANENG V01B multimeter features a rotary switch for function selection, an LCD display, and various input jacks.
- Display: 4000 counts LCD for reading measurements.
- On-off detection/Buzzer: For continuity testing.
- Function conversion button (SEL): Used to switch between different functions within a single rotary switch position (e.g., AC/DC voltage, diode/continuity).
- AD/DC millivolt voltage (hertz): Measures small AC/DC voltages and frequency.
- OFF: Turns the multimeter off.
- AD/DC voltage (hertz): Measures standard AC/DC voltages and frequency.
- Power on/off: Main power switch.
- "10A" Input: Input jack for high current measurements (up to 10A).
- "COM" Input: Common (negative) input jack for all measurements.
- "VΩHz" Input: Input jack for voltage, resistance, frequency, capacitance, diode, and continuity measurements.
- AD/DC current (mA): Measures small AC/DC currents (milliamperes).
- AD/DC current (amperes): Measures standard AC/DC currents (amperes).
- NCV non-contact power alarm: Detects AC voltage without direct contact.
- Data retention/Backlight (HOLD/*): Holds the current reading on the display and activates/deactivates the backlight.
- Resistance detection: Measures electrical resistance.
5.2. Measuring Current Safely
Important Safety Warning: Incorrect current measurement can damage the instrument.
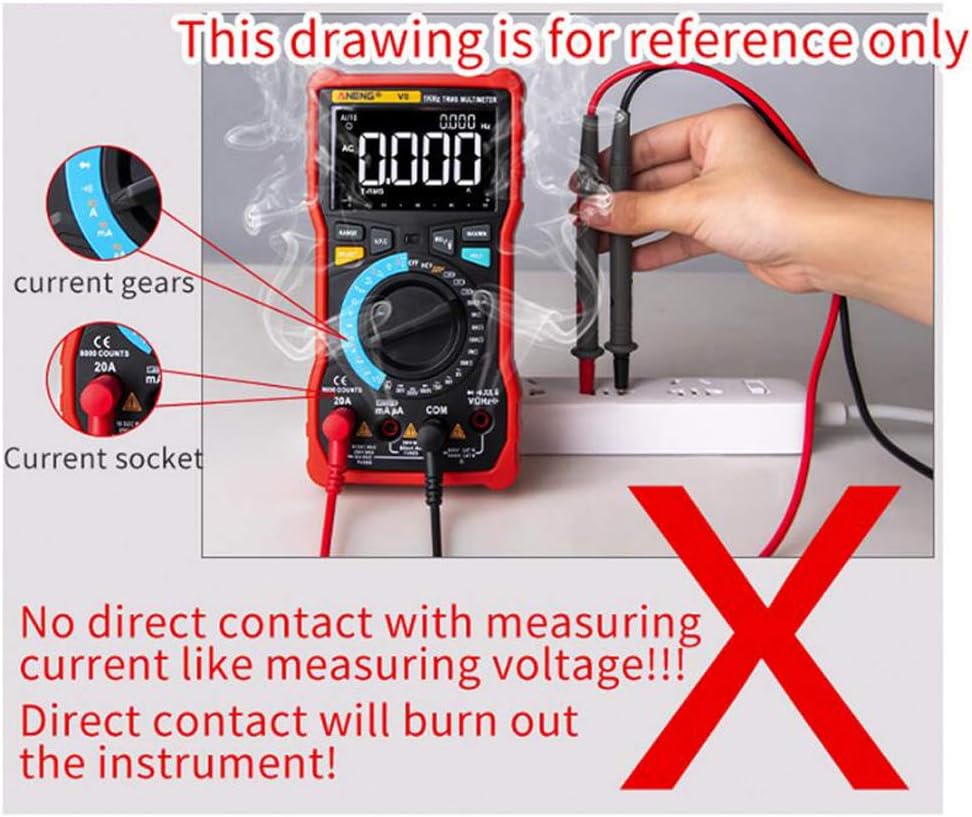
Do not directly contact a live circuit to measure current like measuring voltage. Direct contact will burn out the instrument. This drawing is for reference only to illustrate an incorrect method.
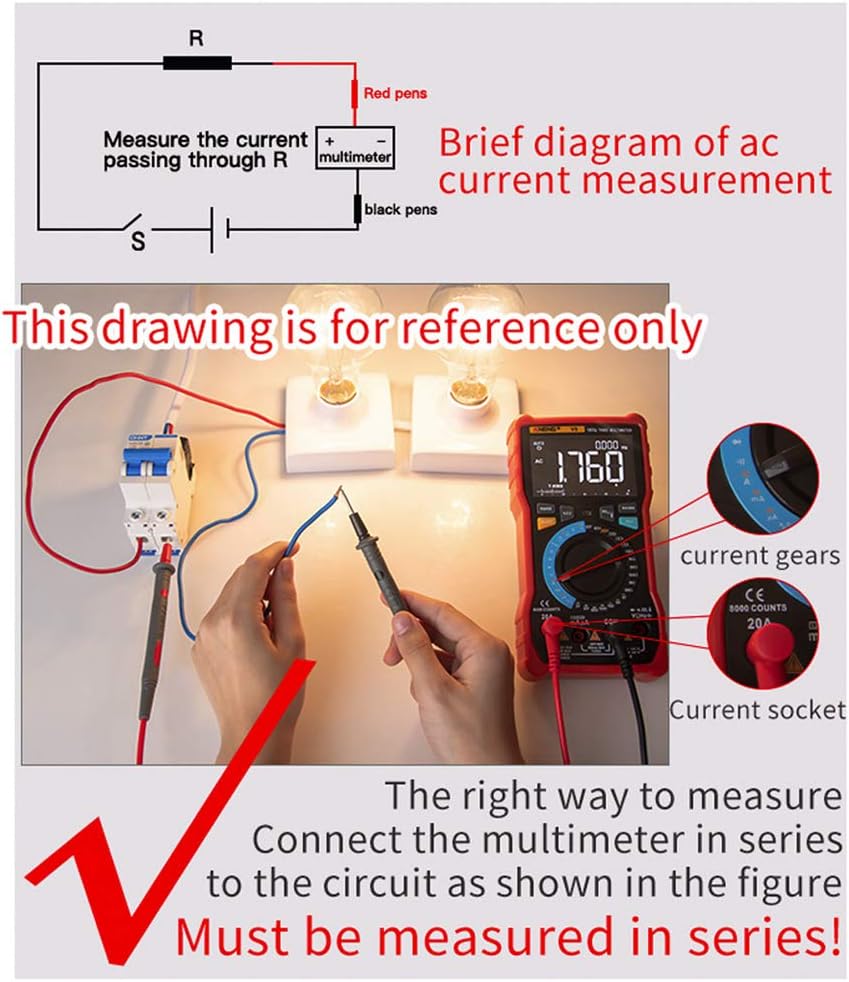
To measure current correctly, the multimeter must be connected in series with the circuit. This means the circuit must be broken, and the multimeter inserted into the break so that the current flows through the multimeter.
Steps for Current Measurement:
- Turn off power to the circuit.
- Break the circuit where you want to measure current.
- Connect the red test lead to the appropriate current input jack (e.g., "10A" or "mA") on the multimeter.
- Connect the black test lead to the "COM" input jack.
- Connect the test leads in series with the circuit, ensuring the current flows through the multimeter.
- Select the appropriate current range on the rotary switch.
- Restore power to the circuit and read the measurement.
- After measurement, turn off power, disconnect the multimeter, and restore the circuit.
6. Maintenance
6.1. General Care
Keep the multimeter dry. If it gets wet, wipe it dry immediately.
Use and store the multimeter in normal temperature environments. Extreme temperatures can shorten the life of electronic devices.
Handle the multimeter gently and carefully. Dropping it can damage circuit boards and cases.
Keep the multimeter away from dust and dirt, which can cause corrosion of electronic components.
Wipe the multimeter with a damp cloth occasionally to keep it looking new. Do not use harsh chemicals, cleaning solvents, or strong detergents.
6.2. Battery Replacement
When the low battery indicator appears on the display, replace the batteries promptly to ensure accurate readings and proper operation. Refer to the "Battery Installation" section for instructions.
7. Troubleshooting
7.1. Millivolt Value Jump
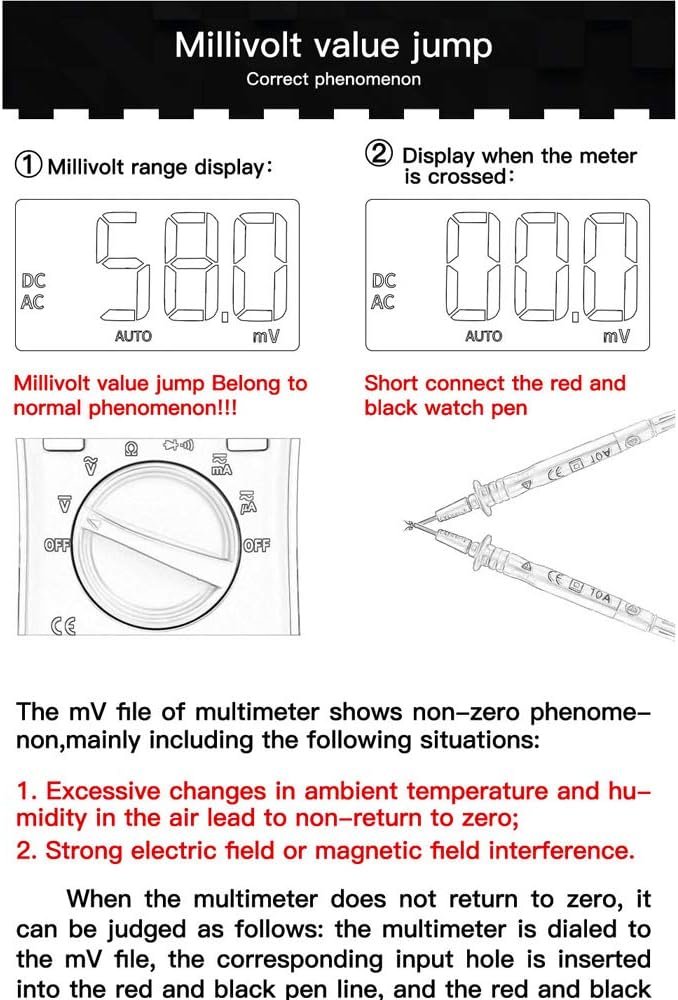
A "millivolt value jump" (non-zero reading) when the multimeter is set to the mV range and no input is connected is a normal phenomenon.
This can occur due to:
- Excessive changes in ambient temperature and humidity in the air, leading to a non-return to zero.
- Strong electric field or magnetic field interference.
If the multimeter does not return to zero in the mV file, you can short the red and black test leads together. The display should then show zero or a very small, stable value. If the issue persists, ensure the environment is free from strong interference.
8. Specifications
| Feature | Specification |
|---|---|
| Brand | ANENG |
| Model | V01B |
| Display | 4000 Counts LCD |
| Power Source | Battery Powered |
| Measurement Type | Multimeter (True-RMS, Auto-Ranging) |
| Features | Backlight, Flashlight, NCV |
| UPC | 630282728844 |
| ASIN | B0831BXWGC |
9. Warranty and Support
Information regarding warranty coverage and customer support for the ANENG V01B Digital Multimeter is not available in this document. Please refer to the product packaging or contact the retailer/manufacturer directly for details.


