
Wendry Wendrydo3qxs5hz8
Wendry Computer Chassis Front Panel User Manual
Model: Wendrydo3qxs5hz8
Introduction
Thank you for purchasing the Wendry Computer Chassis Front Panel. This product is designed to provide convenient access to USB 3.0, USB 2.0, and audio ports from the front of your computer chassis. This manual provides detailed instructions for installation, operation, maintenance, and troubleshooting to ensure optimal performance and longevity of your device.
Safety Information
Please read all safety instructions carefully before installing or using this product. Failure to follow these instructions may result in electric shock, fire, or damage to the product or other components.
- Ensure your computer is powered off and unplugged from the wall outlet before installation.
- Avoid touching internal components of your computer unless properly grounded.
- Do not expose the product to moisture or extreme temperatures.
- Keep out of reach of children.
- If any damage occurs, discontinue use immediately and contact support.
Product Overview
The Wendry Front Panel is a versatile accessory for your computer, offering enhanced connectivity. Key features include:
- Durable Construction: Features a stainless steel USB interface housing, designed for longevity and resistance to corrosion.
- Optimized Connectivity: Supports both USB 3.0 and USB 2.0 transmission modes, ensuring compatibility with a wide range of devices.
- Stable Performance: Incorporates a capacitor-added design for more stable power delivery and data transmission.
- High-Quality Wiring: The wire plating is designed to resist oxidation, ensuring reliable signal integrity.
- Ideal Length: With a 55cm cable length, it is suitable for most JM9K series computer cases, providing ample reach for internal connections.
- Audio Support: Compatible with AC'97 and HD audio drivers for clear sound output and input.

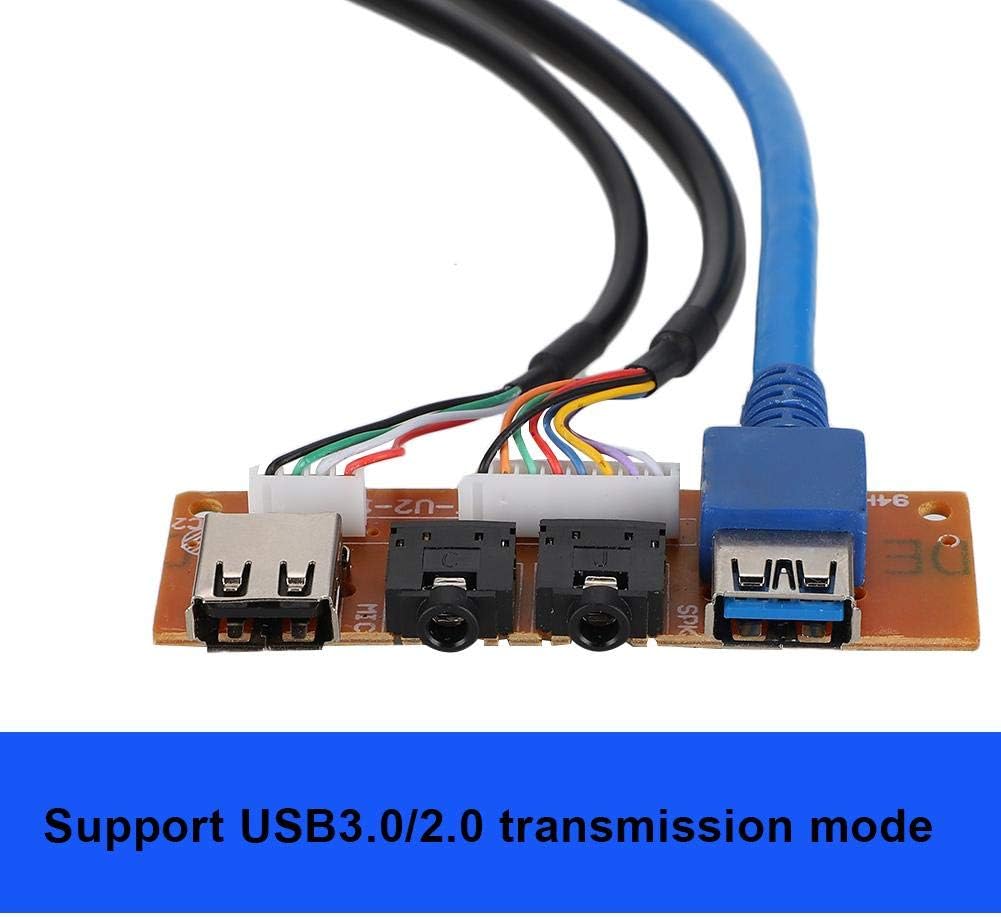


Setup and Installation
Follow these steps to properly install the front panel into your computer chassis.
- Prepare Your System:
- Power off your computer completely and unplug the power cord from the wall outlet.
- Open your computer case by removing the side panel(s).
- Identify Installation Location:
- Locate an available 3.5-inch or 5.25-inch drive bay (with adapter, if necessary) on the front of your computer chassis where the panel will be mounted.
- Mount the Front Panel:
- Slide the Wendry Front Panel into the chosen drive bay from the front of the chassis.
- Secure the panel using the screws provided with your computer case or the front panel itself, typically on the sides of the drive bay.
- Connect USB 3.0 Cable:
- Locate the blue USB 3.0 cable from the front panel.
- Connect the 20-pin connector of the USB 3.0 cable to the corresponding USB 3.0 header on your motherboard. This header is usually blue and labeled "USB3.0" or "F_USB3".
- Connect USB 2.0 Cable:
- Locate the black USB 2.0 cable from the front panel.
- Connect the 9-pin connector of the USB 2.0 cable to an available USB 2.0 header on your motherboard. These headers are typically black and labeled "USB" or "F_USB".
- Connect Audio Cables:
- Locate the audio cables (usually a single cable with multiple colored wires) from the front panel.
- Connect the audio header to the "F_AUDIO" or "HD_AUDIO" header on your motherboard. Ensure correct pin alignment as per your motherboard manual.
- Finalize Installation:
- Route the cables neatly to avoid obstructing airflow or other components.
- Close your computer case and secure the side panel(s).
- Plug in the power cord and power on your computer.
Operating Instructions
Once installed, the Wendry Front Panel operates automatically with your computer's operating system.
- USB Ports: Simply plug your USB devices (e.g., flash drives, external hard drives, keyboards, mice) into the available USB 3.0 or USB 2.0 ports. The operating system will detect and install necessary drivers automatically.
- Audio Jacks: Connect your headphones, speakers, or microphone to the corresponding audio jacks. Ensure your audio drivers are up-to-date for optimal performance. You may need to configure audio settings in your operating system's sound control panel.
Maintenance
Regular maintenance helps ensure the longevity and proper functioning of your front panel.
- Cleaning: Use a soft, dry, lint-free cloth to gently wipe the surface of the front panel. Do not use liquid cleaners or abrasive materials.
- Dust Removal: Periodically use compressed air to clear dust from the USB and audio ports to prevent connectivity issues.
- Cable Inspection: Occasionally check the internal cables for any signs of wear or damage.
Troubleshooting
If you encounter issues with your front panel, refer to the following common problems and solutions:
| Problem | Possible Cause | Solution |
|---|---|---|
| USB ports not working. | Incorrect or loose cable connection to motherboard. | Ensure USB 3.0 (20-pin) and USB 2.0 (9-pin) cables are securely connected to the correct motherboard headers. Check motherboard manual for header locations. |
| USB 3.0 devices operating at USB 2.0 speeds. | Device connected to a USB 2.0 port, or USB 3.0 cable not properly connected. | Ensure USB 3.0 devices are connected to the blue USB 3.0 port. Verify the USB 3.0 cable is correctly seated on the motherboard's USB 3.0 header. |
| No audio from headphone jack or microphone input not working. | Audio cable not connected or incorrect audio driver settings. | Verify the audio cable is securely connected to the "F_AUDIO" or "HD_AUDIO" header on your motherboard. Check your operating system's sound settings to ensure the correct audio output/input device is selected and drivers are up-to-date. |
| Panel not fitting in chassis bay. | Incorrect bay size or missing adapter. | Ensure you are using a standard 3.5-inch drive bay. If your chassis only has 5.25-inch bays, you may need a 5.25-inch to 3.5-inch bay adapter (not included). |
Specifications
| Feature | Detail |
|---|---|
| Brand | Wendry |
| Model Number | Wendrydo3qxs5hz8 |
| Hardware Interface | USB 3.0, USB 2.0, Audio (AC'97/HD Audio) |
| Cable Length | 55 cm (approx. 21.65 inches) |
| Product Dimensions (L x W x H) | 21.65" x 0.94" x 0.94" (approximate, referring to cable length and panel width/height) |
| Item Weight | 3.17 ounces (0.09 Kilograms) |
| Compatible Operating Systems | Windows, macOS, Linux |
| Material | Stainless steel USB interface housing |
| Country of Origin | China |
| Date First Available | December 23, 2019 |
Warranty and Support
For warranty information or technical support, please contact your retailer or the manufacturer directly. Keep your purchase receipt as proof of purchase.
Manufacturer: Wendry
For further assistance, you may visit the Wendry Store on Amazon.
Ask a question about this manual
Ask about setup, troubleshooting, compatibility, parts, safety, or missing instructions. Manuals+ will review the question and use this page’s manual context to help answer it.