
XLC SP-T10B
XLC SP-T10B Telescopic Seatpost Instruction Manual
Model: SP-T10B | Brand: XLC
Introduction
This manual provides essential information for the safe and effective use of your XLC SP-T10B telescopic seatpost. Please read these instructions carefully before installation and operation to ensure proper function and longevity of the product. The XLC SP-T10B is designed for All Mountain (All MTN) cycling, offering 100mm of travel for on-the-fly saddle height adjustments.
Safety Information
Always prioritize safety when working with bicycle components. Incorrect installation or maintenance can lead to serious injury or product damage. For detailed safety guidelines, please refer to the official safety document provided by XLC. A general safety information PDF is available for download: XLC Safety Information (PDF).
- Ensure all bolts are tightened to the manufacturer's specified torque settings.
- Regularly inspect the seatpost and remote lever for any signs of wear or damage.
- Do not attempt to modify the seatpost or its components.
- Always wear appropriate safety gear when cycling.
Setup and Installation
Proper installation is crucial for the performance and safety of your XLC SP-T10B telescopic seatpost. If you are unsure about any step, consult a professional bicycle mechanic.
1. Prepare Your Bicycle
- Ensure your bicycle frame's seat tube diameter matches the seatpost diameter (30.9mm).
- Clean the inside of the seat tube to remove any dirt or debris.
2. Install the Seatpost
- Apply a thin layer of assembly paste or grease to the lower part of the seatpost.
- Insert the seatpost into the bicycle's seat tube. Ensure the minimum insertion line on the seatpost is not visible above the seat tube.
- Tighten the seat collar bolt to the manufacturer's recommended torque specification. Overtightening can damage the seatpost or frame.
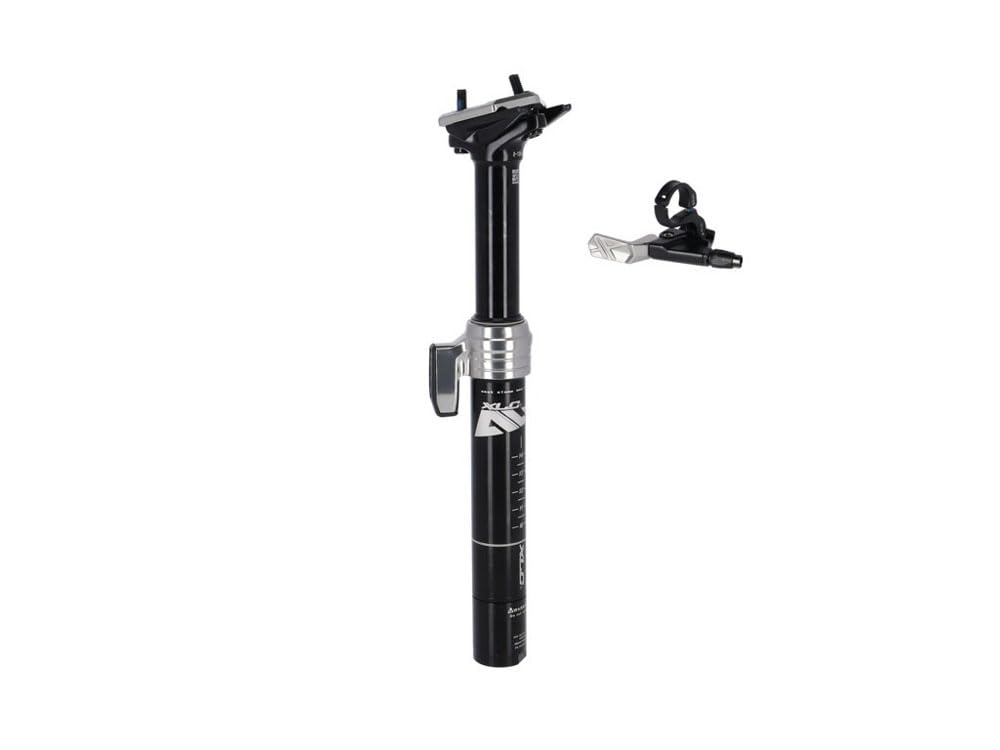
Image: The XLC SP-T10B telescopic seatpost, shown installed on a bicycle. Note the remote cable routing.
3. Install the Remote Lever and Cable
- Mount the remote lever on your handlebar in a comfortable and accessible position.
- Route the cable from the remote lever to the seatpost. The XLC SP-T10B typically features external cable routing. Ensure the cable path is free from kinks and does not interfere with steering or other moving parts.
- Connect the cable to the seatpost mechanism according to the specific instructions provided with your seatpost. Adjust cable tension to ensure smooth operation of the remote lever.
4. Adjust Saddle Angle and Position
- Attach your saddle to the seatpost clamp.
- Adjust the saddle angle and fore/aft position for optimal comfort and pedaling efficiency.
- Tighten the saddle clamp bolts to the recommended torque.
Operating Instructions
The XLC SP-T10B telescopic seatpost allows for quick saddle height adjustments while riding.
Adjusting Saddle Height
- To Lower the Saddle: While seated on the saddle, press and hold the remote lever. The saddle will descend to its lowest position (100mm travel). Release the lever to lock the saddle at any desired height within its travel range.
- To Raise the Saddle: With your weight off the saddle, press and hold the remote lever. The saddle will extend to its fully extended position. Release the lever to lock the saddle at any desired height.
Practice using the remote lever in a safe environment before riding on challenging terrain.
Maintenance
Regular maintenance ensures optimal performance and extends the lifespan of your telescopic seatpost.
- Cleaning: After each ride, especially in wet or dusty conditions, wipe down the exposed stanchion (the shiny upper part of the seatpost) with a clean, soft cloth.
- Lubrication: Apply a small amount of suspension-specific lubricant to the stanchion and wiper seal periodically. Do not use petroleum-based lubricants as they can damage seals.
- Cable Inspection: Check the remote cable and housing for any fraying, kinks, or damage. Replace damaged cables or housing promptly.
- Bolt Torque: Periodically check the torque of the seat collar bolt and saddle clamp bolts.
- Air Pressure (if applicable): Some telescopic seatposts require air pressure adjustments. Consult the specific product documentation for your SP-T10B model to determine if this applies and how to perform it.
Troubleshooting
Here are some common issues and their potential solutions:
| Problem | Possible Cause | Solution |
|---|---|---|
| Seatpost not extending/retracting smoothly | Dirty stanchion, low cable tension, damaged cable/housing, internal issue. | Clean and lubricate stanchion. Adjust cable tension. Inspect and replace cable/housing. If issue persists, seek professional service. |
| Seatpost sags when weighted | Insufficient air pressure (if applicable), internal seal issue. | Check and adjust air pressure according to manufacturer's specifications. If not air-sprung or issue persists, professional service is required. |
| Remote lever feels stiff or unresponsive | Friction in cable/housing, misaligned lever. | Lubricate cable or replace cable/housing. Re-position remote lever for optimal cable routing. |
For issues not listed here or if solutions do not resolve the problem, please contact XLC customer support or a certified bicycle mechanic.
Specifications
| Model | SP-T10B |
| Brand | XLC |
| Part Number | 2502069792 |
| Diameter | 30.9 mm |
| Length | 350 mm |
| Travel | 100 mm |
| Color | Black |
| Weight | 535 Grams |
| Bike Type | All Mountain (VTT) |
Warranty Information
The XLC SP-T10B telescopic seatpost comes with a warranty in accordance with legal provisions. Please retain your proof of purchase for any warranty claims. For specific details regarding warranty terms and conditions, refer to the documentation provided at the time of purchase or contact XLC customer service.
Support
If you require further assistance with the installation, operation, or maintenance of your XLC SP-T10B telescopic seatpost, please:
- Consult your local authorized XLC dealer.
- Visit the official XLC website for product support and FAQs.
- Contact XLC customer service directly.
Related documentsSP-T10B


Ask a question about this manual
Ask about setup, troubleshooting, compatibility, parts, safety, or missing instructions. Manuals+ will review the question and use this page’s manual context to help answer it.