
1. Introduction
This manual provides detailed instructions for the operation and maintenance of your Mugast Digital Satellite Signal Strength Meter Detector. This device is designed to assist in the installation and alignment of satellite dishes, supporting DVB-S/S2/MPEG-2/MPEG4 standards. Please read this manual thoroughly before use to ensure proper functionality and safety.
2. Important Safety Instructions
- Always handle the device with care to prevent damage.
- Do not expose the device to moisture, rain, or extreme temperatures.
- Ensure proper ventilation during operation.
- Use only the provided power adapter for charging.
- Keep out of reach of children.
3. Package Contents
Verify that all items are present in the package:
- Mugast Digital Satellite Signal Strength Meter Detector
- Modulator
- AV Cable
- Antenna
- Power Adapter
- USB Data Cable
- Shoulder Strap
- User Manual
4. Product Overview
The Mugast Digital Satellite Signal Strength Meter Detector features a compact design with a clear display and intuitive controls. It is encased in a protective yellow silicone cover for durability.

Figure 4.1: Front view of the Mugast Digital Satellite Signal Strength Meter Detector, showing the display, control buttons, and a built-in compass.
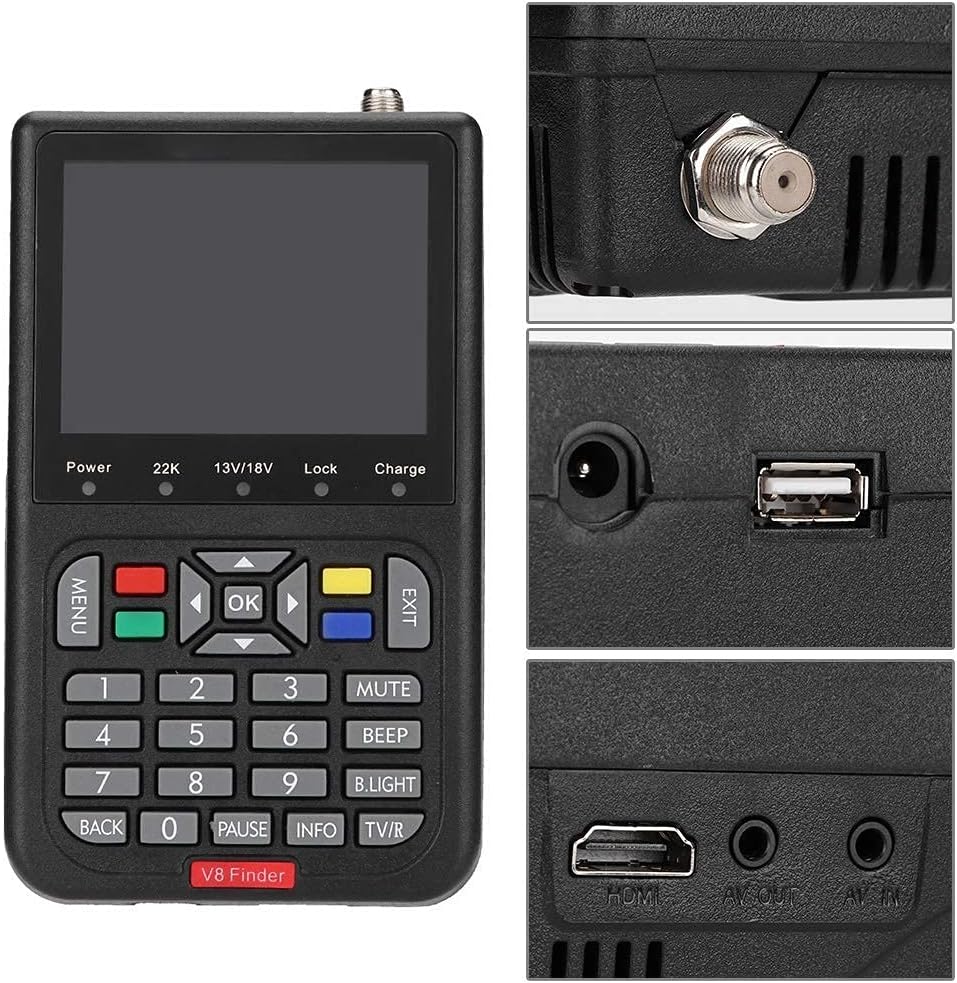
Figure 4.2: Side view illustrating the various ports including LNB IN, USB, DC IN, HDMI, AV OUT, and AV IN connections.
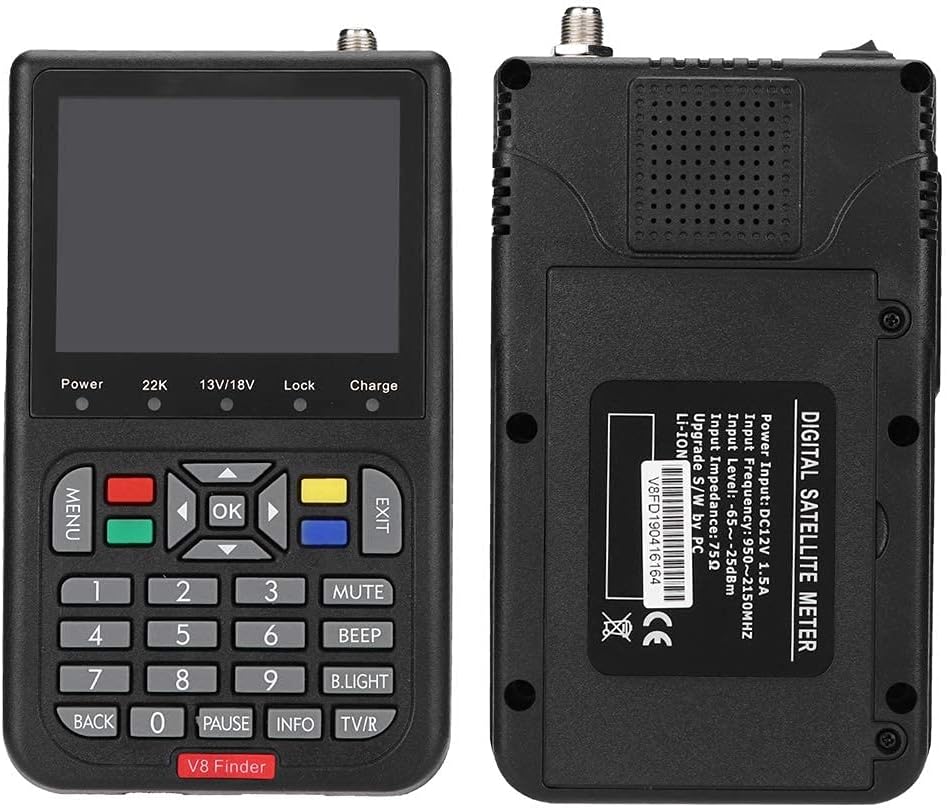
Figure 4.3: Front and back views of the device, highlighting the main display and the rear panel with product information and battery compartment.
5. Setup
Before using your satellite finder, ensure it is fully charged. Connect the LNB cable from your satellite dish to the LNB IN port on the device. Power on the device using the side switch.
Video 5.1: This video demonstrates the initial setup and menu navigation for a similar satellite finder, including satellite selection and LNB settings. It shows how to navigate through the 'Installation' menu to select a satellite, adjust LNB frequency, DiSEqC settings, and LNB power, and then save the configuration. It also briefly shows the 'Antenna Setup' and 'Blind Scan' processes.
6. Operating Instructions
The device's main menu provides access to various functions for satellite installation and signal management. Use the directional buttons and 'OK' button to navigate.
6.1. Main Menu Navigation

Figure 6.1: The main menu displaying options such as Channel List, Satellite Installation, System, and Tools.
6.2. Satellite Installation
To install or adjust a satellite, navigate to 'Satellite Installation' from the main menu. Here you can select the desired satellite, configure LNB frequency, DiSEqC settings, and LNB power. The device provides real-time signal intensity and quality readings.

Figure 6.2: The 'Satellite Installation' screen, showing options for LNB Freq, DiSEqC, 22K, LNB Power, and Motor settings, along with signal intensity and quality bars.
6.3. Signal Scan
After setting up the satellite, perform a signal scan to find available channels. The device supports automatic, manual, and network scanning modes. Navigate to 'Signal Scan' from the main menu.
Video 6.3: This video provides an unboxing and overview of the WS-6933 Digital Satellite Meter Finder, demonstrating its physical features, accessories, and basic menu navigation. It highlights the device's compact size, protective casing, and various ports, as well as showing the main menu options for satellite settings, signal scan, and system settings.
6.4. Channel List
View and manage TV and Radio channels found during the scan. You can access this from the main menu.

Figure 6.4: The 'TV Channel List' screen, showing a list of detected channels and options to favorite, lock, skip, move, or edit channels.
6.5. Tools Menu
The 'Tools' menu offers additional functionalities such as information display, factory settings, USB upgrade, and USB backup options.
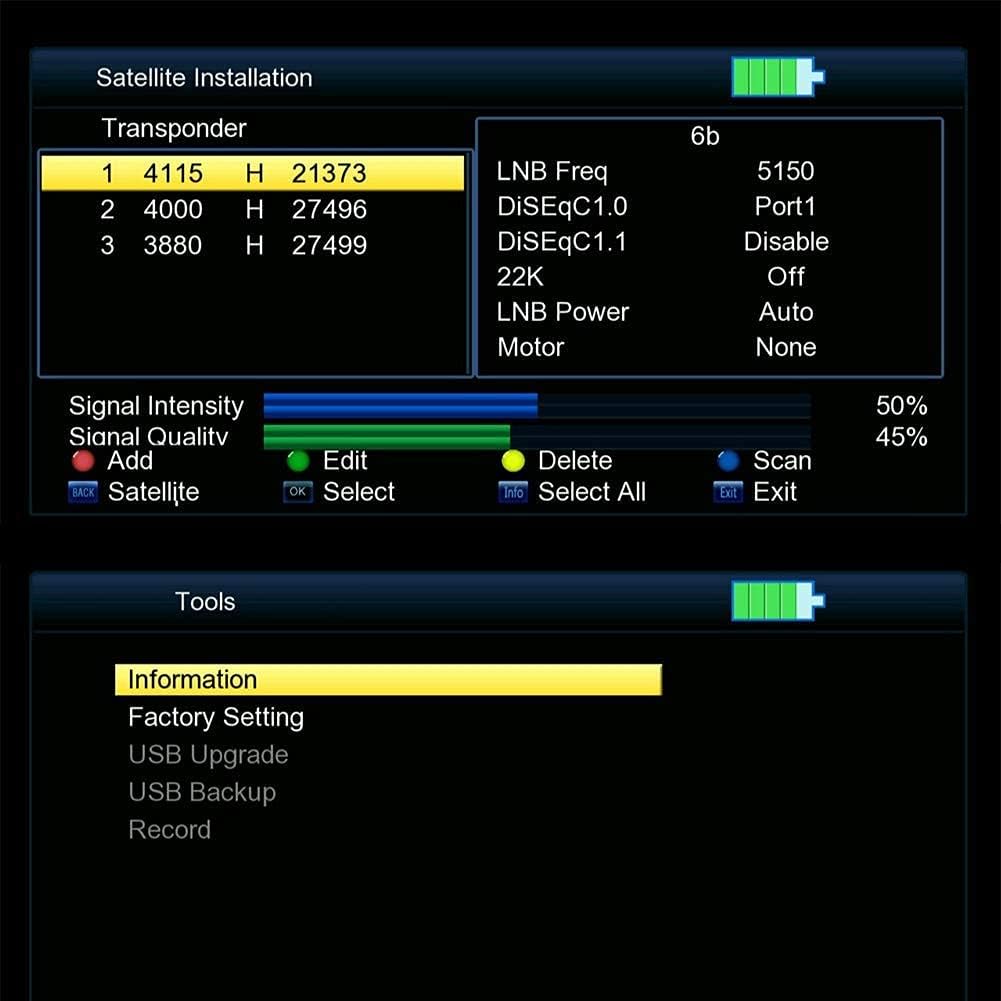
Figure 6.5: The 'Tools' menu, providing access to Information, Factory Setting, USB Upgrade, USB Backup, and Record functions.
7. Maintenance
- Clean the device regularly with a soft, dry cloth. Avoid abrasive cleaners or solvents.
- Store the device in a cool, dry place when not in use.
- Periodically check cables and connectors for wear or damage.
- Ensure the battery is charged before extended storage to maintain battery health.
8. Troubleshooting
- No Power: Ensure the device is charged. Check the power adapter and cable connections.
- No Signal: Verify LNB connections and satellite dish alignment. Check LNB settings (frequency, power) in the 'Satellite Installation' menu.
- Poor Signal Quality: Adjust the satellite dish alignment incrementally. Check for obstructions between the dish and the satellite.
- Device Not Responding: Try restarting the device. If the issue persists, perform a factory reset via the 'Tools' menu (note: this will erase custom settings).
9. Specifications
| Feature | Specification |
|---|---|
| Brand | Mugast |
| Model Number | Mugast8degr1vwpq-01 |
| Item Weight | 1.7 pounds |
| Package Dimensions | 7.6 x 7.2 x 2.32 inches |
| Connectivity Technology | HDMI, USB |
| Total USB Ports | 2 |
| Audio Output Mode | Stereo, Mono |
| Analog Video Output | HDMI |
10. Warranty and Support
For warranty information or technical support, please refer to the documentation included with your purchase or contact Mugast customer service. Keep your proof of purchase for warranty claims.