
ChiButtons B400-37H-200US
ChiButtons B400 Pro 37mm Button Maker Machine Kit Instruction Manual
Model: B400-37H-200US
1. Introduction
This instruction manual provides comprehensive guidance for the safe and effective use of your ChiButtons B400 Pro 37mm Button Maker Machine Kit. Please read this manual thoroughly before operating the machine to ensure proper setup, operation, and maintenance. Retain this manual for future reference.
2. Product Overview
2.1 Kit Contents
The ChiButtons B400 Pro 37mm Button Maker Machine Kit includes the following components:
- ChiButtons B400 Pro Button Maker Machine
- 37mm Round Die Mould Set
- 200 Sets of Pre-Pinned Button Components (Shells, Mylar, Pin-backs)
- Handling Cutter
- Photo Paper (for testing/initial use)

Figure 1: Complete ChiButtons B400 Pro 37mm Button Maker Machine Kit.
2.2 Key Features
- Durable Construction: The machine features an aluminum and stainless-steel build for strength and longevity.
- User-Friendly Design: Engineered for ease of use with a comfortable handle and rust-resistant components.
- Interchangeable Moulds: The swivel-type mould support allows for quick and easy exchange of different sized and shaped die moulds (sold separately).
- Non-Slip Base: Provides added stability during operation.

Figure 2: Key features of the ChiButtons B400 Pro Button Maker.
3. Setup Instructions
Follow these steps to properly set up your button maker machine:
- Unpack Components: Carefully remove all items from the packaging and ensure all listed kit contents are present.
- Position the Machine: Place the button maker on a stable, flat surface. The non-slip base will help secure it during use.
- Install Die Moulds:
- Align the little pin on the mould with the socket on the machine's upper press mechanism.
- Insert the upper mould into the upper mould socket.
- Install Mould A into the holes marked "A" on the swivel plate.
- Install Mould B into the holes marked "B" on the swivel plate.
- Ensure the protruding location pins on Moulds A and B face each other, not away.
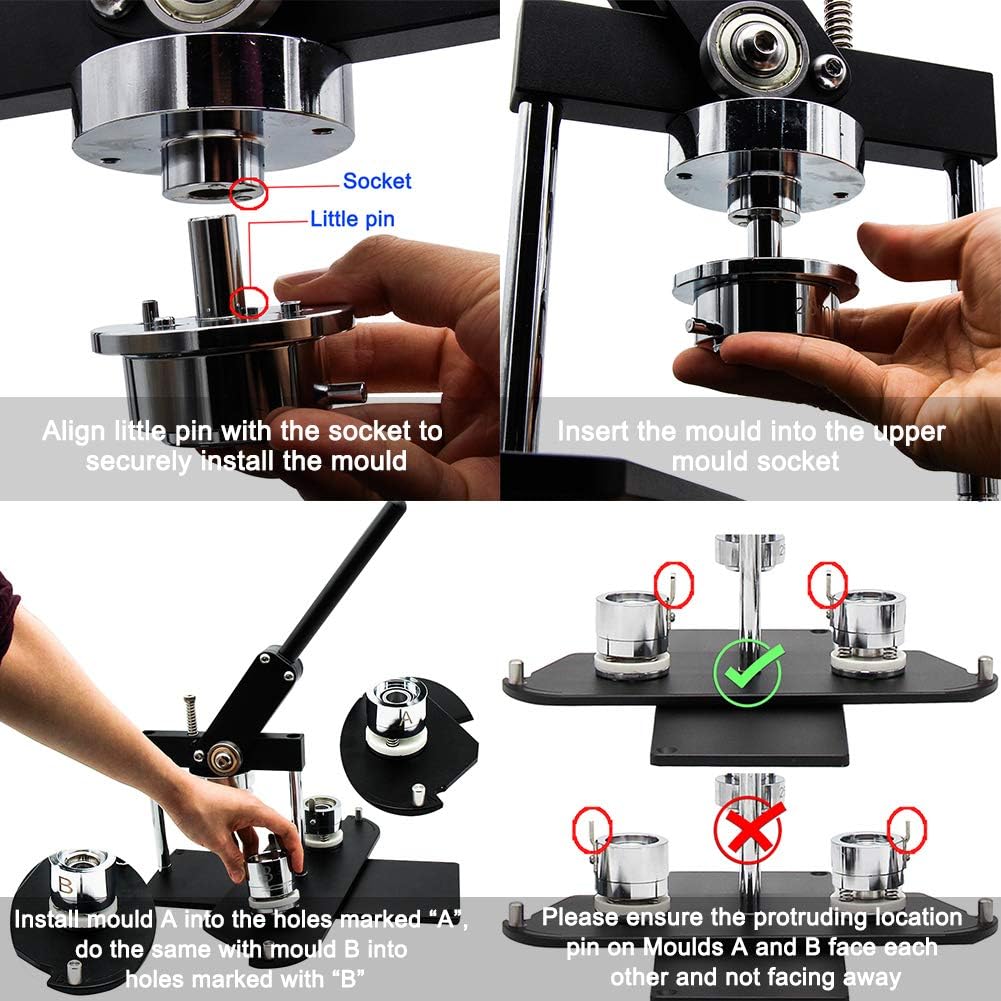
Figure 3: Correct installation of die moulds.
4. Operating Instructions: Making a Button
Follow these steps to create a 37mm button:
- Prepare Your Design: Use the handling cutter to cut your paper design to the appropriate 37mm size.
- Load Mould A: Place the Upper Shell into Mould A. Then, place your paper design on top of the shell, followed by the Mylar film.
- Press First Stage: Pull down the handle firmly to press the components in Mould A. This crimps the design and Mylar onto the shell.
- Load Mould B: Rotate the mould support so Mould B faces the upper press mechanism. Place the Gasket into Mould B, followed by the Pin-back component (pin facing away from the machine).
- Press Second Stage: Pull down the handle firmly once again to press the components in Mould B. This secures the pin-back to the button assembly.
- Retrieve Button: Lift the handle and rotate the mould support. Your finished button can now be removed from Mould B.

Figure 4: Step-by-step button making process.
5. Maintenance
To ensure the longevity and optimal performance of your ChiButtons B400 Pro Button Maker, follow these maintenance guidelines:
- Cleaning: Regularly wipe down the machine with a soft, dry cloth to remove dust and debris. Avoid using abrasive cleaners or solvents.
- Lubrication: Periodically apply a small amount of light machine oil to moving parts, such as the handle pivot points and the mould support swivel, to ensure smooth operation.
- Storage: Store the machine in a dry, clean environment when not in use. Keep die moulds clean and free of foreign objects.
- Inspection: Periodically inspect the machine for any signs of wear or damage. If any issues are found, contact customer service for assistance.
6. Troubleshooting
This section addresses common issues you might encounter. For problems not listed here, please refer to the manufacturer's official support resources.
6.1 Common Issues and Solutions
| Problem | Possible Cause | Solution |
|---|---|---|
| Button does not crimp properly / components fall out | Insufficient pressure applied; incorrect component order; wrong size components. | Ensure the handle is pulled down completely and firmly. Verify components are placed in the correct order (Shell, Design, Mylar). Confirm all components match the 37mm mould size. |
| Pin-back is not securely attached | Insufficient pressure; pin-back incorrectly oriented; missing gasket. | Apply full pressure during the second press. Ensure the pin-back is placed correctly with the pin facing away from the machine. Do not forget the gasket. |
| Machine feels stiff or difficult to operate | Lack of lubrication; debris in moving parts. | Clean the machine and apply light machine oil to pivot points and the mould swivel. |
| Moulds are difficult to install or remove | Incorrect alignment; debris in sockets. | Ensure the little pin on the mould aligns perfectly with the socket. Clean any debris from the mould sockets. |
7. Specifications
| Feature | Detail |
|---|---|
| Product Dimensions | 16.34 x 5.51 x 11.81 inches |
| Item Model Number | B400-37H-200US |
| Item Weight | 13.2 pounds |
| Manufacturer | ChiButtons |
| Button Size (Included) | 37mm (1.5 inches) Round |
| Material | Aluminum and Stainless Steel |

Figure 5: Machine dimensions.
8. Warranty and Support
8.1 Warranty Information
The ChiButtons B400 Pro Button Maker Machine and its moulds are covered by a 1-year warranty from the date of purchase. This warranty covers manufacturing defects under normal use. Please retain your proof of purchase for warranty claims.
8.2 Customer Service
ChiButtons is committed to providing professional and efficient customer service. For any questions, technical assistance, or warranty inquiries, please contact ChiButtons customer support through their official website or the retailer where the product was purchased.
Refillable components of various shapes and sizes, as well as other supplies, are available for purchase from ChiButtons.
Ask a question about this manual
Ask about setup, troubleshooting, compatibility, parts, safety, or missing instructions. Manuals+ will review the question and use this page’s manual context to help answer it.