
1. Introduction
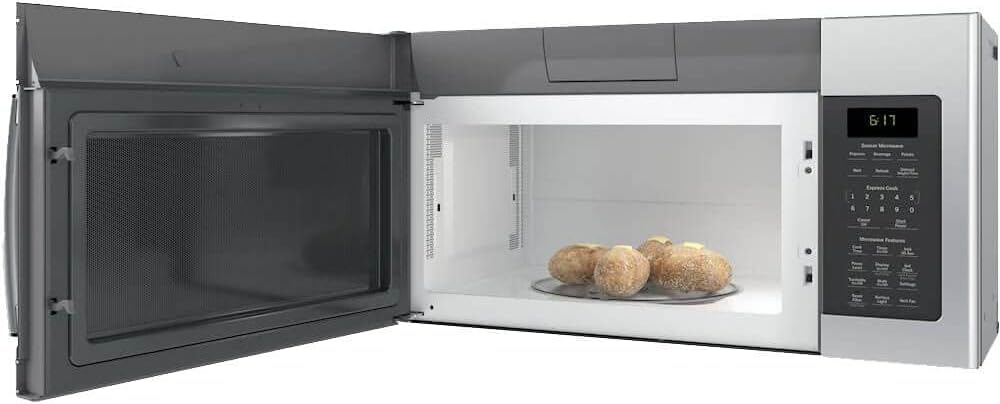
This manual provides essential information for the safe and efficient operation of your new GE 1.7 Cu. Ft. Stainless Steel Over-The-Range Microwave Oven, Model JVM6175YKFS. This appliance is designed to be installed above a cooking range, offering both microwave cooking capabilities and a ventilation system for your kitchen. Please read all instructions carefully before use.
2. Safety Information
Always follow basic safety precautions when using electrical appliances to reduce the risk of burns, electric shock, fire, injury to persons, or exposure to excessive microwave energy.
- Do not attempt to operate this oven with the door open or if the door is damaged.
- Do not heat sealed containers, as they may explode.
- Do not allow children to use the microwave without close supervision.
- Use caution when removing hot items from the microwave.
- Ensure proper ventilation during operation, especially when using the vent fan.
3. Setup
The GE JVM6175YKFS microwave is designed for over-the-range installation. Professional installation is recommended to ensure proper mounting and ventilation setup.
3.1. Installation Type
This microwave is an over-the-range model, designed to be installed above a cooking surface. It integrates seamlessly into your kitchen cabinetry, saving valuable counter space.
3.2. Ventilation Options
The oven is adaptable to three types of ventilation: recirculating, vertical outside exhaust, or horizontal outside exhaust. Consult the detailed installation instructions provided with the product for specific guidance on configuring the ventilation system.
3.3. Dimensions
Ensure your installation space accommodates the microwave's dimensions: 15.56"D x 29.88"W x 16.31"H.
3.4. Installation Overview Video
Video 1: An overview of the GE JVM6175YKFS microwave, highlighting its features and suitability for over-the-range installation. This video provides visual context for the appliance's design and functionality.
4. Operating Instructions
Your microwave oven features intuitive controls for various cooking needs.
4.1. Basic Cooking
- Cook Time: Press the 'Cook Time' button, enter the desired cooking duration using the number pad, and then press 'Start/Pause'.
- Power Level: To adjust power, press 'Power Level', enter a number from 1-10 (10 being 100% power), and then press 'Start/Pause'.
- Add 30 Sec: Press this button to instantly add 30 seconds of cooking time at 100% power.
4.2. Express Cook
For quick cooking, simply press any number from 1 to 5 on the number pad to cook for that many minutes at 100% power. For example, pressing '1' will cook for 1 minute.
4.3. Sensor Cooking Controls
The microwave features sensor cooking for optimal results:
- Popcorn: Automatically pops popcorn based on package size.
- Beverage: Heats beverages to an ideal temperature.
- Potato: Cooks potatoes thoroughly.
- Melt: Gently melts butter, chocolate, or cheese.
- Reheat: Reheats various foods to a serving temperature.
- Defrost Weight/Time: Defrosts food based on weight or a set time.
4.4. Turntable Operation
The glass turntable ensures even cooking. You can turn the turntable function On or Off using the dedicated control button if needed for oversized dishes.
4.5. Clock and Timer
- Set Clock: Press 'Set Clock' and follow the prompts to set the current time.
- Timer On/Off: Use this feature for general kitchen timing, independent of microwave cooking.
4.6. Vent Fan and Surface Light
- Vent Fan: The two-speed, 300-CFM venting system helps remove smoke, steam, and odors from your cooking surface. Press 'Vent Fan' to cycle through speeds (Low, High, Off).
- Surface Light: Illuminates your cooking surface. Press 'Surface Light' to turn it on or off.

4.7. User-Friendly Operation Video
Video 2: A demonstration of the GE Stainless Microwave's user-friendly controls and features, including express cook and sensor cooking options.
5. Maintenance
Regular cleaning and maintenance will ensure the longevity and optimal performance of your microwave oven.
5.1. Cleaning the Exterior
The stainless steel exterior features a fingerprint-resistant finish. Wipe with a soft, damp cloth and mild soap, then dry thoroughly. Avoid abrasive cleaners or scouring pads.

5.2. Cleaning the Interior
Clean the interior with a soft cloth, warm water, and mild soap. For stubborn food splatters, place a bowl of water with lemon slices inside and microwave for a few minutes to loosen residue, then wipe clean.
5.3. Turntable Care
The glass turntable can be removed for easy cleaning and is dishwasher safe.
5.4. Filter Maintenance
The microwave includes an upfront charcoal filter with an indicator light. When the indicator light illuminates, it's time to clean or replace the filter to maintain effective ventilation.
6. Troubleshooting
If you encounter issues with your microwave, refer to the following common solutions before contacting service.
| Problem | Possible Cause | Solution |
|---|---|---|
| Microwave does not operate | Door not closed properly; Power outage; Blown fuse/tripped circuit breaker. | Ensure door is securely closed. Check household fuses or circuit breakers. |
| Food not heating evenly | Food not stirred or rearranged; Turntable not rotating. | Stir or rearrange food during cooking. Check if turntable is properly seated and functioning. |
| Excessive noise during operation | Turntable not properly seated; Foreign object in the cavity. | Ensure turntable is correctly positioned. Remove any obstructions. |
| Vent fan not working | Fan speed set to 'Off'; Filter clogged. | Press 'Vent Fan' to select a speed. Clean or replace the charcoal filter. |
7. Specifications
- Model Number: JVM6175YKFS
- Capacity: 1.7 Cubic Feet
- Color: Stainless Steel
- Product Dimensions (D x W x H): 15.56"D x 29.88"W x 16.31"H
- Wattage: 1000 watts
- Voltage: 120 Volts
- Material: Stainless Steel
- Special Features: Fingerprint Resistant Stainless, Sensor Cooking Controls, Turntable, Two-Speed 300-CFM Venting System, Upfront Charcoal Filter with Indicator Light
- Installation Type: Over-the-Range
- UPC: 084691845461
8. Warranty & Support
8.1. Limited Warranty
This GE microwave oven comes with a Limited 1-year warranty covering the entire appliance. For detailed terms and conditions, please refer to the warranty card included with your product or visit the official GE Appliances website.
8.2. Customer Support
For technical assistance, service scheduling, or to order replacement parts, please contact GE Appliances customer support. You can find contact information on the GE Appliances website or in your product documentation.


