
1. Introduction
This manual provides essential information for the safe operation, setup, and maintenance of your SYMA S39 RC Helicopter. The S39 features a 3.5-channel control system, a built-in gyro stabilizer for enhanced flight stability, and a durable alloy construction. It operates on 2.4GHz spread spectrum technology, allowing for multiple aircraft to fly simultaneously without interference.
Please read this manual thoroughly before operating the helicopter to ensure proper function and to prevent damage or injury.
2. What's in the Box
Verify that all components listed below are present in your package:
- SYMA S39 RC Helicopter
- Remote Control Transmitter
- USB Charging Cable
- Instruction Manual
- Screwdriver
- Spare Tail Rotor Blade (Spoiler)

3. Components Overview
3.1. SYMA S39 Helicopter

The S39 helicopter is constructed with a high-strength plastic body and an alloy frame for durability and resistance to impacts. It features flexible blades designed to withstand minor crashes.

3.2. Remote Control Transmitter
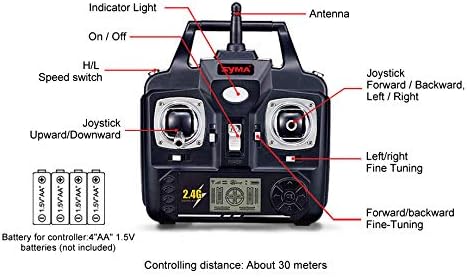
The remote control features:
- Indicator Light: Shows power status.
- Antenna: For signal transmission.
- On/Off Switch: Powers the remote control.
- H/L Speed Switch: Toggles between High and Low-speed flight modes.
- Left Joystick (Upward/Downward): Controls throttle (ascend/descend) and yaw (turn left/right).
- Right Joystick (Forward/Backward, Left/Right): Controls pitch (forward/backward) and roll (sideways movement).
- Left/Right Fine-Tuning: Adjusts yaw trim for stable hovering.
- Forward/Backward Fine-Tuning: Adjusts pitch trim for stable hovering.
4. Setup
4.1. Remote Control Battery Installation
- Locate the battery compartment on the back of the remote control.
- Open the battery cover.
- Insert four (4) 1.5V AA batteries (not included), ensuring correct polarity (+/-).
- Close the battery cover securely.
4.2. Helicopter Battery Charging
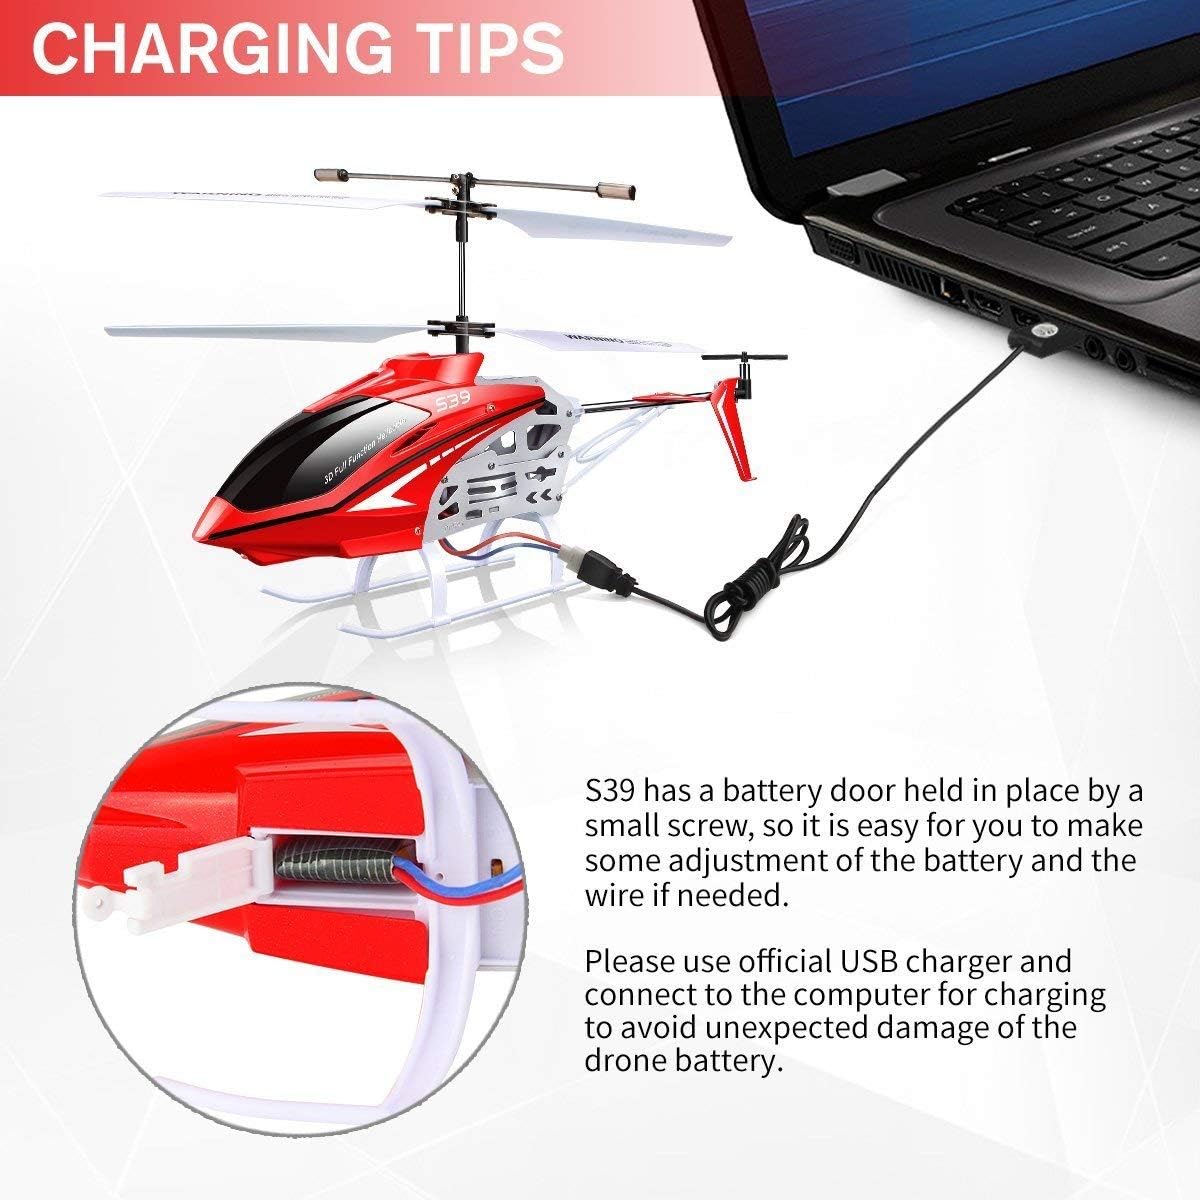
The S39 helicopter uses an internal rechargeable battery. To charge:
- Ensure the helicopter's power switch is in the OFF position.
- Locate the battery door on the helicopter, typically secured by a small screw. Use the provided screwdriver to open it.
- Connect the helicopter's internal battery wire to the charging port inside the helicopter. This is a critical step for charging.
- Connect the USB charging cable to the helicopter's charging port.
- Plug the other end of the USB charging cable into a computer's USB port or a suitable USB power adapter.
- The indicator light on the USB cable will typically illuminate during charging and turn off or change color when fully charged.
- Once charging is complete, disconnect the USB cable, and ensure the internal battery wire is securely connected for flight. Close the battery door.
Note: Use only the official USB charger provided to prevent damage to the helicopter's battery. Do not attempt to charge the battery if it is damaged or swollen.
5. Operating Instructions
5.1. Pairing the Helicopter and Remote
- Ensure both the helicopter and remote control have fresh batteries.
- Place the helicopter on a flat, level surface.
- Turn on the helicopter's power switch. The helicopter's indicator light will flash.
- Turn on the remote control's power switch.
- Push the left joystick (throttle) all the way up, then pull it all the way down. The indicator lights on both the helicopter and remote control should become solid, indicating successful pairing.
5.2. Basic Flight Controls

- Ascend/Descend: Push the left joystick up to ascend, pull down to descend.
- Forward/Backward: Push the right joystick up to move forward, pull down to move backward.
- Turn Left/Right (Yaw): Push the left joystick left to turn the helicopter counter-clockwise, push right to turn clockwise.
- Fine-Tuning (Trimming): If the helicopter drifts or rotates unintentionally during hover, use the fine-tuning buttons on the remote control to adjust its stability. For example, if it rotates clockwise, press the left fine-tuning button until it stabilizes.
5.3. Speed Modes
The H/L Speed switch on the remote control allows you to select between two flight speeds:
- Low Speed (L): Recommended for beginners and indoor flight, offering more stable and controlled movements.
- High Speed (H): Provides faster and more agile flight, suitable for experienced pilots.
5.4. Flight Environment
The SYMA S39 helicopter is primarily designed for indoor use to achieve the best flight experience. Ensure you have a clear, open space free from obstacles, people, and pets.
6. Safety Guidelines
- Adult Supervision: Always operate the helicopter under adult supervision, especially for younger users.
- Clear Area: Fly in an open area free from obstacles, people, and animals to prevent collisions and injuries.
- Avoid Water: Do not operate the helicopter near water or in wet conditions.
- Battery Safety: Do not short-circuit, disassemble, or expose batteries to extreme temperatures. Dispose of used batteries responsibly.
- Rotor Blades: Keep hands, face, and hair away from rotating blades. Do not touch the helicopter while the blades are spinning.
- Power Off: Always turn off the helicopter and remote control after use.
- Impacts: After any significant impact, inspect the helicopter for damage before flying again.
7. Maintenance
- Cleaning: Use a soft, dry cloth to clean the helicopter and remote control. Avoid using solvents or harsh chemicals.
- Blade Inspection: Regularly check rotor blades for cracks, bends, or damage. Replace damaged blades immediately using the provided screwdriver and spare parts.
- Battery Care: Store the helicopter with a partially charged battery if not used for extended periods. Do not leave batteries fully discharged or fully charged for long durations.
- Storage: Store the helicopter and remote control in a cool, dry place away from direct sunlight.
8. Troubleshooting
| Problem | Possible Cause | Solution |
|---|---|---|
| Helicopter does not respond to remote. | Low battery in helicopter or remote; Not paired; Power switches off. | Charge helicopter battery; Replace remote batteries; Ensure both are powered on and paired correctly. |
| Short flight time. | Battery not fully charged; Old or damaged battery. | Ensure battery is fully charged; Consider replacing the battery if it's old or shows signs of damage. |
| Helicopter drifts or spins during hover. | Needs fine-tuning; Damaged rotor blades. | Use the fine-tuning buttons on the remote; Inspect and replace damaged blades. |
| Weak control signal. | Out of range; Interference; Obstacles between remote and helicopter. | Operate within the specified range (approx. 30 meters); Ensure clear line of sight; Avoid areas with strong electronic interference. |
| Helicopter does not charge. | Internal battery wire not connected; Faulty USB cable or power source. | Ensure the internal battery wire is connected to the charging port inside the helicopter (refer to Section 4.2); Try a different USB port or power adapter; Check USB cable for damage. |
9. Specifications
| Feature | Detail |
|---|---|
| Model Number | S39 |
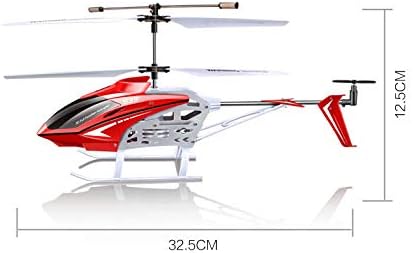
| Product Dimensions | 14.25 x 2.24 x 6.1 inches (36.2 x 5.7 x 15.5 cm) |
| Item Weight | 15.2 ounces (430 grams) |
| Control Channels | 3.5 Channels (Up/Down, Forward/Backward, Left/Right Turn) |
| Stabilization | Built-in Gyro Stabilizer |
| Material | Alloy Frame, High-strength Plastic Body |
| Remote Control Frequency | 2.4 GHz |
| Remote Control Batteries | 4 x AA 1.5V batteries (not included) |
| Manufacturer Recommended Age | 8 years and up |

10. Warranty and Support
For warranty information and customer support, please contact the retailer where you purchased the SYMA S39 RC Helicopter or refer to the official SYMA website. Keep your proof of purchase for any warranty claims.


