
1. Introduction
Thank you for purchasing the H-Tech HT-1019 1-DIN Car MP3 Player. This device is designed to provide high-quality audio entertainment in your vehicle, featuring USB, Micro SD, Auxiliary, Bluetooth connectivity, and an FM radio tuner. Please read this manual thoroughly before installation and operation to ensure proper use and to maximize your listening experience.
2. Safety Information
- Do not operate the unit in a way that distracts you from driving. Always prioritize road safety.
- Ensure proper wiring connections to prevent short circuits or damage to the vehicle's electrical system. Consult a professional if unsure about installation.
- Avoid exposing the unit to extreme temperatures, direct sunlight, or moisture.
- Do not attempt to disassemble or modify the unit. This may void the warranty and cause damage.
- Keep the volume at a moderate level to avoid hearing damage and to remain aware of traffic sounds.
3. Package Contents
Verify that all items are present in the package:
- H-Tech HT-1019 Car MP3 Player Unit
- Remote Control
- Wiring Harness
- Mounting Hardware (Screws, Mounting Frame)
- User Manual (This document)

Figure 3.1: Included components: MP3 player, remote control, and wiring harness.
4. Product Overview
Familiarize yourself with the main features and controls of your H-Tech HT-1019 unit.
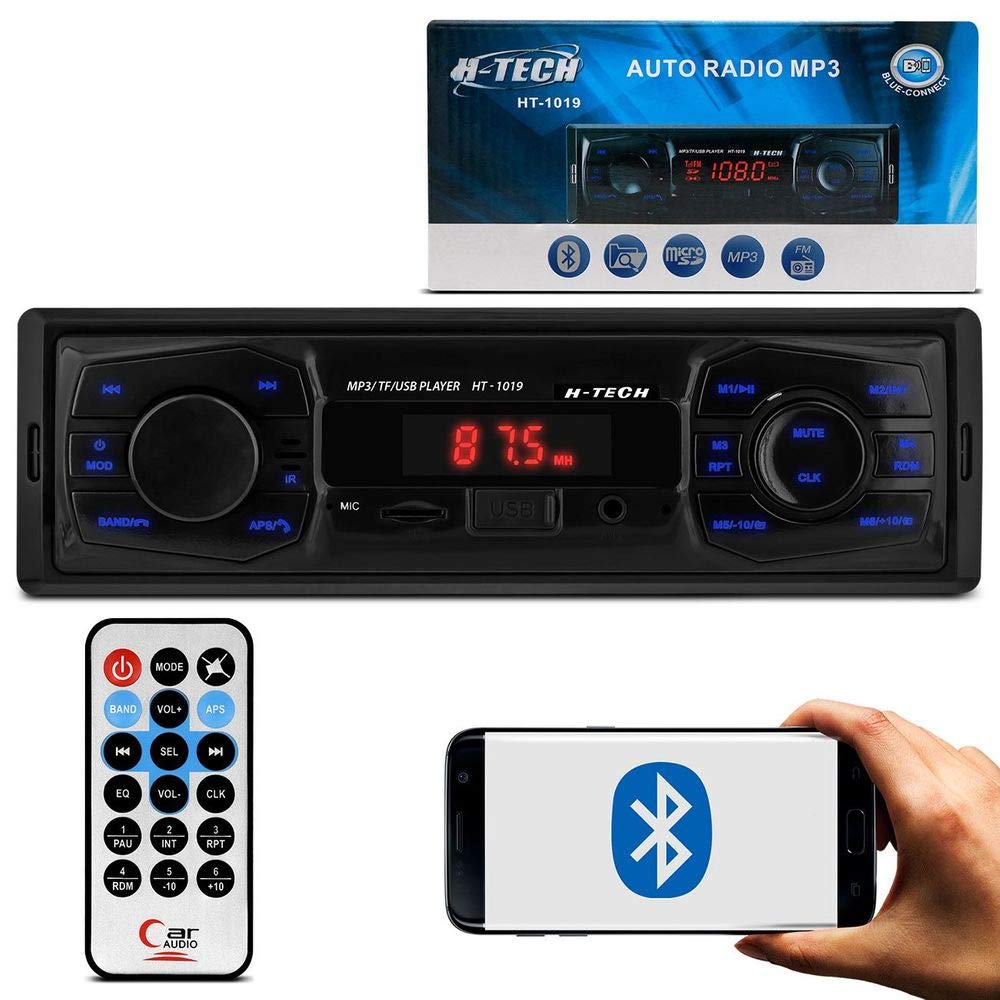
Figure 4.1: Front panel of the H-Tech HT-1019 Car MP3 Player.
4.1 Front Panel Controls
- Power/Mode Button (MOD): Press to turn on/off. Short press to cycle through modes (FM, USB, SD, AUX, Bluetooth).
- Volume Knob: Rotate to adjust volume. Press to select menu options.
- Band/APS Button: In FM mode, short press to cycle through radio bands (FM1, FM2, FM3). Long press for Automatic Preset Store.
- Previous/Next Track Buttons (|<>|): Short press to change tracks/stations. Long press for fast rewind/forward.
- Mute Button (MUTE): Mutes or unmutes audio.
- Repeat Button (RPT): Repeats current track.
- Random Button (RDM): Plays tracks in random order.
- Clock Button (CLK): Displays time. Long press to set time.
- USB Port: For connecting USB flash drives.
- Micro SD Card Slot (TF): For inserting Micro SD cards.
- AUX Input: 3.5mm jack for external audio devices.
- Microphone (MIC): For Bluetooth hands-free calling.
- Display: Shows current mode, frequency, track information, and time.

Figure 4.2: Key features and connectivity options of the HT-1019.
5. Installation and Setup
Proper installation is crucial for optimal performance. If you are unsure about any steps, it is recommended to seek professional assistance.
5.1 Wiring Diagram
Refer to the wiring harness for correct connections. Incorrect wiring can damage the unit or your vehicle.
- Yellow Wire: Constant 12V (Battery Positive)
- Red Wire: ACC 12V (Ignition Switched Positive)
- Black Wire: Ground (Chassis Ground)
- Blue Wire: Antenna/Amplifier Remote Turn-On
- Speaker Wires: Connect to corresponding vehicle speakers (e.g., White/White-Black for Front Left, Gray/Gray-Black for Front Right, Green/Green-Black for Rear Left, Purple/Purple-Black for Rear Right). Ensure correct polarity.
Figure 5.1: Rear panel connections and wiring harness.
5.2 Mounting the Unit
The HT-1019 is a standard 1-DIN size unit. Follow these general steps for installation:
- Remove the existing car stereo (if any) and its mounting sleeve.
- Insert the provided mounting sleeve into the dashboard opening. Bend the tabs outwards to secure it.
- Make all necessary electrical connections using the wiring harness.
- Slide the HT-1019 unit into the mounting sleeve until it clicks into place.
- Reassemble the dashboard trim.

Figure 5.2: Side view illustrating the 1-DIN chassis for mounting.

Figure 5.3: Illustrative image of the HT-1019 installed in a vehicle dashboard.
6. Operating Instructions
6.1 Basic Operations
- Power On/Off: Press the MOD button to turn the unit on. Long press to turn off.
- Mode Selection: Short press the MOD button to cycle through available modes: FM Radio, USB, Micro SD, AUX, Bluetooth.
- Volume Control: Rotate the Volume Knob clockwise to increase volume, counter-clockwise to decrease.
- Mute: Press the MUTE button to silence the audio. Press again to restore.
- Clock Setting: Press CLK to display the time. Long press CLK to enter time setting mode. Use the volume knob or track buttons to adjust hours and minutes, then press CLK again to confirm.
6.2 FM Radio Operation
- Select FM Mode: Press MOD until FM mode is selected.
- Change Band: Short press BAND to switch between FM1, FM2, FM3.
- Automatic Search & Store (APS): Long press BAND/APS to automatically scan and store strong stations into the current band's presets.
- Manual Tuning: Short press |<>| buttons to fine-tune the frequency.
- Preset Stations: Short press the numbered buttons (1-6) on the remote control to select a stored preset station.
6.3 USB/Micro SD Playback
- Insert a USB flash drive into the USB port or a Micro SD card into the TF slot. The unit will automatically switch to USB/SD mode and begin playback.
- Play/Pause: Press the Play/Pause button (usually the volume knob press or a dedicated button on the remote).
- Next/Previous Track: Press |<>| buttons.
- Fast Forward/Rewind: Long press |<>| buttons.
- Repeat: Press RPT to cycle through repeat modes (e.g., repeat one, repeat all).
- Random: Press RDM to enable/disable random playback.
6.4 Bluetooth Operation
- Pairing:
- Switch the unit to Bluetooth mode by pressing MOD. The display will show "BT" or "PAIRING".
- Enable Bluetooth on your mobile device and search for available devices.
- Select "H-Tech HT-1019" or similar from the list.
- If prompted for a password, enter "0000".
- Once paired, the display will show "CONNECTED".
- Audio Streaming: Play music from your paired device. Use the unit's |<>| buttons or your phone to control tracks.
- Hands-Free Calling:
- Answer Call: Press the Answer button (often the volume knob press or a dedicated button on the remote).
- End Call: Press the End Call button.
- Redial: Long press the Answer button to redial the last number.
6.5 Auxiliary Input (AUX)
- Connect an external audio device (e.g., smartphone, MP3 player) to the AUX input jack on the front panel using a 3.5mm audio cable.
- Press MOD until "AUX" mode is selected.
- Control playback (play, pause, track change) directly from your connected device. The unit's volume control will still function.
6.6 Remote Control Usage
The included remote control provides convenient access to various functions. Ensure the remote has a working battery and is pointed towards the unit's IR receiver.
- Power Button: Turns the unit on/off.
- MODE: Cycles through input modes.
- VOL+/VOL-: Adjusts volume.
- BAND: Changes FM bands.
- EQ: Cycles through equalizer presets.
- SEL: Enters audio settings menu (Bass, Treble, Balance, Fader).
- Numbered Buttons (1-6): Selects preset radio stations or specific tracks.
- |<>|: Next/Previous track or station.
- RPT: Repeat function.
- RDM: Random playback.
- MUTE: Mutes audio.
- CLK: Displays/sets clock.
7. Maintenance
- Cleaning: Use a soft, dry cloth to clean the unit's front panel. Do not use abrasive cleaners or solvents.
- USB/SD Slots: Keep the USB port and Micro SD card slot free from dust and debris.
- Remote Control Battery: Replace the remote control battery (CR2025 or equivalent) when its range decreases or it stops functioning.
8. Troubleshooting
| Problem | Possible Cause | Solution |
|---|---|---|
| No power | Incorrect wiring; Blown fuse; Loose connection. | Check wiring connections (Yellow to constant 12V, Red to ACC 12V, Black to Ground). Check vehicle's fuse box and the unit's fuse. Ensure connections are secure. |
| No sound | Volume too low; Mute activated; Incorrect speaker wiring; Incorrect mode. | Increase volume. Deactivate MUTE. Check speaker wiring polarity and connections. Ensure correct input mode is selected. |
| FM radio reception is poor | Antenna not connected or damaged; Weak signal area. | Ensure car antenna is properly connected. Try a different location or a stronger antenna. |
| USB/SD not playing | Unsupported file format; Corrupted files; Incorrectly inserted device; Device not recognized. | Ensure files are in supported formats (e.g., MP3). Reinsert USB/SD card. Try a different USB/SD device. Format the device to FAT32. |
| Bluetooth pairing failed | Unit not in pairing mode; Device too far; Incorrect password; Previous connection interference. | Ensure unit is in Bluetooth mode and "PAIRING" is displayed. Keep devices close. Enter "0000" if prompted. Delete previous pairings on your phone and retry. |
| Remote control not working | Dead battery; Obstruction; Not pointed correctly. | Replace battery. Remove any obstructions between remote and unit. Point remote directly at the unit's IR sensor. |
9. Specifications
| Model | HT-1019 |
| Power Supply | DC 12V (10.8V-14.4V) |
| Max Power Output | 4 x 45W |
| Impedance | 4 Ohms |
| FM Frequency Range | 87.5 - 108.0 MHz |
| Connectivity | USB, Micro SD, Auxiliary (3.5mm), Bluetooth |
| Bluetooth Version | 2.0 (Typical) |
| Supported Audio Formats | MP3, WMA |
| Dimensions (W x H x D) | Standard 1-DIN (approx. 178 x 50 x 120 mm) |
| Weight | 308 Grams |
10. Warranty and Support
For warranty information and technical support, please refer to the warranty card included with your product or contact H-Tech customer service through their official website or the retailer where the product was purchased. Keep your proof of purchase for warranty claims.
Manufacturer: H-Tech


