
1. Safety Information
Read all instructions carefully before operating the fan. Retain this manual for future reference.
- Ensure the power supply voltage matches the rating label on the fan (220-240V~ 50/60Hz).
- Do not operate the fan with a damaged cord or plug. If the cord is damaged, it must be replaced by the manufacturer, its service agent, or similarly qualified persons to avoid a hazard.
- Keep hands, hair, clothing, and other objects away from the fan blades during operation to prevent injury.
- Always unplug the fan from the power outlet before cleaning, performing maintenance, or when not in use.
- Place the fan on a stable, level surface to prevent it from tipping over.
- This fan is intended for indoor use only. Do not use outdoors or in wet conditions.
- Do not insert any objects into the fan grilles.
- Supervise children to ensure they do not play with the appliance.
2. Product Components
The Sona 20-inch Power Stand Fan SSO 6068 includes the following main components:
- Fan Head (includes motor housing, blades, front and rear grilles)
- Stand Pole
- Round Base
- Power Cord with Plug

Image 1: Front view of the assembled Sona 20-inch Power Stand Fan.
3. Assembly Instructions
Follow these steps to assemble your Sona Power Stand Fan:
- Attach the Base: Place the stand pole into the center opening of the round base. Secure it firmly using the provided fasteners (if any, typically a large screw or knob from underneath the base).
- Mount the Fan Head: Carefully place the fan head assembly onto the top of the stand pole. Ensure it is seated correctly and tighten any securing screws or knobs to prevent wobbling.
- Install Rear Grille: If the grilles are separate, attach the rear grille to the motor housing, aligning the mounting holes. Secure it with the provided nuts or clips.
- Attach Fan Blade: Slide the fan blade onto the motor shaft. Ensure it is oriented correctly and secure it with the spinner cap, turning it counter-clockwise to tighten.
- Install Front Grille: Place the front grille over the rear grille, aligning the clips or securing ring. Fasten it securely to prevent accidental contact with the blades.

Image 2: Rear view of the assembled fan, showing the motor housing and power cord connection.
4. Operating Instructions
To operate your Sona Power Stand Fan:
- Power Connection: Insert the power plug into a suitable 220-240V~ 50/60Hz wall outlet.
- Speed Selection: Locate the control knob on the motor housing. Turn the knob to select your desired fan speed:
- 0: Off
- 1: Low Speed
- 2: Medium Speed
- 3: High Speed
- Oscillation Function: To activate the left-right oscillating movement, push down the oscillation pin located on top of the motor housing. To stop oscillation, pull the pin up.
- Adjusting Fan Head Tilt: To adjust the vertical angle of the fan head, loosen the tilt adjustment knob (usually located on the side of the fan head support), tilt the fan head to the desired position, and then tighten the knob firmly.

Image 3: Close-up view of the fan's control knob for speed selection.
5. Care and Cleaning
Regular cleaning and maintenance will ensure optimal performance and extend the life of your fan.
- Always unplug the fan from the power outlet before cleaning.
- Exterior Cleaning: Wipe the exterior surfaces of the fan with a soft, damp cloth. Do not use abrasive cleaners, waxes, or polishes as these may damage the finish.
- Grille and Blade Cleaning: Dust and lint can accumulate on the grilles and blades, affecting airflow. Periodically, remove the front grille (refer to assembly instructions in reverse) and wipe the blades and grilles with a soft, dry or slightly damp cloth. Ensure all parts are completely dry before reassembling and operating the fan.
- The fan blades are made of lightweight alloy with an anti-rust coating, requiring minimal special care beyond regular cleaning.
- Storage: When not in use for extended periods, unplug the fan, clean it thoroughly, and store it in a cool, dry place, preferably in its original packaging.
6. Troubleshooting
If you encounter issues with your fan, refer to the following troubleshooting guide:
| Problem | Possible Cause | Solution |
|---|---|---|
| Fan does not turn on | No power supply Fan speed set to '0' (Off) | Check if the plug is securely inserted into a working outlet. Turn the speed control knob to '1', '2', or '3'. |
| Weak or no airflow | Low speed setting Grilles or blades are dirty | Increase the fan speed using the control knob. Unplug the fan and clean the grilles and blades as per the 'Care and Cleaning' section. |
| Unusual noise or rattling | Loose parts Fan not on a stable surface | Unplug the fan and check if all assembly screws and grilles are securely fastened. Ensure the fan is placed on a flat, stable surface. |
| Oscillation not working | Oscillation pin not engaged | Push down the oscillation pin firmly to engage the function. |
If the problem persists after attempting these solutions, contact customer support.
7. Technical Specifications
| Feature | Specification |
|---|---|
| Model Number | SSO 6068 |
| Brand | Sona |
| Type | 20-inch Power Stand Fan (Floor Fan) |
| Power Source | Corded Electric |
| Voltage | 220-240V~ |
| Frequency | 50/60Hz |
| Wattage | 130W |
| Motor Type | 100% Full Copper Ball Bearing Motor |
| Number of Blades | 3 |
| Blade Material | Lightweight Alloy with Anti-Rust Coating |
| Speed Settings | 3 (Low, Medium, High) |
| Control Type | Button Control (Knob) |
| Special Features | Left-Right Oscillating Function |
| Dimensions (D x W x H) | 45D x 50W x 135H centimetres |
| Indoor/Outdoor Usage | Indoor |
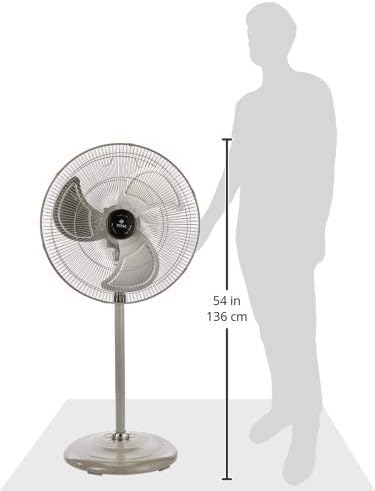
Image 4: The Sona 20-inch Power Stand Fan shown with a person for scale, indicating its approximate height.
8. Warranty and Customer Support
Your Sona 20-inch Power Stand Fan SSO 6068 comes with a warranty to ensure your peace of mind.
- Motor Warranty: A 5-year warranty is provided specifically for the motor component of this fan.
- For warranty claims, technical assistance, or any product-related inquiries, please contact Sona customer service or your authorized retailer. Keep your purchase receipt as proof of purchase.