
Festool TS 55 REBQ-Plus-FS Dive Saw Instruction Manual
Model: TS 55 REBQ-Plus-FS | Brand: Festool
1. Introduction
This manual provides essential information for the safe and effective operation, setup, and maintenance of your Festool TS 55 REBQ-Plus-FS dive saw. Please read all instructions carefully before using the tool to ensure proper function and to prevent injury.
The Festool TS 55 REBQ-Plus-FS is a precision dive saw designed for accurate cuts in various materials, primarily wood. Its features include a guide wedge for safe operation, a viewing window for clear sight of the cut line, and an adjustable angle setting for versatile applications.
2. Safety Information
Always observe general power tool safety warnings and guidelines. Failure to follow these instructions may result in electric shock, fire, and/or serious injury.
- Work Area Safety: Keep your work area clean and well-lit. Cluttered or dark areas invite accidents.
- Electrical Safety: Do not expose power tools to rain or wet conditions. Avoid body contact with earthed or grounded surfaces.
- Personal Safety: Always wear eye protection, hearing protection, and a dust mask. Secure loose clothing and long hair.
- Tool Use and Care: Do not force the power tool. Use the correct power tool for your application. Disconnect the plug from the power source before making any adjustments, changing accessories, or storing power tools.
- Kickback Prevention: Ensure the workpiece is properly supported. Use a sharp saw blade. Avoid cutting into existing nails or screws.
3. Setup
3.1 Unpacking and Component Check
Carefully unpack all components and verify against the packing list. The standard delivery includes:
- Festool TS 55 REBQ-Plus-FS Dive Saw
- Festool Guide Rail FS 1400/2
- HW Saw Blade W48
- Splitter Protection
- Viewing Window
- Work Tool (e.g., hex key for blade changes)
- Festool Systainer SYS3 M 337 (storage and transport case)

Image 3.1: Complete Festool TS 55 REBQ-Plus-FS kit, including the saw, guide rail, saw blade, and Systainer storage case.
3.2 Blade Installation
- Ensure the saw is unplugged from the power source.
- Press the spindle lock button to secure the saw blade.
- Use the provided work tool (hex key) to loosen the blade retaining screw.
- Remove the old blade and carefully place the new HW W48 saw blade, ensuring the rotation direction matches the arrow on the saw.
- Tighten the blade retaining screw securely.

Image 3.2: Detailed view of the saw blade area, illustrating the process of changing or inspecting the blade.
3.3 Attaching the Guide Rail
The Festool guide rail (FS 1400/2) is designed for precise, straight cuts. Place the guide rail on the workpiece and align it with your desired cut line. The saw will run along the rail, ensuring accuracy.

Image 3.3: A user demonstrating the use of the Festool TS 55 REBQ-Plus-FS with a guide rail for a precise cut.
4. Operating Instructions
4.1 Adjusting Cutting Depth
The cutting depth can be adjusted from 0 to 55 mm at 90° and 0 to 43 mm at 45°. Use the depth adjustment lever and scale on the saw to set the desired depth. Ensure the depth is slightly greater than the material thickness to ensure a complete cut.

Image 4.1: The front of the saw, highlighting the visible blade and the clear depth adjustment markings.
4.2 Adjusting Cutting Angle
The saw allows for angle adjustments from -1° to 47°. Loosen the angle adjustment knob, set the desired angle, and re-tighten the knob. The flat body design provides maximum flexibility for angle settings.

Image 4.2: Side profile of the saw, illustrating the angle adjustment mechanism and the model designation.
4.3 Making a Cut
- Ensure the workpiece is stable and clamped if necessary.
- Position the saw on the guide rail (if used) or directly on the workpiece, aligning the viewing window with your cut line.
- Switch on the saw and allow the blade to reach full speed.
- Gently plunge the saw into the material, maintaining a steady, even feed rate.
- Once the cut is complete, release the trigger and allow the blade to stop before lifting the saw from the workpiece.

Image 4.3: A user demonstrating the plunge cutting action of the Festool TS 55 REBQ-Plus-FS on a dark material.
4.4 Splitter Protection and Viewing Window
The integrated splitter protection minimizes tear-out, especially on delicate materials. The transparent and movable viewing window provides a clear view of the saw blade and cut line, enhancing precision and safety.

Image 4.4: A close-up view of the saw's base, highlighting the splitter protection and the transparent viewing window.
5. Maintenance
Regular maintenance ensures the longevity and optimal performance of your Festool dive saw.
- Cleaning: After each use, clean the saw and guide rail to remove sawdust and debris. Use a soft brush or compressed air. Ensure ventilation slots are clear.
- Blade Inspection: Regularly check the saw blade for sharpness and damage. Replace dull or damaged blades promptly.
- Cord Inspection: Inspect the power cord for any signs of damage. Do not use the tool with a damaged cord.
- Lubrication: Refer to the detailed service manual for specific lubrication points, if any. Generally, Festool tools are designed for minimal user lubrication.
- Storage: Store the saw and accessories in the provided Systainer SYS3 M 337 in a dry, secure location, out of reach of children.
6. Troubleshooting
If you encounter issues with your Festool TS 55 REBQ-Plus-FS, consult the following common troubleshooting steps:
- Saw not starting: Check the power connection. Ensure the plug is fully inserted and the power outlet is functional. Verify the power cord for damage.
- Poor cut quality (e.g., splintering, rough edges): The saw blade may be dull or damaged. Replace the blade. Ensure the splitter protection is correctly positioned. Adjust the cutting depth appropriately.
- Saw overheating: Ensure ventilation slots are clear of dust. Avoid forcing the saw through the material; reduce feed rate. Allow the saw to cool down.
- Excessive vibration: Check if the saw blade is properly installed and tightened. Inspect the blade for damage or warping.
For persistent issues or complex repairs, contact an authorized Festool service center.
7. Specifications
| Feature | Specification |
|---|---|
| Model Number | 576007 |
| Power Consumption | 1200 W |
| Idle Speed | 2000 - 5200 min⁻¹ |
| Saw Blade Diameter | 160 mm |
| Angle Range | -1° - 47° |
| Cutting Depth at 45° | 0 - 43 mm |
| Cutting Depth at 90° | 0 - 55 mm |
| Dust Extraction Connection (Diameter) | 27/36 mm |
| Weight (without battery) | 4.5 kg (11 pounds) |
| Voltage | 240 Volts |
| Blade Material | High Speed Steel |
| Surface Recommendation | Wood |
| Special Features | Guide Wedge, Viewing Window |
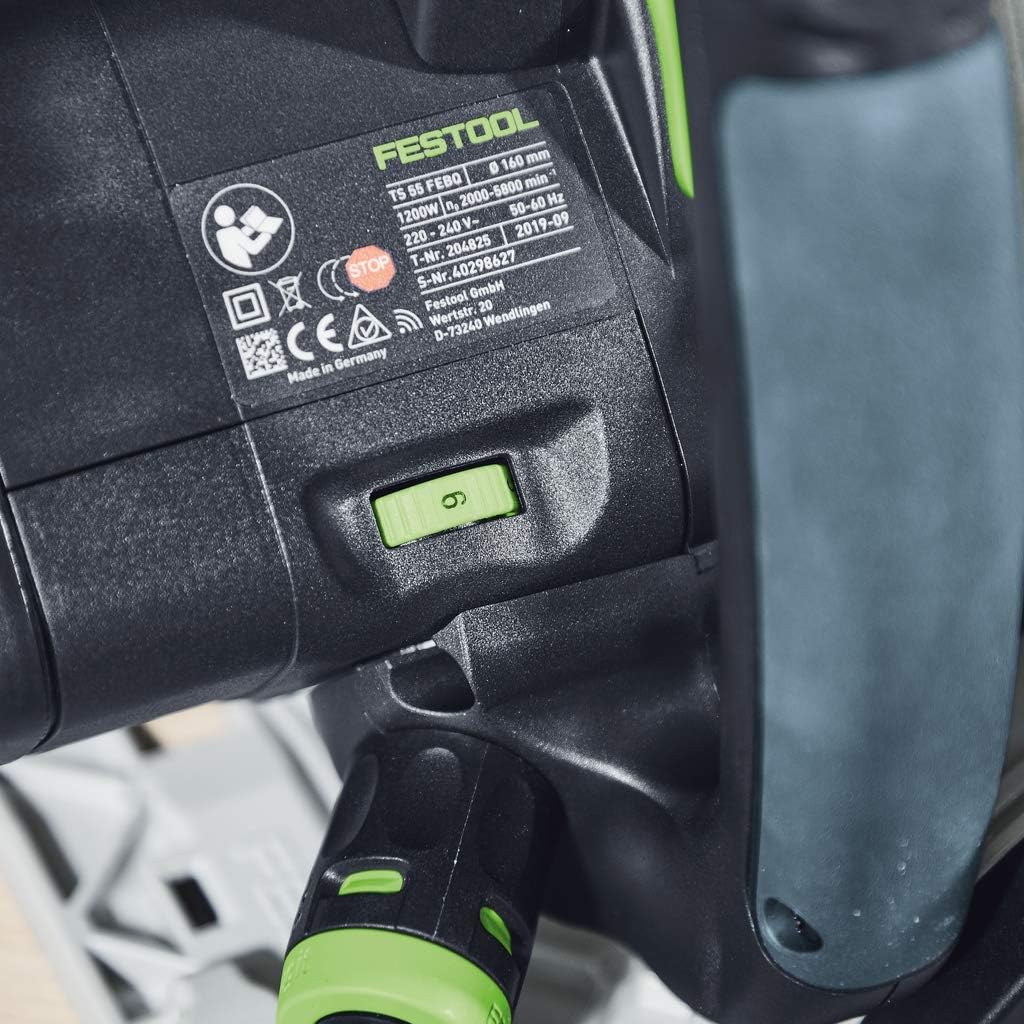
Image 7.1: Product label displaying technical specifications and manufacturing details.
8. Warranty and Support
8.1 Warranty Information
The Festool TS 55 REBQ-Plus-FS comes with a Limited Warranty. Please refer to the warranty card included with your product or visit the official Festool website for detailed terms and conditions regarding coverage and duration. Registration of your product may be required to activate the full warranty.
8.2 Customer Support
For technical assistance, spare parts, or service inquiries, please contact Festool customer support. Contact information can typically be found on the official Festool website or in the documentation provided with your tool.
Online resources, including FAQs and additional instructional videos, may also be available on the Festool website.

