1. Introduction
This manual provides comprehensive instructions for the safe and efficient use of your KitchenAid 5KSMFVSFGA Food Grinder and Fruit/Vegetable Strainer attachment. This versatile accessory is designed to seamlessly integrate with all KitchenAid stand mixer models, transforming your mixer into a powerful tool for preparing fresh ingredients for a variety of culinary applications.
The attachment allows you to grind meats, vegetables, and other foods, as well as strain fruits and cooked vegetables to create purees, sauces, and jams. Please read this manual thoroughly before first use to ensure proper operation and maintenance.
2. Important Safety Instructions
When using electrical appliances, basic safety precautions should always be followed, including the following:
- Read all instructions before using the attachment.
- Unplug the stand mixer from the outlet before assembling, disassembling, cleaning, or storing the attachment.
- Avoid contact with moving parts. Keep fingers and utensils away from the feed opening and discharge opening during operation to prevent personal injury.
- Do not use the attachment for purposes other than its intended use.
- Close supervision is necessary when any appliance is used by or near children.
- Do not use abrasive cleaners or scouring pads on the attachment. They may scratch or damage the finish.
- Ensure the attachment is securely fastened to the stand mixer before operation.
- Never push food into the grinder or strainer with your hands. Always use the provided food pusher.
3. Product Components
Your KitchenAid 5KSMFVSFGA attachment includes the following parts:
- Grinder Body: The main housing for the grinding mechanism.
- Food Pusher: Used to safely guide food into the grinder/strainer.
- Grinding Plates: Includes a fine plate and a coarse plate for different textures.
- Grinding Knife: The blade that cuts food against the grinding plate.
- Auger (Grinding Worm): Feeds food through the grinder body.
- Strainer Cone: Filters pulp from juice/puree.
- Strainer Housing: Encloses the strainer cone and directs pulp and puree.
- Strainer Tray: Collects the processed puree/juice.
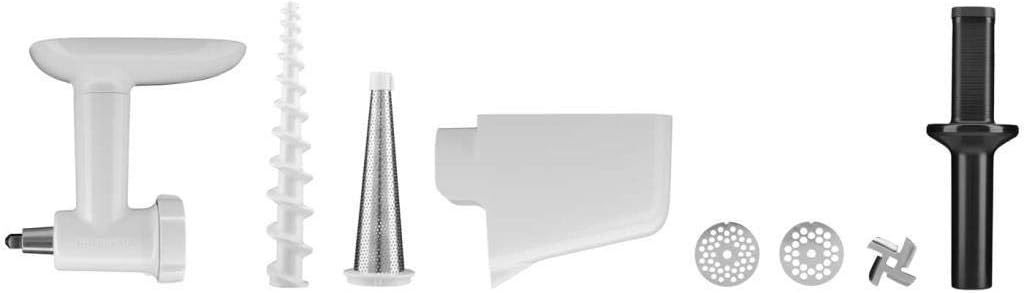
Image 3.1: Disassembled components of the KitchenAid 5KSMFVSFGA attachment, including the grinder body, auger, strainer cone, strainer housing, grinding plates, grinding knife, and food pusher.
4. Setup and Assembly
4.1 Attaching to the Stand Mixer
- Ensure your KitchenAid stand mixer is unplugged and turned off.
- Remove the hub cover from the front of the stand mixer.
- Insert the attachment shaft into the power hub, ensuring the shaft fits into the square drive socket.
- Tighten the attachment knob clockwise until the attachment is securely fastened to the stand mixer.

Image 4.1: The food grinder attachment connected to the power hub of a red KitchenAid stand mixer.
4.2 Assembling the Food Grinder
- Place the auger (grinding worm) into the grinder body.
- Slide the grinding knife onto the auger shaft, ensuring the sharp edge faces outwards towards the grinding plate.
- Select your desired grinding plate (fine or coarse) and place it over the grinding knife.
- Screw the retaining ring onto the grinder body until it is hand-tight.
- Place the food tray on top of the grinder body.
4.3 Assembling the Fruit/Vegetable Strainer (requires grinder assembly)
- First, assemble the food grinder as described in section 4.2, but do not attach a grinding plate or grinding knife.
- Insert the strainer cone into the strainer housing.
- Attach the assembled strainer housing and cone to the front of the grinder body, replacing the retaining ring.
- Place the food tray on top of the grinder body.
- Position a bowl or container under the strainer's pulp outlet and another under the puree/juice outlet.

Image 4.2: The fruit and vegetable strainer attachment fully assembled on a red KitchenAid stand mixer, demonstrating the separation of puree and pulp.
5. Operating Instructions
5.1 Using the Food Grinder
The food grinder is ideal for processing raw meat, firm fruits, and vegetables.
- Ensure the grinder is correctly assembled with the desired grinding plate (fine or coarse) and securely attached to the stand mixer.
- Prepare ingredients by cutting them into pieces that fit easily into the feed opening. Remove any bones or tough sinews from meat.
- Place a bowl under the grinder's discharge opening to collect the ground food.
- Turn the stand mixer to speed 4.
- Feed the ingredients into the feed opening using the food pusher. Never use your fingers or other utensils.
- Continue feeding until all ingredients are processed. Turn off the mixer and unplug when finished.
5.2 Using the Fruit and Vegetable Strainer
The strainer is designed to separate seeds, skins, and stems from soft fruits and cooked vegetables, producing smooth purees for sauces, jams, and baby food.
- Ensure the strainer is correctly assembled and securely attached to the stand mixer (as described in section 4.3).
- Prepare ingredients: For fruits like berries, simply wash them. For vegetables like tomatoes, cook them until soft before straining. Cut larger items into manageable pieces.
- Place separate bowls under the pulp outlet and the puree/juice outlet.
- Turn the stand mixer to speed 4.
- Feed the prepared ingredients into the feed opening using the food pusher.
- The strainer will separate the pulp (skins, seeds) from the smooth puree/juice.
- Continue feeding until all ingredients are processed. Turn off the mixer and unplug when finished.

Image 5.1: A user feeding fruit into the strainer attachment, which is connected to a red KitchenAid stand mixer.
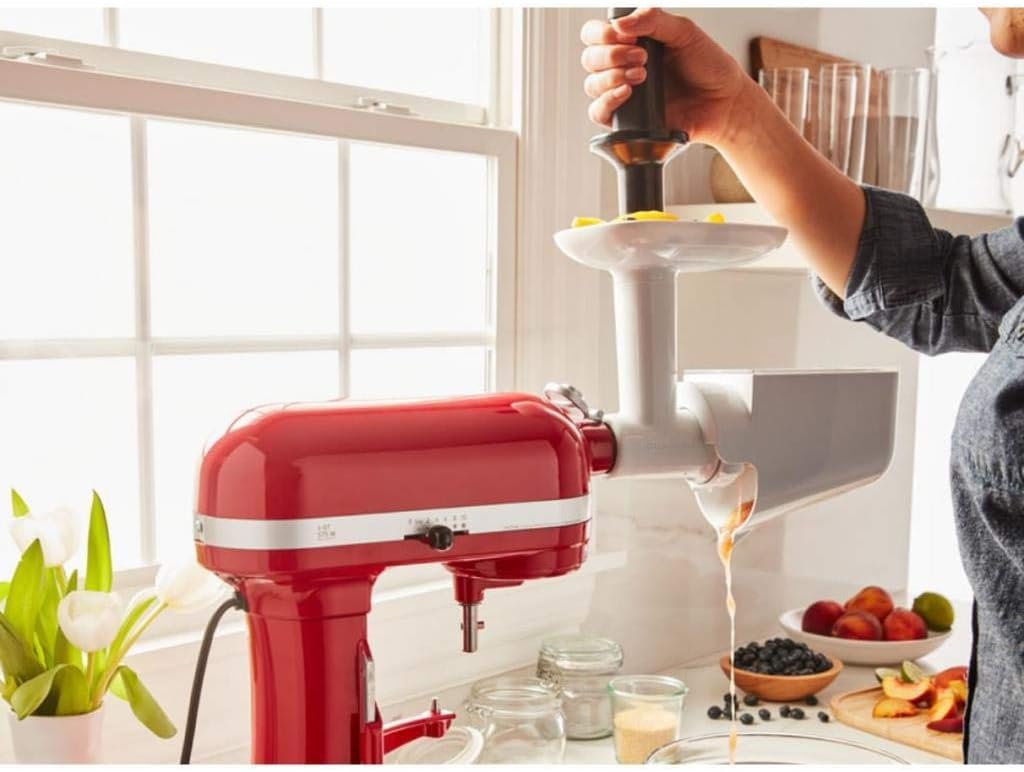
Image 5.2: The strainer attachment in operation, showing fruit being processed and puree collecting in a bowl.
6. Maintenance and Cleaning
Proper cleaning ensures the longevity and hygienic operation of your attachment.
- Always unplug the stand mixer before cleaning the attachment.
- Disassemble the attachment completely. Refer to the assembly instructions in reverse order.
- The grinder body, auger, grinding knife, grinding plates, strainer cone, strainer housing, and food pusher are dishwasher safe. Place them on the top rack of your dishwasher.
- Alternatively, wash all parts in warm, soapy water using a soft brush to remove any food residue. Rinse thoroughly.
- Dry all parts completely before reassembling or storing.
- Do not immerse the stand mixer itself in water or other liquids.
7. Troubleshooting
If you encounter issues with your KitchenAid 5KSMFVSFGA attachment, consider the following common solutions:
- Attachment not operating: Ensure the stand mixer is plugged in, turned on, and the attachment is securely fastened to the power hub. Check that the attachment knob is tightened.
- Food not grinding/straining properly: Verify that the correct grinding plate (for grinder) or strainer cone (for strainer) is installed and that the retaining ring is hand-tight. Ensure ingredients are cut to an appropriate size and not overfilling the feed opening.
- Excessive pulp with strainer: For some fruits and vegetables, a second pass through the strainer may be necessary to extract more puree. Ensure ingredients are cooked sufficiently if applicable.
- Loud noise during operation: This may indicate improper assembly. Disassemble and reassemble the attachment, ensuring all parts are correctly aligned and secured.
- Attachment feels loose: Re-tighten the attachment knob on the stand mixer's power hub.
If problems persist, refer to the stand mixer's instruction manual or contact KitchenAid customer support.
8. Product Specifications
| Feature | Specification |
|---|---|
| Model Number | 5KSMFVSFGA |
| Dimensions (L x W x H) | 12.2 x 27.5 x 25 cm |
| Weight | 1.1 Kilograms |
| Material | Plastic |
| Color | Steel (referring to the color of the attachment, not material) |
| Recommended Uses | Grinding, Chopping, Pureeing |
| Care Instructions | Dishwasher safe (most parts) |
| Assembly Required | Yes |
| Number of Pieces | 1 (set) |
9. Warranty Information
KitchenAid products are manufactured to high-quality standards and are warranted against defects in materials and workmanship. The specific warranty period and terms may vary by region and product. Please refer to the warranty card included with your purchase or visit the official KitchenAid website for detailed warranty information applicable to your location.
Keep your purchase receipt as proof of purchase for any warranty claims.
10. Customer Support
For further assistance, product registration, or to inquire about replacement parts, please contact KitchenAid customer service. You can find contact information, including phone numbers and online support options, on the official KitchenAid website or in the documentation provided with your stand mixer.
When contacting support, please have your product model number (5KSMFVSFGA) and purchase date available.


