
1. Introduction
Thank you for choosing the LASIKA W-H9011 Kids Sports Watch. This watch is designed for children, featuring a durable plastic construction, a dual analog-digital display, and water resistance suitable for daily activities. This manual provides detailed instructions for setting up, operating, and maintaining your watch to ensure optimal performance and longevity.

Image 1: The LASIKA W-H9011 Sports Watch, showcasing its design in an outdoor setting.
2. Safety Information
Please read and understand the following safety guidelines before using the watch:
- Do not attempt to open the watch case or replace the battery yourself, as this may void the warranty and damage the watch.
- Avoid exposing the watch to extreme temperatures (hot or cold) or direct sunlight for prolonged periods.
- While the watch is water-resistant (30M), it is not suitable for diving or prolonged submersion. Avoid pressing buttons underwater.
- Keep the watch away from strong magnetic fields, which can affect timekeeping accuracy.
- Clean the watch with a soft, dry cloth. Do not use chemical cleaners.
3. Package Contents
The package should contain the following items:
- LASIKA W-H9011 Kids Sports Watch
- Instruction Manual (this document)
- Watch box
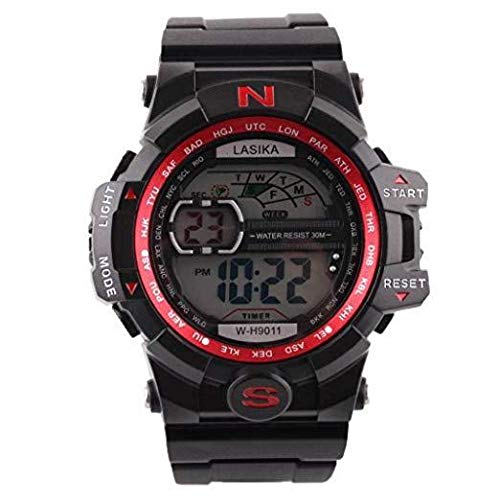
Image 2: The LASIKA W-H9011 Sports Watch displayed next to its retail packaging box.
4. Parts Identification
Familiarize yourself with the different parts and buttons of your LASIKA W-H9011 watch:

Image 3: Detailed view of the watch face and side buttons. Note the "LIGHT", "MODE", "START", and "RESET" buttons.
- LIGHT Button: Activates the backlight for visibility in low light conditions.
- MODE Button: Cycles through different modes (Time, Alarm, Stopwatch, Date).
- START Button: Used to start/stop functions in Stopwatch mode or adjust settings.
- RESET Button: Used to reset functions in Stopwatch mode or adjust settings.
- Analog Hands: Display the current time in analog format.
- Digital Display: Shows time, date, day, and other digital functions.
5. Setup
5.1 Setting Digital Time and Date
- From the normal time display, press the MODE button three times to enter Time Setting mode. The seconds will flash.
- Press the RESET button to zero out the seconds.
- Press the START button to select the hour. Use the RESET button to adjust the hour (12/24-hour format can be toggled here).
- Press the START button to select the minutes. Use the RESET button to adjust the minutes.
- Continue pressing START to cycle through month, date, and day of the week settings, adjusting each with the RESET button.
- Once all settings are correct, press the MODE button to exit Time Setting mode.
5.2 Setting Analog Time
The analog hands are set independently. Pull out the crown (small knob on the side of the watch case, usually on the right) and rotate it to adjust the analog hands to match the digital time. Push the crown back in to start the analog movement.
6. Operating Instructions
6.1 Using the Backlight
Press the LIGHT button (top left) to illuminate the digital display. The backlight will remain on for a few seconds.
6.2 Stopwatch Function
- From the normal time display, press the MODE button once to enter Stopwatch mode. The display will show "00:00:00".
- Press the START button to begin timing.
- Press the START button again to pause timing.
- Press the RESET button to clear the stopwatch to "00:00:00".
- Press the MODE button to return to normal time display.
6.3 Alarm Function
- From the normal time display, press the MODE button twice to enter Alarm Setting mode. The hour digits will flash.
- Press the RESET button to adjust the alarm hour.
- Press the START button to select the minutes. Press the RESET button to adjust the alarm minutes.
- Press the MODE button to exit Alarm Setting mode.
- To turn the alarm ON/OFF: In Alarm mode, press the START button to toggle the alarm on or off. An alarm icon will appear/disappear on the display.
6.4 Hourly Chime
In Alarm mode, press the RESET button to toggle the hourly chime ON/OFF. A chime icon will appear/disappear on the display.
7. Maintenance
7.1 Cleaning Your Watch
To maintain the appearance of your watch, wipe it regularly with a soft, dry cloth. For stubborn dirt, a slightly damp cloth can be used, followed by a dry cloth. Avoid using harsh chemicals, solvents, or abrasive cleaners, as these can damage the watch case and strap.
7.2 Battery Replacement
The LASIKA W-H9011 watch is powered by a button-cell battery. When the display becomes dim or the watch stops functioning, it's time to replace the battery. Battery replacement should ideally be performed by a qualified watch technician to ensure proper sealing and water resistance. Attempting to replace the battery yourself may damage the watch and void the warranty.
8. Troubleshooting
| Problem | Possible Cause | Solution |
|---|---|---|
| Digital display is blank or dim. | Low battery. | Replace the battery (refer to Section 7.2). |
| Analog hands are not moving or incorrect. | Crown is pulled out; battery issue for analog movement. | Push the crown back in. If still not working, battery may need replacement. |
| Buttons are unresponsive. | Watch is wet; internal malfunction. | Ensure watch is dry. If problem persists, seek professional service. |
| Water inside the watch. | Water resistance compromised; buttons pressed underwater. | Immediately take the watch to a service center. Avoid further water exposure. |
9. Specifications
| Feature | Detail |
|---|---|
| Brand | LASIKA |
| Model Number | W-H9011 |
| Display Type | Analog-Digital |
| Movement Type | Quartz |
| Case Shape | Round |
| Case Diameter | 45 mm |
| Case Material | Plastic |
| Band Material | Plastic |
| Band Color | Black |
| Dial Color | Grey |
| Glass Material | Plastic |
| Water Resistance | 30 Meters (3 ATM) - Suitable for splashes, rain, but not swimming or showering. |
| Power Source | Battery Operated |
| Target Group | Children |
10. Warranty and Support
Specific warranty information for the LASIKA W-H9011 Kids Sports Watch is not provided in this manual. Please refer to the product packaging or contact your retailer for details regarding warranty coverage and customer support. Keep your purchase receipt as proof of purchase.