
1. Introduction
This manual provides detailed instructions for the installation, operation, and maintenance of your GLEDOPTO GL-C-006P Zigbee 3.0 WWCW LED Strip Controller. This device allows for versatile control of Warm White and Cold White (WWCW) LED strip lights, offering dimming, color temperature adjustment, and smart home integration. Please read this manual thoroughly before use to ensure proper functionality and safety.

Figure 1: GLEDOPTO GL-C-006P Zigbee 3.0 WWCW LED Strip Controller and accessories.
2. Product Overview
The GLEDOPTO GL-C-006P is a compact and efficient controller designed for WWCW LED strip lights. It supports Zigbee 3.0 protocol, enabling seamless integration with compatible smart home hubs and voice assistants like Amazon Echo Plus. The controller offers both app and remote control options for adjusting brightness and color temperature.
Key Features:
- Zigbee 3.0 Protocol: Ensures broad compatibility with various smart home systems.
- WWCW Control: Adjust warm white and cold white light for desired ambiance.
- Dimmable: Smooth brightness adjustment.
- Multiple Control Options: Voice control (via Alexa), mobile app, and dedicated RF remote control.
- Compact Design: Easy to conceal and integrate into your lighting setup.
3. Specifications
| Specification | Value |
|---|---|
| Model Number | GL-C-006P |
| Input Voltage | DC12-24-36-48-54 V |
| Total Power | 270 W Max |
| Total Output Current | 5 A Max |
| Operating Temperature | -20 to +60°C |
| Connectivity Protocol | ZigBee 3.0 |
| Control Method | Remote, APP, Voice (Amazon Alexa) |
| Dimensions (L x W x H) | 0.93 x 1.89 x 3.5 inches |
| International Protection Rating | IP20 |
| Material | Copper (Contact Material) |
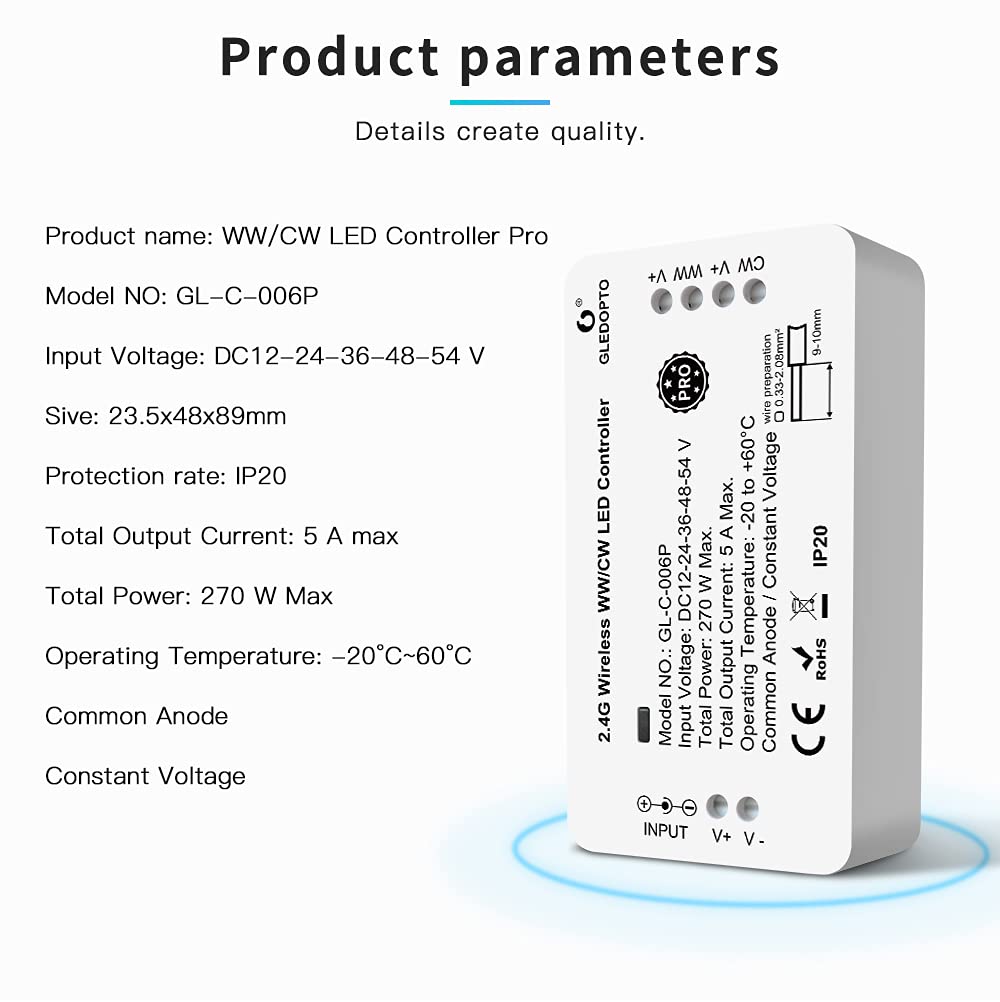
Figure 2: Detailed product specifications and wiring information.
4. Setup & Installation
Follow these steps to install and set up your GLEDOPTO GL-C-006P controller.
4.1 Wiring the Controller
- Ensure all power is disconnected before wiring.
- Connect your WWCW LED strip light to the output terminals of the controller (CW+, WW+, V-).
- Connect a compatible DC12-54V power supply to the input terminals of the controller (V+, V-).
- Ensure all connections are secure and correctly polarized.
4.2 Pairing with a Zigbee Gateway/Hub (e.g., Amazon Echo Plus, Philips Hue)
- Power on the GLEDOPTO controller. The LED strip should light up.
- Open your Zigbee hub's app (e.g., Philips Hue app, Amazon Alexa app) and initiate a device search.
- The controller should be discovered and added to your smart home system. Follow the app's instructions to complete the pairing process.
- Once paired, you can control the LED strip via the app or voice commands.

Figure 3: The controller is compatible with various Zigbee 3.0 gateways.
4.3 Pairing with the GLEDOPTO RF Remote Control
If you have a GLEDOPTO RF remote control, you can pair it directly with the controller:
- Ensure the controller is powered on.
- On the remote control, select the desired zone (e.g., Zone 1).
- Quickly power cycle the LED strip (unplug and plug back in the power cable to the controller).
- Within 3 seconds of powering on the LED strip, press the 'ON' button for the selected zone on the remote control. The LED strip should flash to indicate successful pairing.
- Repeat for other zones if you have multiple controllers or wish to control different segments independently.
5. Operating Instructions
The GLEDOPTO GL-C-006P controller offers multiple ways to manage your LED strip lighting.
5.1 Smart Phone APP Control
After pairing with a Zigbee hub, you can use the corresponding app (e.g., Philips Hue app, SmartThings app, Amazon Alexa app) to control your lights.
- Turn On/Off: Tap the power icon in the app.
- Brightness Adjustment: Use the brightness slider to dim or brighten the lights.
- Color Temperature Regulation: Adjust the color temperature from warm white (e.g., 2700K) to cool white (e.g., 6500K) using the color temperature selector.
- DIY Scenarios: Many apps allow you to create custom lighting scenes and schedules.

Figure 4: Control your LED strip lights using a smartphone app after connecting to a Zigbee hub.

Figure 5: Brightness adjustment allows you to set the perfect light intensity.

Figure 6: Adjust color temperature from 2000K (warm white) to 6500K (cold white).
5.2 Voice Control (via Amazon Alexa)
Once paired with an Amazon Echo Plus or a Zigbee hub connected to Alexa, you can use voice commands:
- "Alexa, turn on the light."
- "Alexa, turn off the light."
- "Alexa, set to warm white."
- "Alexa, increase to 70%."

Figure 7: Control your lighting hands-free with Amazon Alexa voice commands.
5.3 RF Remote Control
Use the dedicated GLEDOPTO RF remote control for direct adjustments:
- On/Off: Press the 'ON' or 'OFF' button for the selected zone.
- Color Temperature/Brightness: Use the dedicated sliders or buttons to adjust.
- Modes: The remote may offer pre-programmed modes for dynamic lighting effects. Use 'S+' to speed up modes and 'S-' to slow down modes.
6. Maintenance
To ensure the longevity and optimal performance of your GLEDOPTO LED Strip Controller:
- Keep the controller in a dry environment, away from moisture and extreme temperatures.
- Clean the controller and LED strips with a soft, dry cloth. Do not use harsh chemicals or abrasive cleaners.
- Regularly check wiring connections for any signs of wear or looseness.
- Ensure adequate ventilation around the controller to prevent overheating.
7. Troubleshooting
If you encounter issues with your GLEDOPTO GL-C-006P controller, refer to the following common solutions:
- Lights not turning on: Check power connections to both the controller and the LED strip. Ensure the power supply is functioning correctly.
- Cannot pair with hub/remote: Ensure the controller is powered on and within range. Try power cycling the controller and re-initiating the pairing process. For remote pairing, ensure you press the 'ON' button within 3 seconds of power-up.
- Inconsistent control: Check for interference from other wireless devices. Ensure your Zigbee hub is updated to the latest firmware.
- Lights flickering: Verify that the power supply voltage and current are appropriate for your LED strip and controller. Loose connections can also cause flickering.
- Remote not responding: Check the remote's battery. Ensure it's paired to the correct zone.
If problems persist, consult the GLEDOPTO support resources or contact customer service.
8. Warranty & Support
GLEDOPTO products are designed for reliability and performance. For warranty information, please refer to the documentation included with your purchase or visit the official GLEDOPTO website. For technical support, troubleshooting assistance, or inquiries about your product, please contact GLEDOPTO customer service through their official channels.
9. Media
Official Product Video: Gledopto Zigbee LED Strip Controller Plus
This video demonstrates the GLEDOPTO Zigbee LED Strip Controller Plus in action, showcasing its smart phone app control for turning lights on/off, changing colors (16 million options), adjusting brightness, and regulating color temperature from 2700K to 6500K. It also highlights the remote control functionality for similar adjustments and mode changes.


