
EPEVER VS1024AU
EPEVER Solar Charge Controller VS1024AU
User Manual
1. Introduction
The EPEVER VS1024AU Solar Charge Controller is a PWM charge controller designed for solar home systems, traffic signals, solar street lights, and solar garden lamps. It features an integrated LCD display and utilizes advanced digital techniques for efficient and reliable operation. This controller automatically detects 12V/24V system voltage and supports various battery types including Sealed, Gel, and Flooded batteries.

Figure 1: EPEVER VS1024AU Solar Charge Controller.
2. Safety Precautions
Please read all instructions and precautions in the manual before installation. Improper installation can lead to serious injury or damage to the device.
- Always connect the battery first to the charge controller to allow it to recognize the system voltage.
- Connect components to the charge controller in the sequence shown in the wiring diagram, paying close attention to the positive (+) and negative (-) terminals.
- Do not insert the fuse or turn on the breaker during the initial installation process.
- When disconnecting the system, reverse the connection order.
- The battery fuse should be installed as close to the battery as possible, ideally within 150mm.
- The VS AU series is a positive ground controller. Any positive connection of solar, load, or battery can be earth grounded as required.
- If an inverter or other load with a large start current is necessary, connect it directly to the battery rather than to the controller.
3. Product Features
The EPEVER VS1024AU controller incorporates several key features for optimal performance and user convenience:
- Positive ground controller: Allows positive connection of solar, load, or battery to be earth grounded.
- Advanced digital technique: Ensures efficient PWM charging.
- Multiple load control modes: Suitable for various applications like home systems, traffic signals, and street lights.
- High-quality components: Utilizes ST, IR, and Infineon components for extended product lifespan.
- UL and VDE certified terminals: Enhances safety and reliability.
- Wide operating temperature range: Functions continuously at full load from -25°C to 55°C.
- Automatic voltage recognition: Supports 12V / 24V auto work.
- Max input voltage: 50V.
- Battery type compatibility: Supports Sealed (Default), Gel, and Flooded batteries.
- USB 5V Output: Includes two 5V 2.4A USB ports for charging external devices.

Figure 2: Key features and components of the controller.

Figure 3: Detail of the 5V 2.4A USB output ports.
4. Setup and Installation
Follow these steps carefully to install your EPEVER Solar Charge Controller:
- Prepare for Installation: Ensure all components are available and that you have the necessary tools. Do not insert the fuse or turn on any breakers at this stage.
- Connect the Battery: Connect the battery to the charge controller first. This allows the controller to automatically detect the system voltage (12V or 24V). Ensure correct polarity (+ to + and - to -).
- Install Battery Fuse: Install the battery fuse as close to the battery as possible, ideally within 150mm, for safety.
- Connect the Solar Panel: Connect the solar panel(s) to the designated solar input terminals on the controller. Observe correct polarity.
- Connect the Load: Connect your DC loads (e.g., lights, fans) to the load output terminals. Ensure correct polarity.
- Power On: After all connections are secure and verified, you may insert the fuse and turn on any breakers. Check the LCD display on the controller to confirm it powers on.
Note: For inverters or other loads with high starting currents, connect them directly to the battery, not through the controller's load terminals.
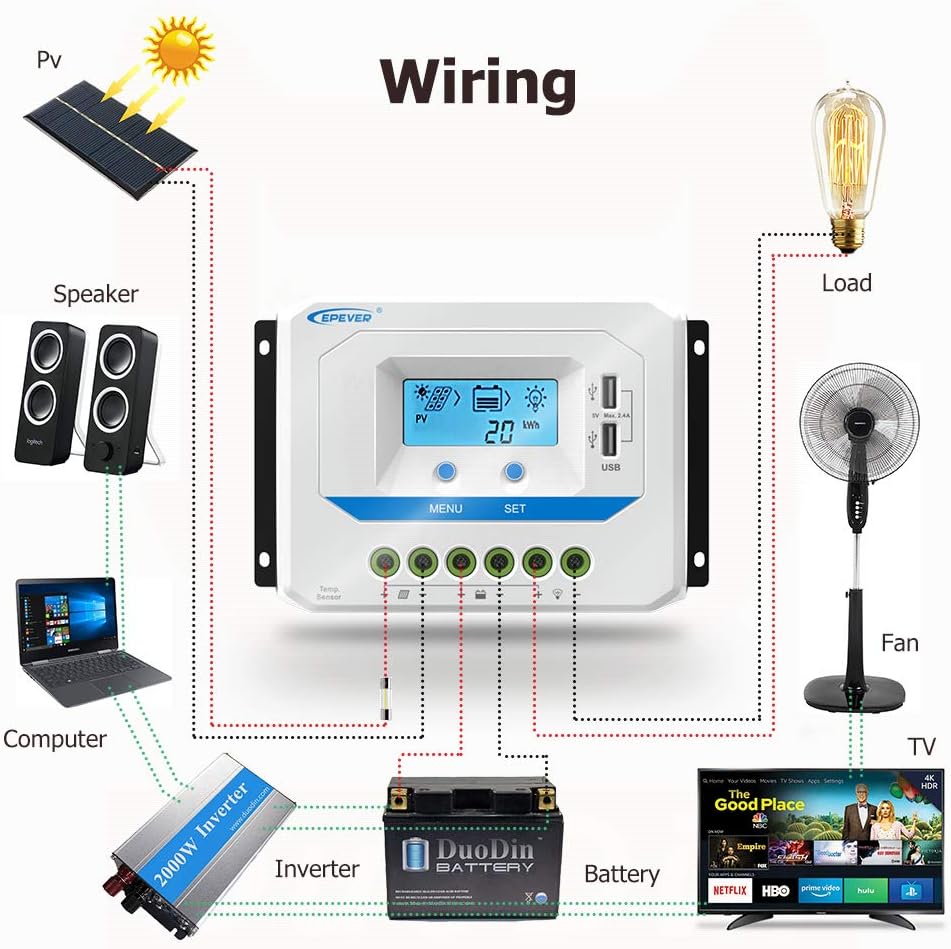
Figure 4: Typical wiring diagram for the solar charge controller system.
5. Operating Instructions
The EPEVER VS1024AU controller features an LCD display and two buttons (MENU and SET) for easy operation and monitoring.
5.1. LCD Display Interface
The LCD displays various system parameters. You can cycle through different screens to view real-time data.

Figure 5: LCD display browsing interface showing various parameters like PV voltage, current, battery voltage, load status, and accumulated energy.
5.2. Button Functions
- MENU Button: Press to cycle through different display screens and view various system parameters (e.g., PV voltage, battery voltage, load current, accumulated energy).
- SET Button: Used to enter setting modes and confirm selections. In some modes, it can be used to adjust parameters.
5.3. Load Control Modes
The controller supports multiple load control modes. Refer to the detailed manual (not provided in this summary) for specific instructions on how to configure these modes using the SET button.
6. Maintenance
Regular maintenance ensures the longevity and optimal performance of your solar charge controller system.
- Cleanliness: Keep the controller clean and free from dust and debris. Use a dry cloth for cleaning.
- Connections: Periodically check all wiring connections to ensure they are tight and free from corrosion. Loose connections can cause overheating and poor performance.
- Ventilation: Ensure the controller has adequate ventilation to prevent overheating. Do not block the ventilation holes.
- Battery Inspection: Regularly inspect your battery for any signs of damage, corrosion, or swelling. Ensure battery terminals are clean.
- System Performance: Monitor the LCD display regularly to ensure the system is operating within normal parameters. Note any unusual readings.
7. Troubleshooting
If you encounter issues with your EPEVER Solar Charge Controller, consider the following common problems and solutions:
- Controller Not Powering On:
- Check battery connections: Ensure the battery is connected first and with correct polarity.
- Check battery voltage: Ensure the battery has sufficient charge (above minimum operating voltage).
- Check fuse: Verify the battery fuse is intact and not blown.
- No Solar Charging:
- Check solar panel connections: Ensure panels are connected correctly and securely to the controller.
- Check solar panel output: Verify panels are receiving sunlight and producing voltage.
- Check for shading: Ensure solar panels are not shaded.
- Load Not Working:
- Check load connections: Ensure loads are connected correctly to the controller's load terminals.
- Check load control mode: Verify the load control mode is set appropriately (e.g., always on, dusk-to-dawn).
- Check battery voltage: If battery voltage is too low, the controller may disconnect the load to protect the battery.
- Check load current: Ensure the load current does not exceed the controller's maximum load current rating.
For more complex issues, please refer to the comprehensive troubleshooting section in the full product manual or contact EPEVER customer support.
8. Technical Specifications
Below are the detailed technical specifications for the EPEVER VS1024AU Solar Charge Controller:
| Parameter | Value (VS1024AU) |
|---|---|
| Model | VS1024AU |
| Rated charge/discharge current | 10A |
| System rated voltage | 12/24VDC Auto |
| Battery input voltage range | 9V~32V |
| Max. PV open circuit voltage | 50V |
| Battery type | Sealed(Default) / Gel / Flooded |
| Grounding | Common Positive |
| USB output | 5VDC/2.4A (Total) |
| Working environment temperature | -25 ℃ ~ +55 ℃ |
| Enclosure | IP30 |
| Package Dimensions | 6.5 x 4.06 x 2.2 inches |
| Item Weight | 10.2 ounces |

Figure 6: Technical specifications for VS AU series models.

Figure 7: Additional technical specifications for higher current VS AU series models.
9. Application Scenarios
The EPEVER VS AU series solar charge controller is versatile and can be widely used in various off-grid solar power systems:
- Solar home systems
- Traffic signals
- Solar street lights
- Solar garden lamps
- RV and marine solar setups
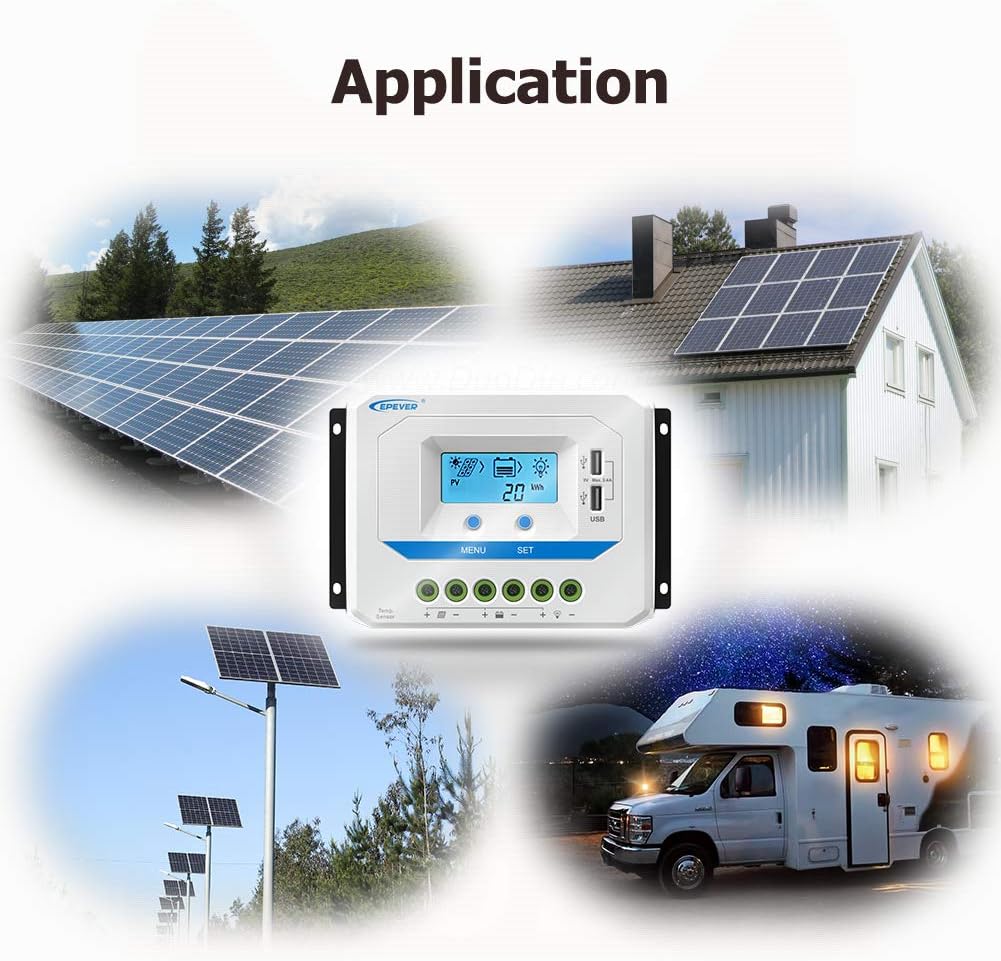
Figure 8: Examples of typical applications including residential, street lighting, and mobile power systems.
10. Warranty and Support
For warranty information, technical support, or any inquiries regarding your EPEVER Solar Charge Controller, please contact the manufacturer or your authorized dealer. Always refer to the official EPEVER website or the full product manual for the most up-to-date warranty terms and support contact details.
You can also visit the official EPEVER store on Amazon for more product information and support resources: EPEVER Store
Related documentsVS1024AU


Ask a question about this manual
Ask about setup, troubleshooting, compatibility, parts, safety, or missing instructions. Manuals+ will review the question and use this page’s manual context to help answer it.