EPEVER 20A+MT50+RTS+RS485
EPEVER MPPT Solar Charge Controller User Manual
Model: 20A+MT50+RTS+RS485
Brand: EPEVER
1. Introduction and Overview
This manual provides detailed instructions for the installation, operation, and maintenance of your EPEVER MPPT Solar Charge Controller. This advanced Maximum Power Point Tracking (MPPT) controller is designed to optimize the power output from your solar panels to efficiently charge your battery bank, ensuring reliable performance for various solar applications.
The EPEVER MPPT Solar Charge Controller features high tracking efficiency (no less than 99.5%) and a maximum conversion efficiency of 98%. It automatically identifies 12V/24VDC system voltage and supports multiple battery types and load control modes. The included MT50 remote meter, temperature sensor, and PC monitoring cable enhance system monitoring and control capabilities.

Figure 1.1: EPEVER MPPT Solar Charge Controller with included MT50 remote meter, temperature sensor, and communication cables.
2. Product Features
The EPEVER MPPT Solar Charge Controller is equipped with several key features to ensure optimal performance and user convenience:
- Advanced MPPT Technology: Ensures maximum power point tracking efficiency of no less than 99.5% and a maximum conversion efficiency of 98%.
- Automatic Voltage Identification: Automatically detects 12V/24VDC system voltage.
- Overload Protection: Reliable automatic limit function of maximum PV input power prevents overload under any circumstance.
- Wide MPP Operating Voltage Range: Accommodates various solar panel configurations.
- Robust Design: Die-cast aluminum construction ensures excellent heat dissipation.
- Multiple Load Control Modes: Includes manual control, light ON/OFF, light ON+Timer, and time control.
- Battery Compatibility: Supports four charging options: Sealed, Gel, Flooded, and User-defined.
- Communication Interface: Features an RS485 interface for monitoring via cellphone APP (eBox required), PC Software, and the MT50 remote meter.
- Versatile Applications: Suitable for solar RVs, household systems, industrial field monitoring, and more.
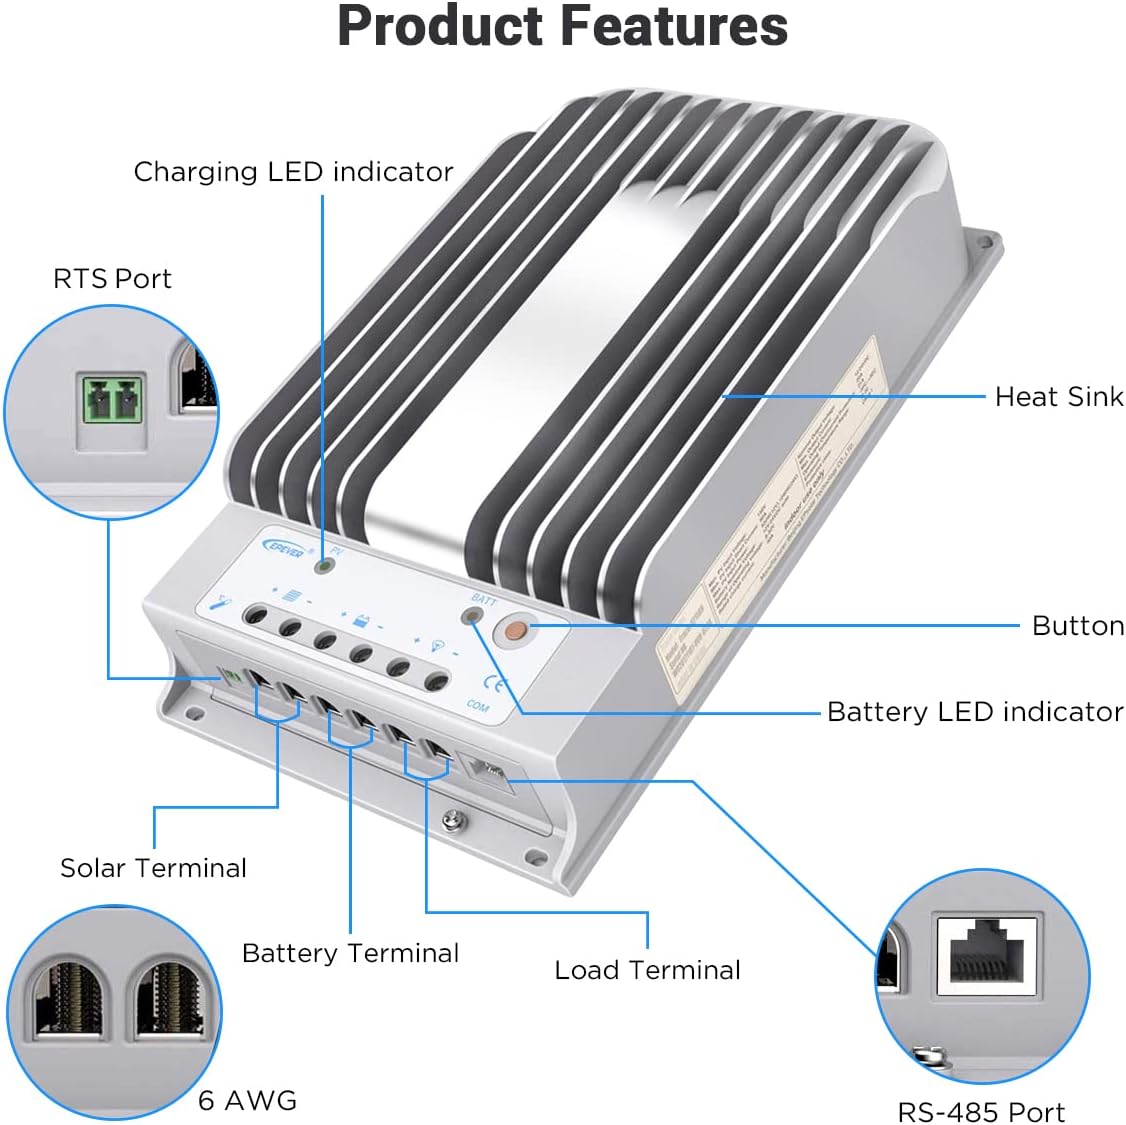
Figure 2.1: Key components and ports of the EPEVER MPPT Solar Charge Controller, including the heat sink, LED indicators, and terminals.
3. Setup and Installation
Proper installation is crucial for the safe and efficient operation of your solar charge controller. Please follow these general guidelines:
- Mounting Location: Choose a cool, dry, and well-ventilated indoor location. Avoid direct sunlight, high temperatures, and moisture. Ensure sufficient clearance around the controller for heat dissipation.
- Mounting Surface: Mount the controller vertically on a non-flammable surface using appropriate screws. The die-cast aluminum design aids in heat dissipation, but good airflow is still essential.
- Wiring Sequence: Always connect the battery first, then the solar panel, and finally the load. Disconnect in the reverse order. Ensure correct polarity for all connections.
- Cable Sizing: Use appropriately sized cables for all connections (solar, battery, load) to minimize voltage drop and ensure safety. Refer to local electrical codes and the controller's specifications for recommended wire gauges.
- Grounding: Ensure the controller is properly grounded according to local regulations.
For detailed wiring instructions, refer to the "Wiring Diagram" section below.
4. Wiring Diagram
The following diagram illustrates the typical wiring connections for the EPEVER MPPT Solar Charge Controller within a solar power system. Ensure all connections are secure and correctly polarized.

Figure 4.1: Wiring connections for the solar charge controller, showing connections to solar panels, battery, inverter, and various loads. The MT50 remote meter and PC/APP monitoring connections are also depicted.
- Battery Connection: Connect the battery to the controller's battery terminals first. Observe correct polarity (+ to + and - to -).
- Solar Panel Connection: Connect the solar panel array to the controller's PV terminals. Ensure correct polarity.
- Load Connection: Connect your DC loads (e.g., lights, small appliances) to the controller's load terminals.
- Optional Connections:
- MT50 Remote Meter: Connect the MT50 to the controller via the RS485 port for remote monitoring and parameter setting.
- PC/APP Monitoring: Use the RS485 to USB cable (and eBox for APP) to connect the controller to a PC or smartphone for advanced monitoring and data logging.
- Temperature Sensor (RTS): Connect the RTS to the designated port for accurate battery temperature compensation.
5. Operating Instructions
Once installed, the EPEVER MPPT Solar Charge Controller operates largely automatically. However, understanding its indicators and settings is beneficial for optimal system management.
5.1. Initial Power-Up
After connecting the battery, the controller will power on and display system information. Connect the solar panels, and the controller will begin charging the battery if sufficient solar power is available.
5.2. Using the MT50 Remote Meter
The MT50 remote meter provides real-time data and allows for parameter adjustments. Connect it to the controller's RS485 port. The display shows charging status, battery voltage, PV voltage, and load status. Use the buttons to navigate menus and modify settings such as battery type, load control mode, and charging parameters.

Figure 5.1: The EPEVER controller connected to the MT50 remote meter, illustrating the setup for monitoring and adjusting system parameters.
5.3. Load Control Modes
The controller offers various load control modes, configurable via the MT50 or PC software:
- Manual Control: Turn the load ON or OFF manually.
- Light ON/OFF: Load turns ON at dusk and OFF at dawn.
- Light ON + Timer: Load turns ON at dusk and stays ON for a set duration.
- Time Control: Load turns ON and OFF at specific times.
5.4. Battery Type Selection
Select the correct battery type (Sealed, Gel, Flooded, or User-defined) to ensure proper charging algorithms and prolong battery life. Incorrect settings can damage your batteries.
6. Maintenance
Regular maintenance helps ensure the longevity and optimal performance of your EPEVER MPPT Solar Charge Controller and the entire solar system.
- Visual Inspection: Periodically check the controller for any signs of physical damage, corrosion, or loose connections.
- Connection Integrity: Ensure all wiring connections (solar, battery, load) are tight and secure. Loose connections can cause overheating and poor performance.
- Cleanliness: Keep the controller clean and free from dust, dirt, and debris. Ensure the heat sink fins are not obstructed to allow for proper heat dissipation.
- Ventilation: Verify that the installation area remains well-ventilated and that airflow around the controller is not restricted.
- Battery Health: Monitor your battery's state of charge and overall health. Ensure the battery type setting on the controller matches your battery chemistry.
- System Performance: Regularly check the system's performance using the MT50 remote meter or PC software to ensure expected power generation and charging.
7. Troubleshooting
This section provides basic troubleshooting steps for common issues. For more complex problems, refer to the comprehensive user manual PDF or contact customer support.
| Problem | Possible Cause | Solution |
|---|---|---|
| Controller not powering on. | Battery not connected or low voltage; reversed polarity. | Check battery connections and voltage. Ensure correct polarity. Charge battery if too low. |
| No charging from solar panels. | Solar panels not connected; insufficient sunlight; PV voltage too low/high. | Verify solar panel connections and polarity. Check sunlight conditions. Ensure PV voltage is within controller's operating range. |
| Load not working. | Load disconnected; load control mode incorrect; battery low voltage disconnect. | Check load connections. Verify load control mode settings. Ensure battery voltage is above LVD setting. |
| Overheating. | Poor ventilation; excessive load; high ambient temperature. | Improve ventilation around the controller. Reduce load if possible. Ensure ambient temperature is within specifications. |
If the problem persists, please refer to the detailed user manual or contact EPEVER customer support.
8. Technical Specifications
Below are the key technical specifications for the EPEVER MPPT Solar Charge Controller (Model: 20A+MT50+RTS+RS485).

Figure 8.1: Detailed electrical and environmental parameters for various EPEVER Tracer series controllers, including the 20A model.
| Parameter | Value |
|---|---|
| Nominal System Voltage | 12/24VDC Auto |
| Rated Charge Current | 20A |
| Rated Discharge Current | 20A |
| Battery Voltage Range | 8V ~ 32V |
| Max. PV Open Circuit Voltage | 150V (at minimum operating environment temperature) |
| MPP Voltage Range | Battery voltage +2V ~ 108V |
| Max. PV Input Power (12V) | 260W |
| Max. PV Input Power (24V) | 520W |
| Self-consumption | ≤60mA (12V); ≤30mA (24V) |
| Discharge Circuit Voltage Drop | ≤0.15V |
| Communication | RS485 (RJ45 interface) |
| Operating Temperature | -35°C ~ +55°C |
| Storage Temperature | -35°C ~ +80°C |
| Humidity Range | ≤95% (N.C.) |
| Enclosure | IP30 |
| Dimensions (L x W x H) | 8.53 x 5.61 x 2.2 inches (approx.) |
| Item Weight | 4.69 pounds (2.13 kg) |
| Material | Aluminum |
9. Warranty and Support
EPEVER stands behind the quality of its products. For specific warranty terms and conditions, please refer to the official product documentation or contact EPEVER customer support.
For comprehensive information, detailed diagrams, and advanced troubleshooting, please download the official User Manual PDF:
Download Official User Manual (PDF)
For further assistance or technical inquiries, please visit the EPEVER Store on Amazon or contact their customer service directly.
Related Documents - 20A+MT50+RTS+RS485
 |
EPEVER Tracer-AN (10~40A) Troubleshooting Guide A comprehensive troubleshooting guide for the EPEVER Tracer-AN series solar charge controllers (10-40A), covering common faults, connection issues, and component testing. |
 |
EPEVER TRIRON Series Modular MPPT Charge Controller Detailed information on the EPEVER TRIRON Series of modular MPPT solar charge controllers, including product models, features, protection functions, naming rules, interface modules, accessories, and electrical parameters. |
 |
EPEVER XTRA-N G3 Advanced MPPT Charge Controller: Features, Setup, and Specifications Comprehensive guide to the EPEVER XTRA-N G3 series Advanced MPPT Charge Controller. Covers product features, naming conventions, unique functionalities like constant voltage output and over-current protection, installation steps, wiring diagrams, load working modes, and available accessories for solar off-grid systems. |
 |
EPEVER Tracer BP MPPT Solar Charge Controller User Manual & Technical Specifications Explore the EPEVER Tracer BP MPPT Solar Charge Controller user manual, featuring advanced Maximum Power Point Tracking technology for efficient solar charging. Learn about its features, wiring, LED indicators, load working modes, comprehensive protection mechanisms, troubleshooting, and detailed technical specifications for various battery types including sealed, gel, flooded, and lithium batteries. Ideal for solar home systems, traffic signals, solar street lights, and garden lamps. |
 |
EPEVER Tracer-AN G3 Series MPPT Solar Charge Controller User Manual Comprehensive user manual for the EPEVER Tracer-AN G3 series MPPT solar charge controllers, covering installation, operation, features, technical specifications, and troubleshooting for models like Tracer1206AN G3, Tracer1210AN G3, Tracer2206AN G3, Tracer2210AN G3, Tracer3210AN G3, and Tracer4210AN G3. |
 |
EPEVER Tracer BP Series MPPT Solar Charge Controller Manual Comprehensive manual for the EPEVER Tracer BP series MPPT solar charge controller, covering safety information, overview, product features, wiring, LED indicators, load working modes, protection, troubleshooting, and technical specifications. |
Ask a question about this manual
Ask about setup, troubleshooting, compatibility, parts, safety, or missing instructions. Manuals+ will review the question and use this page’s manual context to help answer it.