1. Introduction
The EPEVER MT-1 Remote Meter is designed to provide essential monitoring and control for your dual battery solar panel charge controller system. It features an LCD display that presents key charging parameters and system performance data, including voltage, current, and battery state of charge. The meter also records battery charge, accumulated capacity, and minimum/maximum voltage, allowing for performance comparison over different periods. Temperature and time information are also displayed. Users can configure the meter to cycle through data parameters every 3 seconds or display a selected data set. Four front-side buttons facilitate easy navigation and data selection. The MT-1 is supplied with a 10-meter connection cable for convenient integration with your dual battery solar charge controller.

2. Features
- Compatible with EPEVER 10A/20A Dual Battery Solar Panel Charge Controllers.
- Displays main charging parameters and solar system performance data.
- Monitors voltage, current, and state of charge for both batteries.
- Records battery charge, accumulated capacity, and min/max voltage.
- Shows temperature and time on the screen.
- Configurable data display: cycle every 3 seconds or show selected data.
- Equipped with 4 front-side buttons for easy data navigation.
- Includes a 10-meter connection cable for flexible installation.

3. Product Overview
3.1 Display Elements

The LCD display provides a comprehensive overview of your solar system's status. Key indicators include:
- Battery Icon: Indicates the status of Battery 1 and Battery 2.
- Solar Icon: Represents the solar panel input.
- Remote Temp. Icon: Shows the remote temperature sensor status.
- Local Temp. Sensor Icon: Indicates the local temperature sensor status.
- Setting Icon: Appears when settings are being adjusted.
- Error Indicator: Illuminates when an error is detected.
- Circle Indicator: Used for navigation or selection.
- Backlight Icon: Indicates backlight status.
- Self-test Indicator: Appears during self-test procedures.
- Unit Indicator: Displays units such as V (Volts), A (Amperes), RVH (Run Time), KWAhz (Kilowatt-hours).
3.2 LED Indicators
- Charging LED: Green light indicates active charging.
- Error LED: Red light indicates an error condition.
4. Setup and Installation
4.1 Connecting the MT-1 Remote Meter
The MT-1 Remote Meter connects directly to your compatible EPEVER dual battery solar charge controller via the provided 10-meter RJ45 communication cable. Ensure the controller is powered off before making connections.
- Locate the remote meter connection port on your EPEVER dual battery solar charge controller.
- Insert one end of the 10-meter RJ45 cable into the port on the back of the MT-1 Remote Meter.
- Insert the other end of the RJ45 cable into the remote meter connection port on your solar charge controller.
- Secure the MT-1 Remote Meter in your desired location using the mounting frame and screws.


4.2 Physical Dimensions

4.3 Installation Video
5. Operating Instructions
5.1 Navigating the Display
The MT-1 Remote Meter features four buttons for navigation and setting adjustments:
- NEXT: Cycles through different display screens and parameters.
- Left Arrow: Navigates left or decreases a value during settings.
- Right Arrow: Navigates right or increases a value during settings.
- SET: Enters setting mode or confirms a selection.
To view various system parameters, press the 'NEXT' button to cycle through the available data screens. To adjust settings, press 'SET' to enter the setting mode, use the arrow buttons to change values, and press 'SET' again to confirm.
5.2 Remote Monitoring via App
6. Maintenance
To ensure optimal performance and longevity of your EPEVER MT-1 Remote Meter, follow these maintenance guidelines:
- Cleaning: Regularly wipe the display and casing with a soft, dry cloth to remove dust and dirt. Avoid using abrasive cleaners or solvents.
- Connection Check: Periodically inspect the RJ45 connection cable for any signs of wear, damage, or loose connections. Ensure it is securely plugged into both the meter and the charge controller.
- Environmental Conditions: While the meter is designed for durability, avoid exposing it to extreme temperatures, direct sunlight for prolonged periods, or excessive moisture.
7. Troubleshooting
The MT-1 Remote Meter includes an error indicator to alert you to potential issues. If the error LED illuminates, check the following common causes:
- Battery Disconnect/Open Circuit/Over Voltage: Verify that all battery connections are secure and that battery voltage is within the acceptable range.
- Remote Temperature Sensor Issue: Ensure the remote temperature sensor is properly connected and functioning.
- Overcharging Current: Check the solar panel input and controller settings to prevent excessive charging current.
- Solar PV Short-circuit: Inspect the solar panel wiring for any short circuits.
The error symbol on the display will disappear automatically once the issue is resolved.
8. Specifications
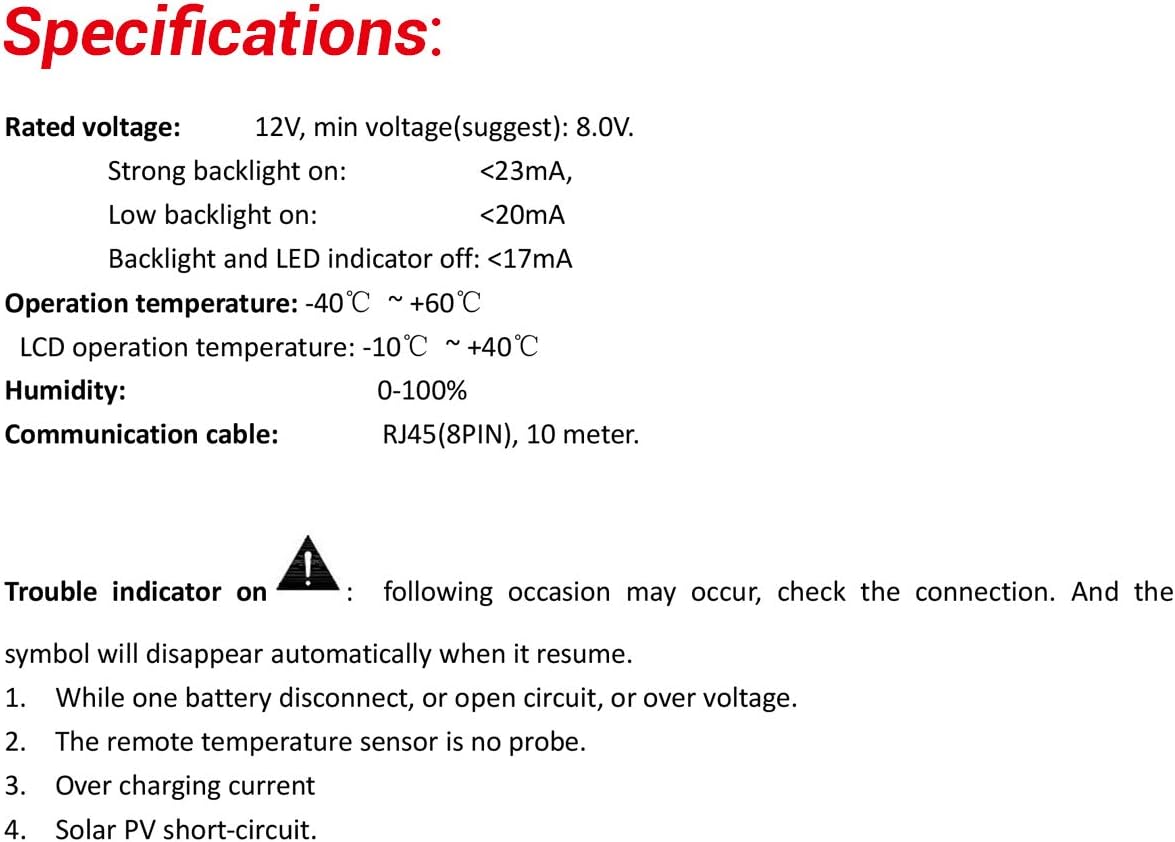
| Specification | Value |
|---|---|
| Rated Voltage | 12V (Min. 8.0V) |
| Strong Backlight On Current | <23mA |
| Low Backlight On Current | <20mA |
| Backlight and LED Indicator Off Current | <17mA |
| Operation Temperature | -40°C ~ +60°C |
| LCD Operation Temperature | -10°C ~ +40°C |
| Humidity | 0-100% |
| Communication Cable | RJ45 (8PIN), 10 meter |
| Item Weight | 1.32 pounds |
| Package Dimensions | 9.57 x 6.5 x 2.01 inches |
| Material | Plastic |
| Display Type | LCD |
9. Warranty and Support
For warranty information and technical support, please refer to the documentation provided with your EPEVER solar charge controller or visit the official EPEVER website. Keep your purchase receipt as proof of purchase for any warranty claims.
You can also visit the EPEVER Store on Amazon for additional product information and support resources.


