
1. Introduction
This manual provides essential information for the safe and effective installation, operation, and maintenance of your Mountfield Infrared Sauna Marianna 2. Please read this manual thoroughly before using the sauna and retain it for future reference.

Figure 1: Front view of the Mountfield Infrared Sauna Marianna 2. This image shows the full sauna unit with its wooden exterior, glass door, and internal heating elements visible.
2. Safety Instructions
Always observe the following safety precautions to prevent injury or damage to the sauna:
- Ensure the sauna is connected to a properly grounded 230V/50Hz power outlet.
- Do not use the sauna if you are pregnant, have a heart condition, high blood pressure, or any other serious medical condition without consulting a physician.
- Avoid consuming alcohol or drugs before or during sauna use.
- Do not block the ventilation openings.
- Keep children and pets away from the sauna during operation.
- Do not pour water on the heating elements. This is an infrared sauna, not a traditional steam sauna.
- Unplug the sauna from the power outlet before cleaning or performing any maintenance.
- Do not attempt to modify or repair the sauna yourself. Contact qualified service personnel.
3. Product Features
The Mountfield Infrared Sauna Marianna 2 is designed for single-person use and offers the following key features:
- Efficient Heating: Equipped with 3 ceramic heaters for rapid and consistent infrared heat distribution.
- External Control Panel: User-friendly interface for easy temperature and time adjustments.
- Quality Construction: Made from Canadian Hemlock wood, known for its durability, resin-free nature, and pleasant aroma.
- Tempered Glass Door: Clear 7mm tempered glass door for safety and visibility.
- Integrated Lighting: Includes one reading light for convenience.
- Natural Ventilation: Designed for indoor placement, requiring only natural air circulation. No special ventilation system is needed as it does not generate steam or excessively high temperatures.

Figure 2: Interior view of the sauna, highlighting the ceramic heating elements protected by wooden grilles.
4. Setup and Installation
Follow these steps for proper setup of your infrared sauna:
- Unpacking: Carefully unpack all components and check against the packing list to ensure all parts are present and undamaged.
- Placement: Select a suitable indoor location (e.g., bedroom, conservatory) with a flat, stable surface. Ensure sufficient space around the sauna for assembly and door opening. The sauna requires natural air circulation; no special ventilation is needed.
- Assembly: Assemble the sauna according to the detailed assembly instructions provided separately with your product. Ensure all panels are securely fastened.
- Door Installation: Install the clear tempered glass door. Note that the doorway is designed for right-hand opening.
- Power Connection: Connect the sauna to a standard, grounded 230V/50Hz electrical outlet. The power cable from the controller is approximately 3 meters long.
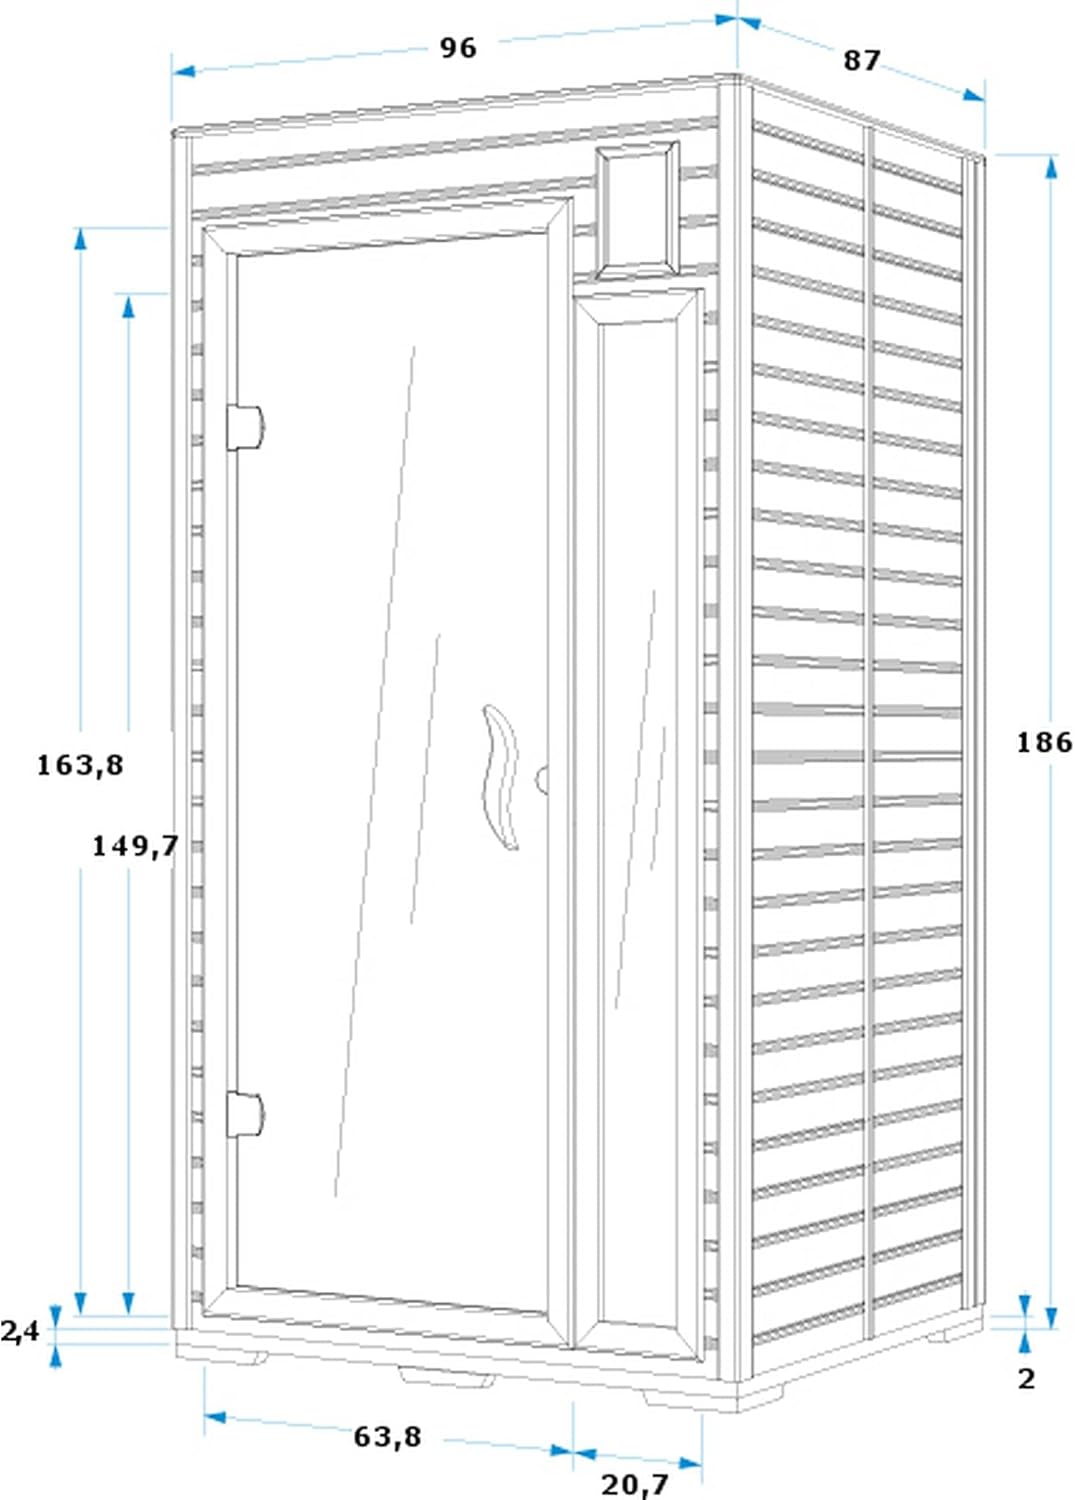
Figure 3: Technical drawing illustrating the external dimensions of the sauna: 97 cm (width) x 87 cm (depth) x 186 cm (height).

Figure 4: Close-up of the ergonomically designed wooden door handle, providing a comfortable grip for opening and closing the sauna door.
5. Operating Instructions
The sauna is controlled via an external panel. Familiarize yourself with the controls before use.

Figure 5: The external control panel features digital displays for temperature and time, along with buttons for adjustment, power, and reading lamp control.
- Power On: Press the "ON/OFF" button to power on the sauna. The display will illuminate.
- Set Temperature: Use the "Temperature" up/down arrows to set your desired temperature. The temperature sensor will monitor the internal temperature.
- Set Time: Use the "Time" up/down arrows to set the desired duration of your sauna session.
- Start Session: Press the "START/STOP" button to begin the heating process. The "Heat" indicator light will illuminate.
- Reading Lamp: Press the "Reading Lamp" button to turn the internal light on or off.
- End Session: The sauna will automatically turn off after the set time expires. You can also manually stop the session at any time by pressing the "START/STOP" button again, or power off the unit with the "ON/OFF" button.
6. Maintenance
Regular maintenance ensures the longevity and optimal performance of your sauna.
- Cleaning:
- Wipe the interior and exterior wood surfaces with a clean, damp cloth. Do not use harsh chemicals or abrasive cleaners.
- Clean the glass door with a mild glass cleaner.
- Ensure the sauna is unplugged and cool before cleaning.
- Ventilation: Ensure the ceiling ventilation opening remains clear of obstructions.
- Wood Care: The Canadian Hemlock wood is naturally resistant. Avoid applying any finishes or sealants to the interior wood, as this can interfere with the wood's natural properties and affect the sauna experience.
7. Troubleshooting
If you encounter any issues, refer to the following common problems and solutions:
| Problem | Possible Cause | Solution |
|---|---|---|
| Sauna does not power on. | No power supply; power cable not connected; circuit breaker tripped. | Check power outlet, ensure cable is securely plugged in, reset circuit breaker. |
| Sauna not heating. | Temperature not set; session time not started; heater malfunction. | Verify temperature and time settings on the control panel. Ensure "START" button was pressed. If problem persists, contact support. |
| Control panel not responding. | Temporary electronic glitch; power issue. | Turn off the sauna, unplug it for 5 minutes, then plug back in and restart. |
| Unusual odors. | New product odor; foreign material on heaters. | Initial use may produce a slight odor which will dissipate. Ensure no foreign objects are near heaters. Ventilate the room. |
If the problem persists after attempting these solutions, please contact customer support.
8. Specifications
Detailed technical specifications for the Mountfield Infrared Sauna Marianna 2:
| Parameter | Value |
|---|---|
| Model | Marianna 2 |
| Dimensions (W x D x H) | 97 cm x 87 cm x 186 cm |
| Capacity | 1 Person |
| Material | Canadian Hemlock Wood |
| Heater Type | 3 Ceramic Heaters |
| Total Power Absorption | 1.15 kW |
| Mains Voltage | 230V / 50Hz |
| Power Cable Length (from controller) | 3 m |
| Control Panel | External Digital Panel |
| Backrest | No |
| Door Type | Clear Tempered Glass |
| Door Opening | Right-hand |
| Glass Thickness | 7 mm |
| Lighting | 1 Reading Light |
| Ceiling Ventilation | Yes |
| Temperature Sensor | Yes |
| Ionizer | No |
| Infrared Wavelength | 6-16 micrometers |

Figure 6: Top-down schematic showing the placement of the three ceramic heaters: two 400W heaters on the back wall and one 350W heater below the bench, totaling 1150W (1.15 kW).
9. Warranty and Support
For warranty information, please refer to the documentation provided at the time of purchase. Mountfield stands behind the quality of its products.
If you require technical assistance, have questions about your sauna, or need to report a defect, please contact Mountfield customer support through the retailer where the product was purchased or refer to the official Mountfield website for contact details.