
1. Introduction
This manual provides detailed instructions for the installation, configuration, operation, and maintenance of the Cisco Catalyst 9800-L-F Gateway/Controller. It is designed to assist users in maximizing the performance and longevity of their device. Please read this manual thoroughly before operating the device.
2. Product Overview
The Cisco Catalyst 9800-L-F is a compact, fixed-fiber wireless controller designed for small to medium-sized enterprises. It offers advanced wireless capabilities, security features, and simplified management for modern network environments.
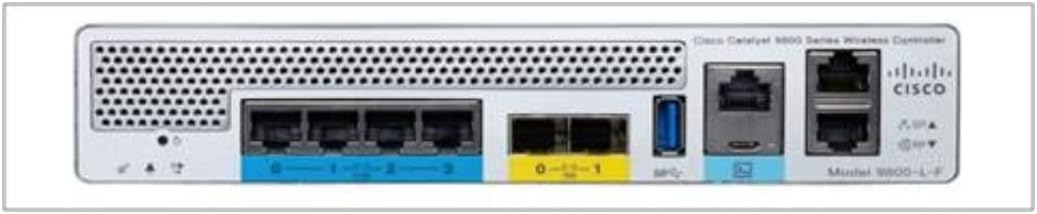
Figure 2.1: Rear Panel of Cisco Catalyst 9800-L-F
The image displays the rear panel of the Cisco Catalyst 9800-L-F Wireless Controller. From left to right, it features ventilation grilles, status indicator LEDs, multiple Ethernet ports (some labeled 0, 1, 2, 3), two SFP/SFP+ ports (labeled 0, 1), a USB port, a console port (RJ-45), and another set of Ethernet ports, along with the Cisco logo and model number. This layout facilitates various network connections and management interfaces.
Key Features:
- Integrated wireless LAN controller functionality.
- Support for various wireless standards.
- Multiple Gigabit Ethernet and SFP/SFP+ ports for flexible connectivity.
- Advanced security features for network protection.
- Centralized management and monitoring capabilities.
3. Package Contents
Verify that all items are present and undamaged. If any item is missing or damaged, contact your vendor immediately.
- Cisco Catalyst 9800-L WLAN Ctrl Fiber Up (C9800-L-F-K9)
- Power Cord (region-specific)
- Rack-mount kit (if applicable)
- Documentation (Quick Start Guide, Safety Information)
4. Specifications
The following table outlines the technical specifications for the Cisco Catalyst 9800-L-F Gateway/Controller.
| Feature | Specification |
|---|---|
| Model Number | C9800-L-F-K9 |
| Product Dimensions | 23.62 x 23.62 x 33.46 inches |
| Item Weight | 6.89 pounds |
| Manufacturer | Cisco |
| Connectivity | 10, 100, 1000, 10000 Mbit/s (Fiber/Ethernet) |
| Batteries | 1 Lithium Ion battery required |
| Language | English |
5. Setup
Follow these steps to properly set up your Cisco Catalyst 9800-L-F Gateway/Controller.
5.1. Site Preparation
- Ensure the installation site is clean, dry, and well-ventilated.
- Maintain appropriate temperature and humidity levels as per environmental specifications.
- Ensure adequate power supply and grounding are available.
5.2. Physical Installation
- Mounting: Securely mount the controller in a standard 19-inch rack using the provided rack-mount kit. Ensure proper airflow around the device.
- Power Connection: Connect the power cord to the power input on the rear panel of the controller and then to a grounded electrical outlet.
- Network Connections: Connect your network cables (Ethernet or fiber) to the appropriate ports on the rear panel. Refer to the network design for specific port assignments.
- Console Connection (Optional): For initial configuration or troubleshooting, connect a console cable from your management workstation to the console port on the controller.
5.3. Initial Power On
- After all physical connections are made, power on the device.
- Observe the status indicator LEDs on the front panel. Refer to the LED status guide for their meaning.
- Access the device via the console port or network interface for initial configuration.
6. Operating Instructions
This section provides general guidelines for operating the Cisco Catalyst 9800-L-F Gateway/Controller. For detailed configuration and management, refer to the Cisco IOS XE documentation.
6.1. Accessing the Controller
- Command Line Interface (CLI): Access via SSH or the console port for advanced configuration.
- Web User Interface (WebUI): Access via a web browser using the controller's IP address for graphical management.
6.2. Basic Configuration
- Configure network interfaces (IP addresses, VLANs).
- Set up wireless LANs (WLANs) and security policies.
- Integrate with authentication servers (e.g., RADIUS).
- Configure system settings such as hostname, time, and user accounts.
6.3. Monitoring and Management
- Monitor network performance and client connectivity.
- Review system logs for events and errors.
- Perform software upgrades as recommended by Cisco.
7. Maintenance
Regular maintenance ensures optimal performance and longevity of your device.
- Software Updates: Regularly check for and apply the latest software updates and security patches from Cisco.
- Environmental Control: Ensure the operating environment remains within specified temperature and humidity ranges.
- Physical Inspection: Periodically inspect the device for any physical damage, loose connections, or excessive dust accumulation.
- Cleaning: Use a soft, dry cloth to clean the exterior of the device. Do not use liquid cleaners or aerosols. Ensure ventilation openings are clear of obstructions.
- Backup Configuration: Regularly back up your controller's configuration to an external storage device.
8. Troubleshooting
This section provides solutions to common issues you might encounter.
| Problem | Possible Solution |
|---|---|
| Device does not power on | Check power cord connection, power outlet, and power supply. Ensure the power switch is in the ON position. |
| Cannot access WebUI or CLI | Verify network connectivity, IP address configuration, and firewall settings. Ensure correct console cable connection and terminal settings. |
| Wireless clients cannot connect | Check WLAN configuration, security settings (SSID, password, authentication), and ensure access points are properly registered and operational. |
| Poor wireless performance | Investigate potential interference, channel utilization, access point placement, and client signal strength. Review controller resource utilization. |
If the issue persists, consult the Cisco documentation or contact Cisco Technical Support.
9. Safety Information
Observe the following safety precautions to prevent injury and damage to the device.
- Always disconnect power before performing any maintenance or installation procedures.
- Do not operate the device in wet or damp conditions.
- Ensure proper grounding to prevent electrical shock.
- Do not block ventilation openings.
- Only qualified personnel should perform installation and servicing.
10. Support and Warranty
For technical assistance, product documentation, and software downloads, please visit the official Cisco support website.
Cisco Support: https://www.cisco.com/go/support
Information regarding product warranty can be found on the Cisco website or by contacting your authorized Cisco reseller. Please retain your proof of purchase for warranty claims.


