1. Introduction
This manual provides detailed instructions for the LemoVoz Mini Voice Recorder Q11. Please read this guide carefully to ensure proper use and to maximize the device's functionality. This compact digital voice recorder is designed for discreet audio capture and playback, suitable for various personal and professional applications.
2. Package Contents
Verify that all items listed below are included in your package:
- LemoVoz Mini Voice Recorder Q11
- Neck String
- USB Charging/Data Cable
- Earphones
- User Manual (this document)

Figure 2.1: Package contents of the LemoVoz Mini Voice Recorder.
3. Product Overview
The LemoVoz Mini Voice Recorder Q11 is a compact and discreet device, designed for ease of use and portability. Its small size allows it to be carried conveniently in a pocket or bag, or worn as a necklace.

Figure 3.1: Front view of the LemoVoz Mini Voice Recorder.

Figure 3.2: The recorder can be worn as a discreet necklace.
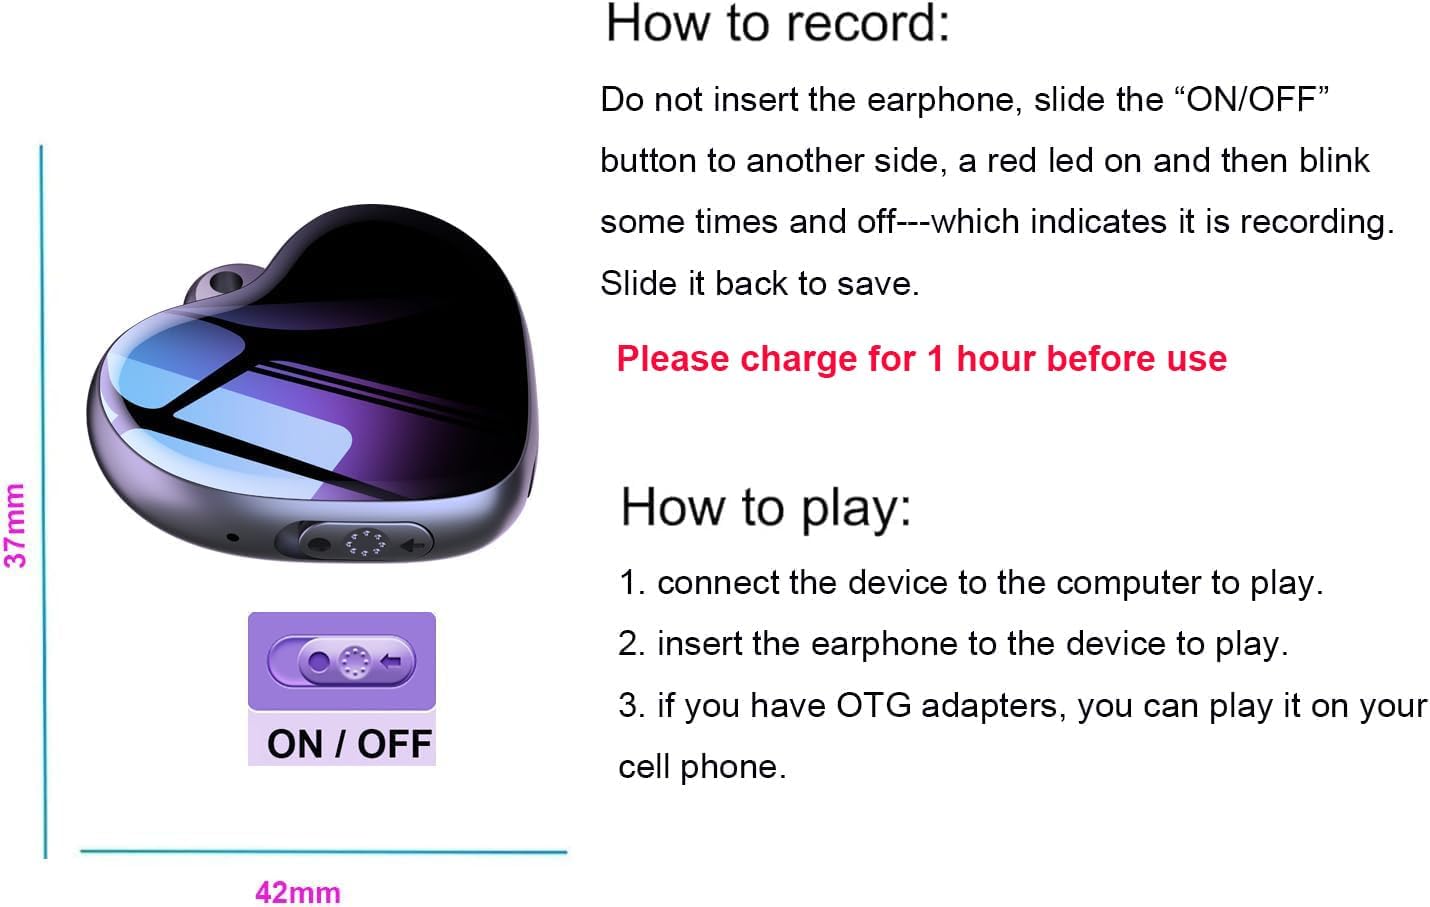
Figure 3.3: Device dimensions and ON/OFF switch location.

Figure 3.4: Size comparison of the recorder.

Figure 3.5: Detailed view of the ON/OFF switch.

Figure 3.6: Recorder with earphones, showing LED indicator and playback controls.
4. Setup
4.1. Initial Charging
Before first use, fully charge the device. Connect the recorder to a computer's USB 2.0 port or a compatible USB wall adapter using the provided USB cable. Charging typically takes 1-2 hours. A full charge supports 20-24 hours of continuous voice recording.
Important: Please charge the device for at least 1 hour before its first use.
4.2. Time Synchronization
To ensure your audio files are timestamped correctly, synchronize the device's internal clock with your computer's time:
- Connect the recorder to your computer's USB 2.0 port.
- An external drive will appear on your computer.
- Navigate to the folder named "Time Synchronization" within the device's storage.
- Locate and run the "SET DISK TIME" utility or file to set the correct time.
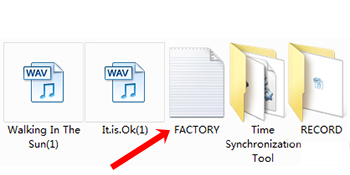
Figure 4.1: Folder structure for time synchronization.

Figure 4.2: Example of time synchronization interface.
5. Operating Instructions
5.1. Recording Audio
To start recording:
- Ensure earphones are not inserted into the device.
- Slide the ON/OFF switch to the "ON" position (the opposite side from "OFF").
- A red LED indicator will light up briefly, then blink a few times, and finally turn off. This indicates that the device is actively recording.
To save the recording and stop:
- Slide the ON/OFF switch back to the "OFF" position. The recording will be saved automatically.
Recorded audio files are automatically named by time. Ensure time synchronization is performed regularly.
5.2. Voice Activated Recording (VOR Mode)
The device supports Voice Activated Recording (VOR), where recording automatically starts when sound is detected and pauses during silence. This feature helps conserve memory and battery life by avoiding long periods of silent recording.
To enable or configure VOR mode, connect the device to a computer and access its settings via the device's storage. Look for a setting related to "VOR" or "Voice Activated Recording" and adjust it as needed. Refer to the device's internal software documentation for specific instructions on enabling VOR.
5.3. Playing Back Recordings
There are several ways to play back your recordings:
- Via Computer:
- Connect the device to your computer using the USB cable.
- Access the device's storage and locate the recorded audio files (typically in WAV, MP3, or WMA format).
- Play the files using your computer's media player.
- Via Earphones:
- Insert the provided earphones into the device's 3.5mm jack.
- Use the controls on the earphone cable (if available) or the device's ON/OFF switch to navigate and play recordings.
- Via Mobile Phone (with OTG adapter):
- If you have an OTG (On-The-Go) adapter compatible with your mobile phone, you can connect the recorder to your phone to play back files directly.
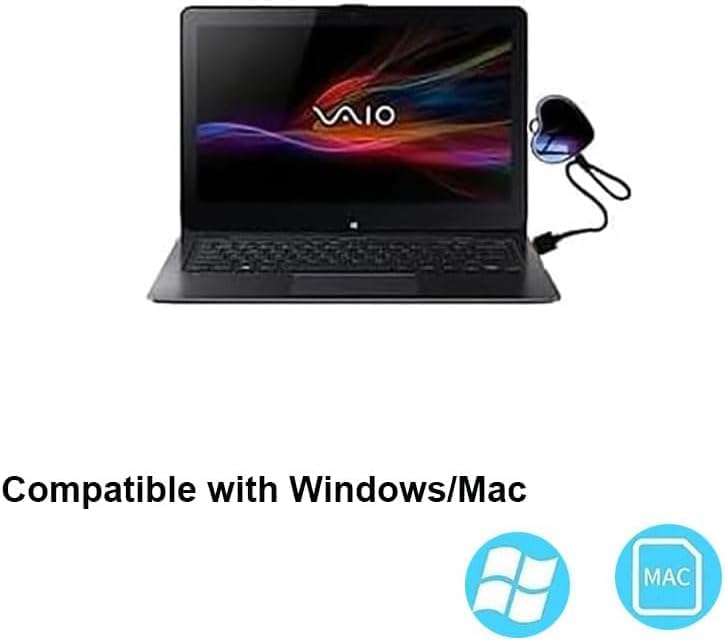
Figure 5.1: Connecting the recorder to a computer for playback.
6. Maintenance
- Keep the device dry and away from extreme temperatures.
- Clean the device with a soft, dry cloth. Do not use liquid cleaners or solvents.
- Avoid dropping the device or subjecting it to strong impacts.
- Regularly back up important recordings to your computer to prevent data loss.
- Charge the device periodically if not in use for extended periods to maintain battery health.
7. Troubleshooting
| Problem | Possible Cause | Solution |
|---|---|---|
| Device does not turn on. | Low battery. | Charge the device for 1-2 hours. |
| Cannot record. | Device memory is full. | Connect to a computer and delete old files to free up space. |
| Recordings have incorrect timestamps. | Time not synchronized. | Perform time synchronization as described in Section 4.2. |
| Difficulty setting Voice Activated Recording (VOR). | Complex software interface. | Connect the device to a computer and carefully review the settings within the device's storage. Look for specific VOR configuration files or utilities. |
| Poor audio quality. | Device too far from sound source; background noise. | Ensure the device is close to the sound source and minimize environmental noise. |
8. Specifications
| Feature | Detail |
|---|---|
| Brand | LemoVoz |
| Model Number | Q11 |
| Storage Capacity | 16 GB (Note: Some specifications may list 8 GB, but the product is generally marketed as 16 GB) |
| Digital Recording Time | Up to 24 hours (on full charge) |
| Battery Type | Lithium-polymer (1 included) |
| Charging Time | 1-2 hours |
| Interface | USB 2.0 |
| Compatible Devices | Personal Computer (Windows/Mac) |
| Microphone Form Factor | Integrated |
| Microphone Operating Mode | Mono |
| Audio Formats | MP3, WAV, WMA |
| Headphone Jack | 3.5 mm |
| Dimensions (approx.) | 27 x 32 x 8 mm (1.06 x 1.26 x 0.31 inches) |
| Weight (approx.) | 0.85 oz |
| Special Features | USB port, Pocket-sized, Voice Activated Recording, Discreet design |
9. Warranty and Support
Information regarding product warranty and customer support is not explicitly provided in the available product data. Please refer to the product packaging or the seller's website for details on warranty coverage and how to contact customer support for assistance.


