1. Introduction
This manual provides essential information for the proper installation, operation, and maintenance of your RIGID 360-Series 4-inch LED Off-Road Drive Beam Lights with Amber Backlight. Please read this manual thoroughly before proceeding with installation or use to ensure optimal performance and safety.

Image 1.1: RIGID 360-Series 4-inch LED Off-Road Drive Beam Lights with Amber Backlight.
The RIGID 360-Series lights are engineered for off-road vehicle applications, offering powerful illumination and versatile beam patterns. They feature a durable aluminum housing and are designed for longevity in demanding environments.
2. Safety Information
Always observe the following safety precautions during installation and operation:
- Professional Installation Recommended: If you are not experienced with automotive electrical systems, seek professional installation to prevent damage to the product or your vehicle.
- Disconnect Power: Always disconnect the vehicle's battery before beginning any electrical work to avoid electrical shock or short circuits.
- Proper Wiring: Ensure all wiring connections are secure, insulated, and protected from abrasion or heat. Use appropriate gauge wiring for the current draw.
- Mounting Security: Securely mount the lights to a stable surface capable of supporting their weight and resisting vibration. Loose lights can become projectiles.
- Heat Dissipation: Do not obstruct the heatsink fins on the back of the light, as this can lead to overheating and reduced lifespan.
- Off-Road Use Only: These lights are intended for off-road use. Check local, state, and federal laws regarding auxiliary lighting on public highways.
3. Package Contents
Verify that all components are present in your package:
- RIGID Industries 36118 (Pair of 360-Series 4-inch LED Lights)
- Mounting Brackets
- Hardware (bolts, washers, nuts)
Note: Wiring harness is not included and must be sourced separately.
4. Features Overview
The RIGID 360-Series LED lights incorporate several key features for robust performance:
- Powerful LED Output: Projects up to 8,600 raw lumens for significant illumination.
- Versatile Beam Patterns: Available in various beam patterns from 17 to 60 degrees, including the Drive Beam for moderate speeds (20-50 MPH).
- Amber Backlight: Features an amber backlight option for enhanced visibility or aesthetic preference.
- Durable Construction: Protected by an aluminum housing with a blacked-out circuit board.
- Advanced Protection: Includes reverse polarity protection, over/under voltage protection, and an IP68 compliant rating for dust and water ingress.
- Long Lifespan: Designed for a 50,000-hour lifespan.
- High-Grade Aluminum Alloy Heatsink: Ensures efficient thermal management.

Image 4.1: Key features of the RIGID 360-Series lights.
5. Setup and Installation
The RIGID 360-Series lights are designed for universal fitment in various vehicle exterior applications. Installation typically involves mounting the lights and connecting them to the vehicle's electrical system.
5.1. Mounting
- Select Mounting Location: Choose a secure, flat surface on your vehicle that provides adequate clearance and does not obstruct vehicle functions or other lighting. Common locations include bumpers, A-pillars, or roof racks.
- Drill Mounting Holes: If necessary, mark and drill appropriate holes for the included mounting brackets. Ensure holes are properly sized and deburred.
- Attach Brackets: Secure the mounting brackets to the vehicle using the provided hardware. Tighten fasteners to recommended torque specifications (refer to vehicle manufacturer guidelines if applicable).
- Attach Lights: Mount the 360-Series lights to the brackets. Adjust the angle and position as desired before final tightening.
5.2. Wiring
The lights operate on 9-36 VDC. A wiring harness is required (not included). It is recommended to use a harness with a relay and fuse for protection.
- Identify Wires: The lights typically have multiple wires: positive for the main beam, positive for the backlight (amber), and a common negative (ground). Consult the specific wiring diagram provided with your wiring harness.
- Connect to Power Source: Connect the main beam positive wire to a switched 12V/24V power source (e.g., through a switch and relay).
- Connect Backlight: Connect the amber backlight positive wire to a separate switched power source if independent control is desired, or to a marker light circuit for simultaneous activation.
- Connect Ground: Connect the common negative wire to a reliable chassis ground point on the vehicle.
- Test Functionality: Before securing all wiring, test the lights to ensure proper operation of both the main beam and backlight.

Image 5.1: RIGID 360-Series lights installed on a vehicle.
6. Operating Instructions
Once installed and wired correctly, operating your RIGID 360-Series lights is straightforward.
- Main Beam Activation: Activate the main LED drive beam by engaging the switch connected to its power circuit.
- Amber Backlight Activation: Activate the amber backlight by engaging the switch connected to its power circuit. This can be operated independently or in conjunction with other vehicle lights, depending on your wiring setup.
The Drive Beam optic is designed to provide a balanced beam for moderate speeds, offering both width and distance. The amber backlight provides an additional visual element and can be used for accent lighting.
Video 6.1: An overview of the RIGID 360-Series lights, demonstrating their features and performance on various vehicles. This video is provided by ISellerLLc.
7. Maintenance
Regular maintenance ensures the longevity and optimal performance of your RIGID 360-Series lights.
- Cleaning: Clean the lens and housing regularly with mild soap and water. Avoid abrasive cleaners or harsh chemicals that could damage the lens or finish.
- Inspection: Periodically inspect mounting hardware for tightness and corrosion. Check wiring for any signs of wear, fraying, or damage.
- Lens Condition: Ensure the lens is free from cracks or deep scratches that could affect light output or water sealing.
8. Troubleshooting
If you encounter issues with your RIGID 360-Series lights, refer to the following common problems and solutions:
| Problem | Possible Cause | Solution |
|---|---|---|
| Light does not turn on | No power, faulty wiring, blown fuse, faulty switch. | Check power connections, fuse, and switch. Ensure proper grounding. |
| Light is dim or flickers | Low voltage, poor connection, damaged wiring. | Verify voltage supply, inspect all connections for corrosion or looseness. |
| Amber backlight is not visible | Backlight circuit not powered, ambient light too bright. | Ensure backlight circuit is correctly wired and switched on. Note that amber backlights are subtle and may not be highly visible in bright daylight. |
| Moisture inside the lens | Seal compromise, pressure equalizing vent clogged. | Contact RIGID support. Do not attempt to open the light. |
9. Specifications
Detailed technical specifications for the RIGID 360-Series 4-inch LED Off-Road Drive Beam Light (Model 36118):
- Model Number: 36118
- Dimensions (L x W x H): 6.5 x 9 x 6.25 inches
- Item Weight: 3.22 pounds
- Brand: RIGID
- Form Factor: Pod
- Recommended Uses: Vehicle Exterior (Off-Road & 4x4)
- Material: Plastic (Housing), Aluminum (Heatsink)
- Water Resistance Level: Water Resistant (IP68 Compliant)
- Operating Voltage: 9-36 VDC
- Raw Lumens: Up to 8,600 (specific to beam pattern)
- Optics: Drive Beam
- Amp Draw: 2 Amps (per light, approximate)
- Lifespan: 50,000+ hours
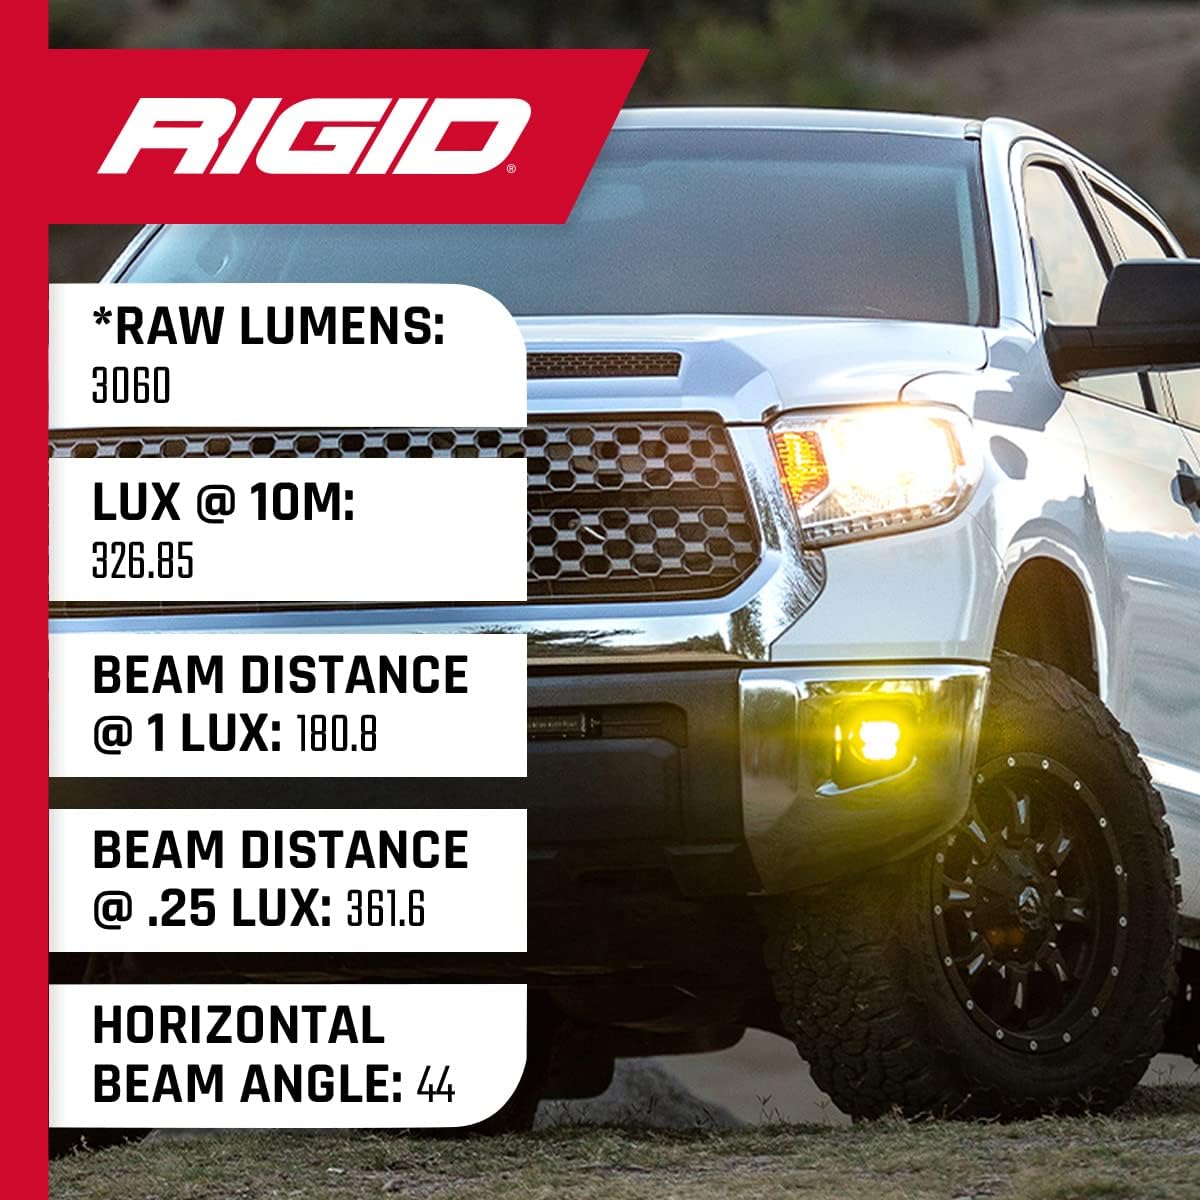
Image 9.1: Beam pattern and key specifications for the 360-Series Drive Optic.
10. Warranty and Support
RIGID Industries products are manufactured to high standards and are backed by a limited warranty. For specific warranty details, please refer to the official RIGID Industries website or contact their customer service.
If you require technical assistance, have questions about installation, or need to report a product issue, please contact RIGID Industries customer support through their official channels.
Contact Information:
Please visit the official RIGID Industries website for the most current support contact details.


