1. Introduction
Thank you for choosing the ORDRO 4K Camcorder AC3. This camcorder is designed to capture high-quality video and photos, featuring a 4K Ultra HD resolution, a sensitive Sony IMX258 CMOS sensor, and a versatile 3.1-inch IPS touchscreen. With advanced features like IR night vision, Wi-Fi connectivity, and support for external accessories, the AC3 is suitable for various recording environments. This manual provides detailed instructions for setup, operation, maintenance, and troubleshooting to ensure optimal performance of your device.
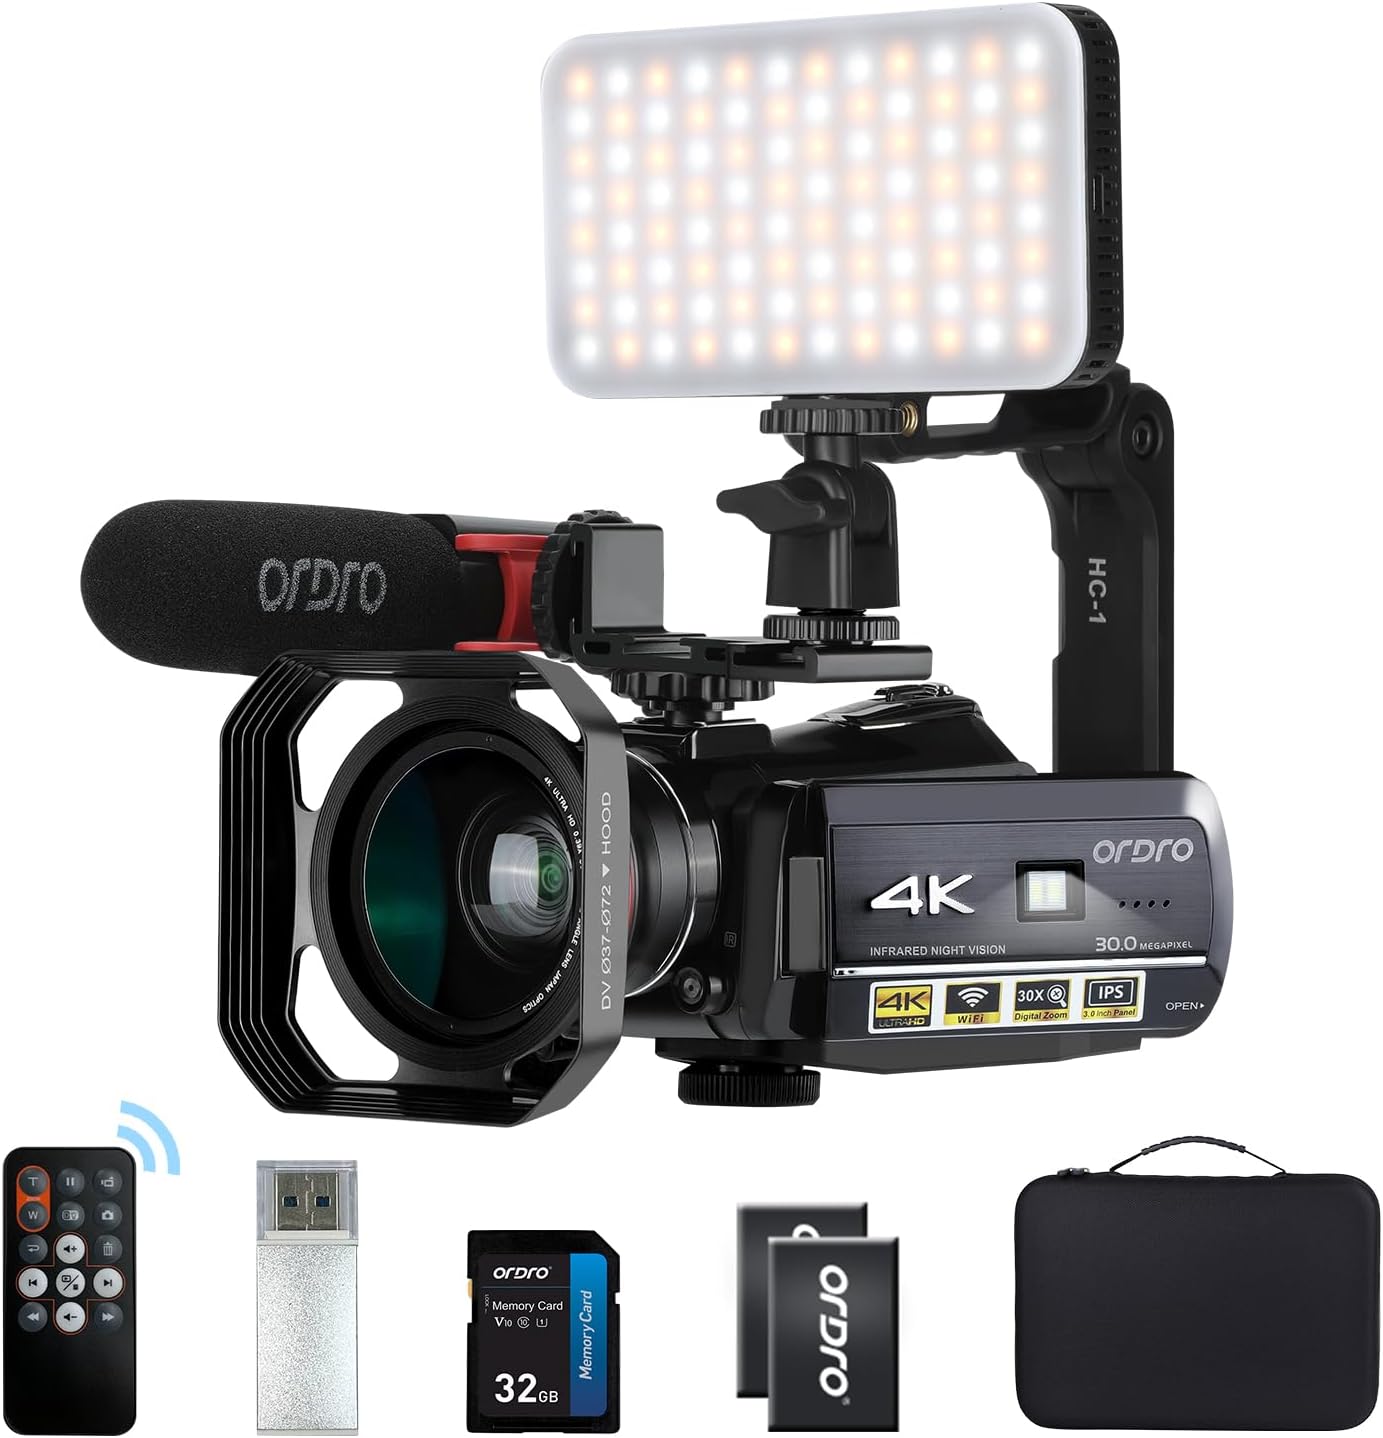
Figure 1.1: ORDRO 4K Camcorder AC3 with included accessories such as the microphone, LED light, wide-angle lens, remote control, and carrying case.
2. What's in the Box
The ORDRO AC3-SET5 kit includes the following components:
- ORDRO 4K Camcorder AC3
- Carrying Case
- External Microphone
- Micro/USB Adapter (1 to 2)
- 0.39X Professional Wide-Angle Lens (includes Macro Lens)
- LED Video Light (2700-6500K, 80pcs cold/warm lights)
- Lens Hood
- Camera Holder/Handle
- Two Lithium-ion Batteries
- Battery Charger
- USB Charger
- Camera Pouch and Wrist Strap
- Card Reader (random color)
- Micro USB Cable
- 5-pin USB Charging Cable
- HDMI Cable
- Hot Shoe Mount
- English User Manual
3. Setup Guide
3.1 Battery Installation
The camcorder uses lithium-ion batteries. Ensure batteries are fully charged before first use.
- Open the battery compartment cover located at the bottom of the camcorder.
- Insert the charged lithium-ion battery, ensuring the correct polarity.
- Close the battery compartment cover securely.
- Use the provided battery charger to charge the spare battery.
3.2 SD Card Installation
The camcorder supports SDHC flash memory cards up to 128GB. A 32GB SD card is included in the AC3-SET5 kit.
- Locate the SD card slot, usually on the side or bottom of the camcorder.
- Insert the SD card with the metal contacts facing the correct direction (refer to the diagram near the slot).
- Push the card gently until it clicks into place. To remove, push again until it springs out.
3.3 Attaching Accessories
The ORDRO AC3 comes with several accessories to enhance your recording experience.
- External Microphone: Attach the microphone to the hot shoe mount on top of the camcorder. Connect the microphone cable to the designated audio input port. The microphone features a super-cardioid polar pattern and a low-cut filter to reduce noise and improve sound quality.

Figure 3.1: Attaching the external microphone to the camcorder.
- Wide-Angle Lens: Screw the 0.39X wide-angle lens onto the front of the camcorder's main lens. This lens allows for a broader field of view. The kit also includes a macro lens for close-up shots (effective shooting range 4-5cm).

Figure 3.2: Illustration of wide-angle and macro lens attachment and their effects.
- LED Video Light: Mount the LED video light onto the hot shoe mount. This light provides adjustable illumination (2700-6500K, 80pcs cold/warm lights) to enhance fill light in various shooting conditions.

Figure 3.3: The LED video light attached to the camcorder, demonstrating its use for improving image quality.
- Camera Holder/Handle: Attach the camera holder for stable handheld shooting or to mount on a tripod.
4. Operating Instructions
4.1 Basic Operation
- Power On/Off: Press and hold the power button to turn the camcorder on or off.
- Recording Video: Press the RECORD button to start and stop video recording.
- Taking Photos: Switch to photo mode and press the PHOTO button to capture still images. The maximum photo resolution is 24.0 MP (5600x4200 interpolation).
4.2 Display and Navigation
The camcorder features a 3.1-inch IPS capacitive touchscreen with 270° rotation. Use the touchscreen for menu navigation and settings adjustments. The camcorder also supports 30X digital zoom.
4.3 4K Video Recording
The ORDRO AC3 records videos in Ultra HD 4K resolution (2880x2160 at 24FPS), ensuring high-quality and vibrant footage.
4.4 IR Night Vision
To record clear videos and photos in low-light or dark conditions, activate the IR Night Vision mode.
- Press the IR button (typically a dedicated button on the camcorder body) to enter night vision mode.
- The camcorder will switch to infrared recording, capturing monochrome images in darkness.

Figure 4.1: Demonstrates the difference between normal and IR night vision recording.
4.5 Wi-Fi Connectivity
The camcorder can be controlled remotely via Wi-Fi using the "D Video" application on your smartphone or tablet.
- Turn on the camcorder and set the mode button to the "SET" position.
- Touch the camcorder screen and select the Wi-Fi icon.
- The Wi-Fi name (SSID: HDV) and password (PWD: 12345678) will be displayed on the screen.
- Download the "D Video" app from Google Play (Android) or Apple App Store (iOS), or by scanning the QR code in the user manual.
- Find the Wi-Fi network named "HDV" on your smartphone/tablet and enter the password.
- Open the "D Video" app to remotely control the camcorder and view a real-time feed.
- Press the "PHOTO" button on the camcorder to disconnect the Wi-Fi.
- Note: The effective Wi-Fi distance is less than 9.8 feet (3 meters). This Wi-Fi function is for direct device-to-device connection and does not connect to a router.
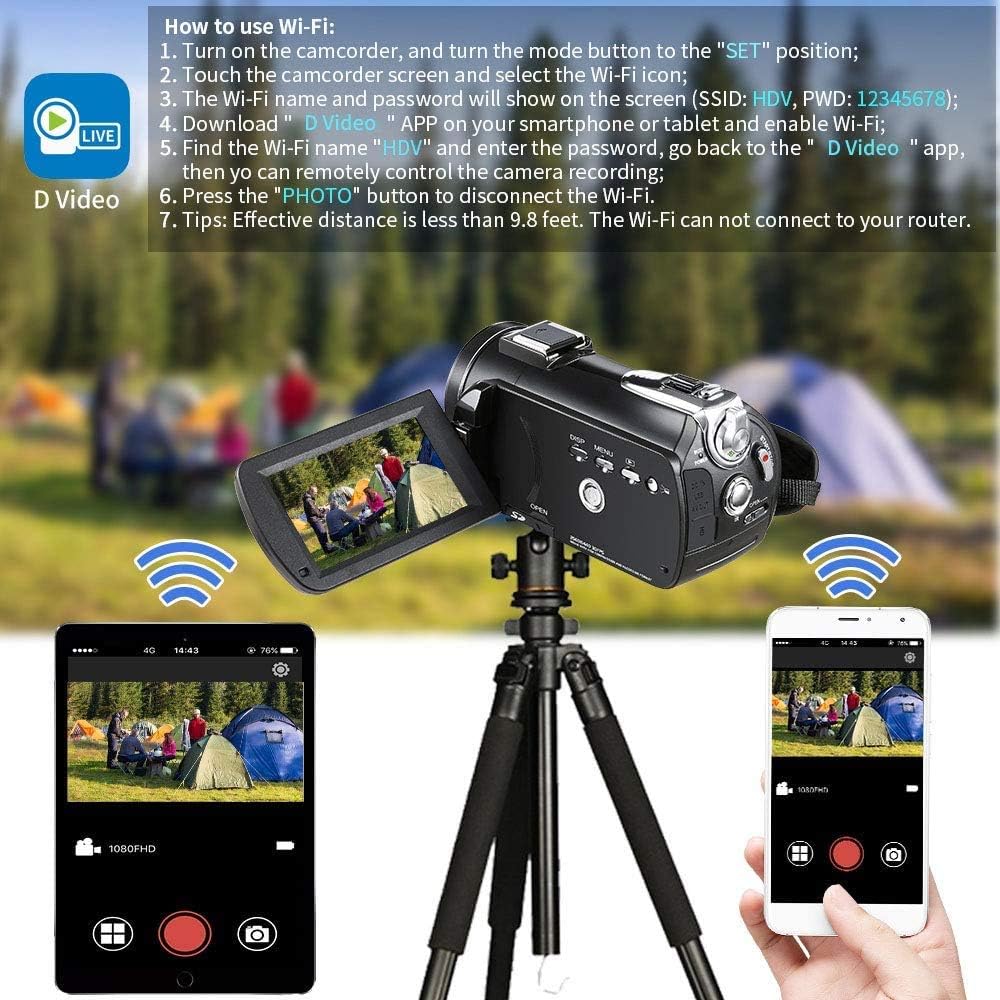
Figure 4.2: Steps for connecting the camcorder to a smartphone or tablet via Wi-Fi using the "D Video" app.
4.6 Time-Lapse Video
The camcorder supports time-lapse video recording, allowing you to capture changes over time.
- You can set the interval between each shot to 1 second, 3 seconds, or 5 seconds.
- The camcorder will then compile these shots into a high-quality 4K time-lapse video.

Figure 4.3: Example of time-lapse video capturing changes in a city skyline from day to night.
4.7 Connecting to TV or Computer
You can connect your camcorder to a TV for playback or to a computer for file transfer and use as a webcam.
- To TV: Use the provided HDMI cable to connect the camcorder's HDMI output port to an HDMI input port on your television. Select the correct HDMI input on your TV to view the camcorder's display.
- To Computer: Use the provided USB cable to connect the camcorder to your computer. The camcorder can function as a mass storage device for file transfer or as a webcam. Press the "PHOTO" button on the camcorder to connect it as a webcam.

Figure 4.4: Diagrams showing how to connect the camcorder to a TV via HDMI and to a computer via USB.
5. Maintenance
- Cleaning: Use a soft, dry cloth to clean the camcorder body. For the lens, use a specialized lens cleaning cloth and solution. Avoid using abrasive cleaners or solvents.
- Battery Care: Store batteries in a cool, dry place. Do not expose them to extreme temperatures. Charge batteries regularly, even if not in use, to maintain their lifespan.
- Storage: When not in use for extended periods, remove the battery and store the camcorder in its carrying case in a dry, dust-free environment.
6. Troubleshooting
If you encounter issues with your ORDRO AC3 camcorder, please refer to the following common troubleshooting tips:
- Camcorder does not power on: Ensure the battery is fully charged and correctly inserted. Try using a different charged battery.
- Cannot record: Check if an SD card is inserted and if it has sufficient free space. Ensure the card is not locked (write-protected).
- Poor image/video quality: Clean the lens. Ensure you are shooting in adequate lighting conditions. For 4K recording, ensure sufficient light.
- Wi-Fi connection issues: Ensure the camcorder is in "SET" mode and the Wi-Fi function is enabled. Verify the SSID and password. Make sure your smart device is within the 9.8 feet effective range. Remember, the Wi-Fi does not connect to a router.
- No sound in recordings: Check if the external microphone is properly connected and enabled in the settings. Ensure microphone volume is not muted.
If the problem persists, please contact ORDRO customer support.
7. Specifications
| Feature | Specification |
|---|---|
| Brand | ORDRO |
| Model | HDR-AC3 |
| Video Resolution | 4K (2880x2160 @ 24FPS) |
| Photo Resolution | 24.0 MP (5600x4200 interpolation) |
| Sensor Technology | CMOS (Sony IMX258, 13 MP) |
| Screen | 3.1 inches IPS Capacitive Touchscreen, 270° Rotation |
| Digital Zoom | 30X |
| Optical Zoom | 1x Multiplier |
| Connectivity | Wi-Fi, USB, HDMI |
| Special Features | IR Night Vision, Time-Lapse, Webcam Function |
| Image Stabilization | Dynamic |
| Max Focal Length | 72 Millimeters |
| Min Focal Length | 39 Millimeters |
| Aperture | f/22 |
| Memory Card Type | SDHC (up to 128GB capacity) |
| Battery Composition | Lithium-ion (2 included) |
| Weight | 380 Grams |
| Dimensions (L x W x H) | 37.5 x 26.5 x 9 cm |
8. Warranty and Support
Specific warranty details for the ORDRO 4K Camcorder AC3 are not provided in the product information. For warranty claims, technical support, or inquiries regarding spare parts, please contact the seller (ORDRO UK) or the manufacturer directly.
Please retain your proof of purchase for any warranty-related services.


