
Trexonic TRX-16BLK
Trexonic Retro Record Player User Manual
Model: TRX-16BLK
Introduction
Thank you for purchasing the Trexonic Retro Record Player. This versatile audio system combines vintage aesthetics with modern functionality, allowing you to enjoy your favorite music from various sources including vinyl records, CDs, Bluetooth devices, AM/FM radio, and USB/SD cards. This manual provides detailed instructions for setup, operation, and maintenance to ensure optimal performance and longevity of your device.

Image: The Trexonic Retro Record Player, showcasing its classic design with the turntable lid open and a vinyl record in place.
Important Safety Information
Please read these safety instructions carefully before operating the unit. Keep this manual for future reference.
- Do not expose this appliance to rain or moisture.
- Do not block any ventilation openings. Install in accordance with the manufacturer's instructions.
- Do not install near any heat sources such as radiators, heat registers, stoves, or other apparatus (including amplifiers) that produce heat.
- Protect the power cord from being walked on or pinched, particularly at plugs, convenience receptacles, and the point where they exit from the apparatus.
- Only use attachments/accessories specified by the manufacturer.
- Unplug this apparatus during lightning storms or when unused for long periods of time.
- Refer all servicing to qualified service personnel. Servicing is required when the apparatus has been damaged in any way, such as power-supply cord or plug is damaged, liquid has been spilled or objects have fallen into the apparatus, the apparatus has been exposed to rain or moisture, does not operate normally, or has been dropped.
Product Features
The Trexonic Retro Record Player is equipped with a variety of features for a comprehensive audio experience:
- 3-Speed Belt-Driven Turntable: Plays 33 1/3, 45, and 78 RPM vinyl records.
- Built-in Bluetooth: Wirelessly stream music from compatible devices.
- CD Player: Supports standard audio CDs.
- AM/FM Radio: Integrated tuner with backlit display.
- USB/SD Input: For MP3 playback and recording vinyl to MP3.
- Auxiliary Input (3.5mm): Connect external audio devices.
- Headphone Jack: For private listening.
- RCA Line-Out: Connect to external speakers or audio systems.
- Alarm Clock with Timer: Programmable alarm and sleep timer functions.
- Built-in Stereo Speakers: For immediate audio playback.
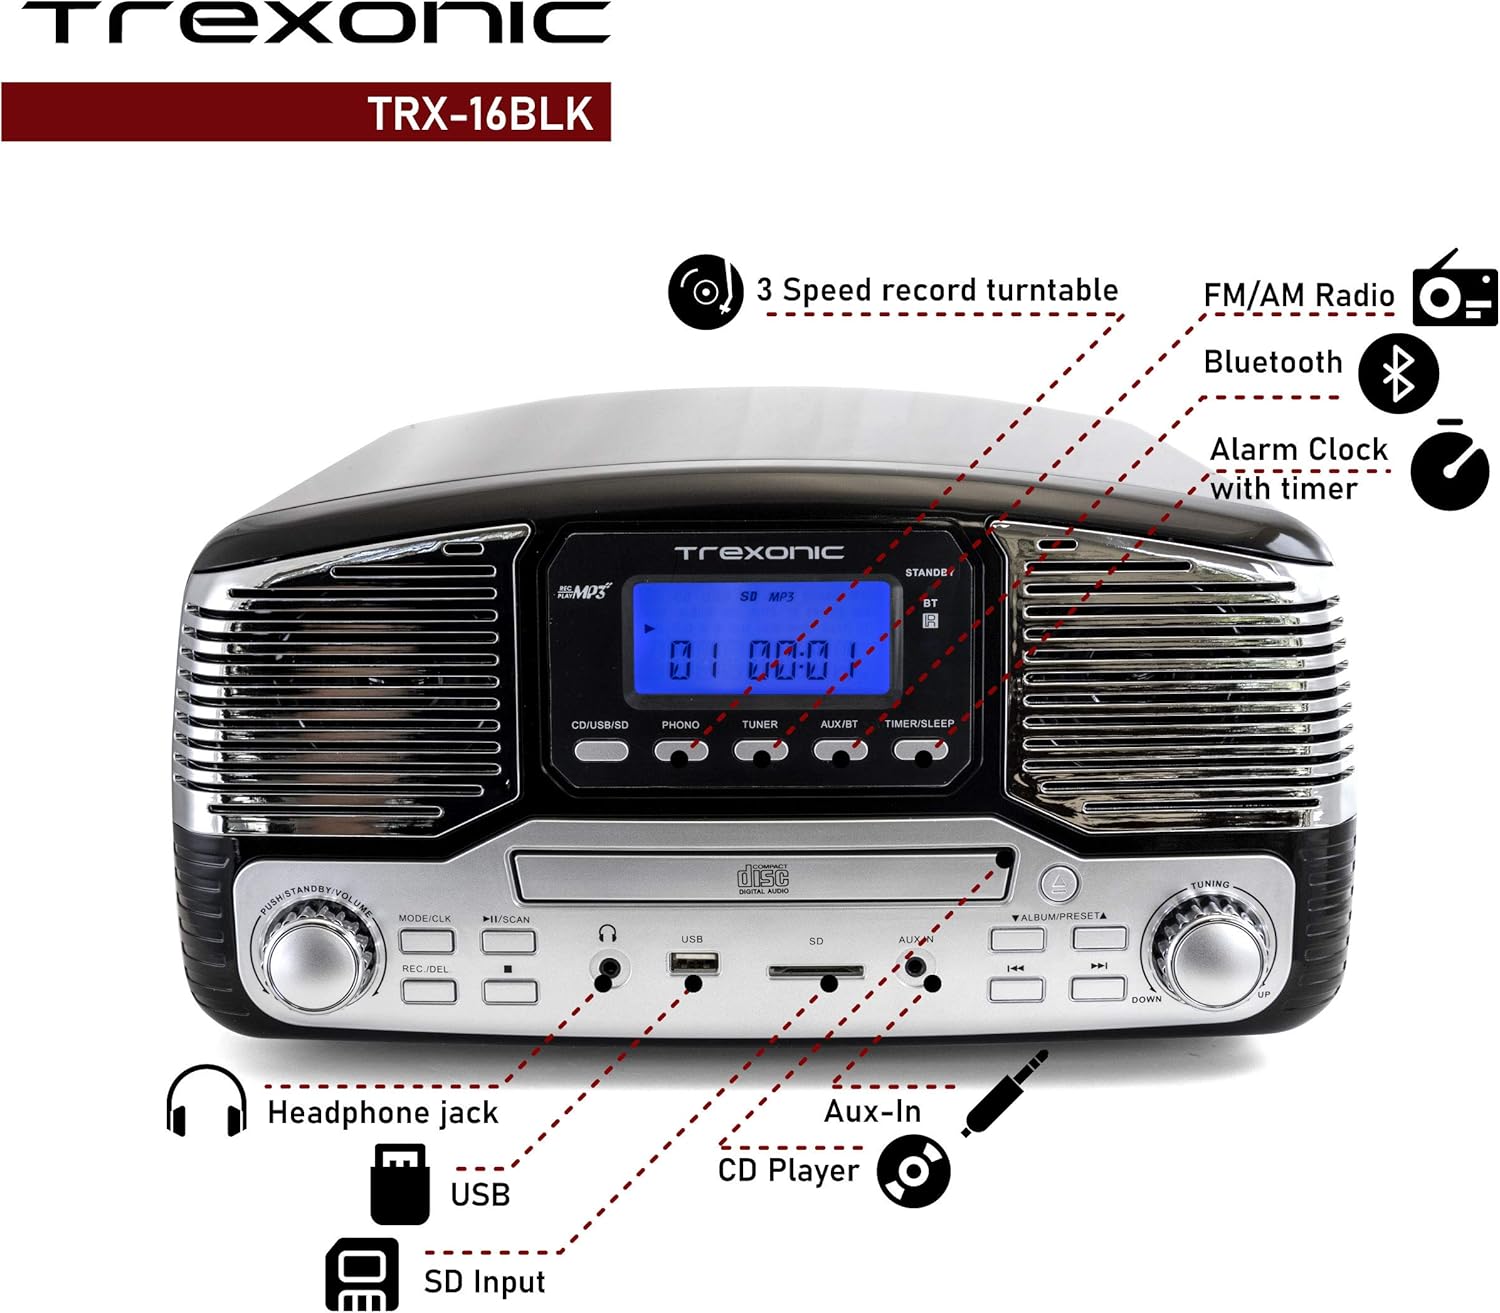
Image: A detailed diagram highlighting the key features and control locations on the Trexonic Retro Record Player.
Controls and Functions
Familiarize yourself with the various controls and ports on your Trexonic Retro Record Player:

Image: Close-up view of the digital display and mode selection buttons (CD/USB/SD, PHONO, TUNER, AUX/BT, TIMER/SLEEP).
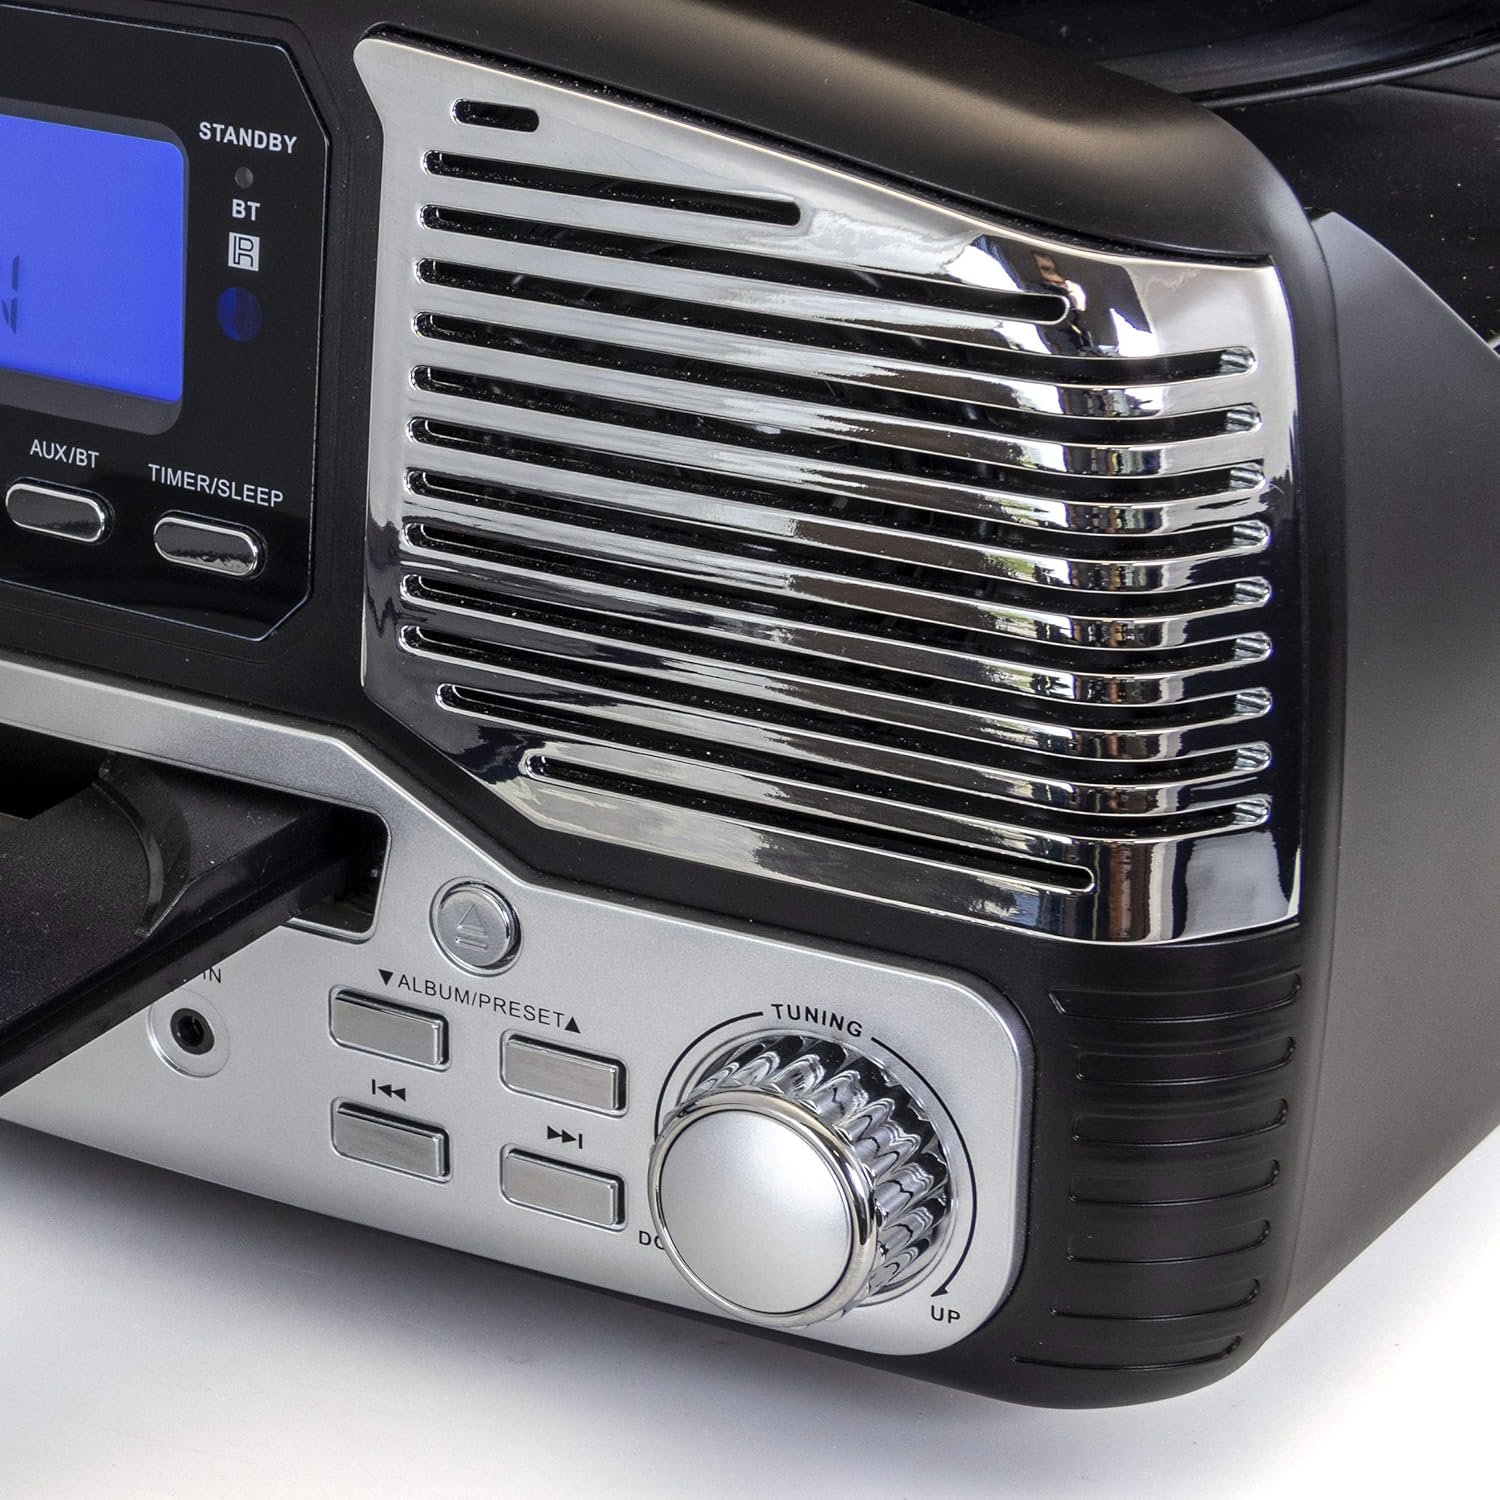
Image: Close-up view of the tuning knob and track navigation buttons (SCAN, ALBUM/PRESET, UP, DOWN).
Key controls include:
- Power/Volume Knob: Turns the unit on/off and adjusts volume.
- Mode/CLK Button: Selects audio source (CD/USB/SD, PHONO, TUNER, AUX/BT) and sets clock.
- REC/DEL Button: Initiates recording to USB/SD or deletes files.
- Play/Pause, Stop, Skip Buttons: Standard playback controls for CD/USB/SD.
- Tuning Knob: For manual radio station selection.
- Timer/Sleep Button: Activates sleep timer or alarm settings.
- Headphone Jack: 3.5mm output for headphones.
- USB Port: For USB flash drives.
- SD Card Slot: For SD memory cards.
- AUX IN Jack: 3.5mm input for external audio devices.
- RCA Line Out (Rear): Connects to external amplifiers or powered speakers.
- FM Antenna (Rear): For FM radio reception.
Initial Setup
Follow these steps to set up your Trexonic Retro Record Player:
- Unpacking: Carefully remove the unit from its packaging. Retain the packaging materials for future transport or storage.
- Placement: Place the unit on a flat, stable surface away from direct sunlight, heat sources, and excessive dust or moisture.
- Power Connection: Connect the AC power adapter to the DC 12V IN (1000mA) jack on the rear of the unit, then plug the adapter into a standard wall outlet.
- FM Antenna: Extend the FM wire antenna located at the back of the unit for optimal radio reception.
- External Connections (Optional): If connecting to external speakers or an amplifier, use RCA cables to connect the LINE OUT jacks on the rear of the unit to the corresponding input jacks on your external audio equipment.

Image: The rear panel of the Trexonic Retro Record Player, illustrating the connection points for power, FM antenna, and RCA line-out.
Operating Instructions
Playing Vinyl Records
This unit supports 33 1/3, 45, and 78 RPM records.
- Lift the dust cover.
- Place a record on the turntable platter. If playing a 45 RPM single, place the included 45 RPM adapter on the center spindle.
- Set the speed selector switch to the appropriate speed (33, 45, or 78 RPM) for your record.
- Press the MODE/CLK button repeatedly until "PHONO" is displayed.
- Gently lift the tone arm from its rest and move it over the record. The platter will begin to rotate.
- Carefully lower the tone arm onto the desired track of the record.
- Adjust the volume using the Power/Volume knob.
- When the record finishes, the tone arm will automatically return to its rest (for most records). Lift the tone arm and return it to its rest manually if needed.

Image: A close-up view of the turntable in operation, showing the stylus tracking a vinyl record.
Playing Compact Discs (CD)
- Press the MODE/CLK button repeatedly until "CD" is displayed.
- Press the OPEN/CLOSE button to open the CD tray.
- Place a CD with the label side facing up into the tray.
- Press the OPEN/CLOSE button again to close the tray. The unit will read the CD and begin playback automatically.
- Use the PLAY/PAUSE, STOP, and SKIP buttons to control playback.

Image: The Trexonic Retro Record Player with its CD tray extended, ready for disc insertion or removal.
Connecting via Bluetooth
- Press the MODE/CLK button repeatedly until "BT" (Bluetooth) is displayed. The unit will enter pairing mode, indicated by a flashing Bluetooth icon on the display.
- Enable Bluetooth on your external device (smartphone, tablet, etc.) and search for available devices.
- Select "Trexonic" or "TRX-16BLK" from the list of devices.
- Once paired, the Bluetooth icon will stop flashing and remain solid. You can now stream audio wirelessly to the unit.
Using the AM/FM Radio
- Press the MODE/CLK button repeatedly until "TUNER" is displayed.
- Rotate the Tuning knob to manually select your desired AM or FM radio station.
- For better FM reception, adjust the position of the FM wire antenna on the rear of the unit.
USB/SD Card Functions (Playback & Recording)
The unit supports MP3 playback from USB flash drives and SD cards, and can record audio from vinyl to MP3 format.
- Playback: Insert a USB flash drive into the USB port or an SD card into the SD card slot. Press the MODE/CLK button until "USB" or "SD" is displayed. The unit will automatically detect and play MP3 files. Use playback controls to navigate.
- Recording (Vinyl to MP3):
- Ensure a USB drive or SD card is inserted.
- Select "PHONO" mode.
- Start playing your vinyl record.
- Press the REC/DEL button to begin recording. The display will indicate recording status.
- Press REC/DEL again to stop recording. The recorded MP3 file will be saved to the USB drive or SD card.
Connecting External Devices (AUX-In)
- Connect one end of a 3.5mm audio cable (not included) to the AUX IN jack on the front of the unit.
- Connect the other end of the cable to the headphone jack or audio output of your external device (e.g., MP3 player, smartphone).
- Press the MODE/CLK button repeatedly until "AUX" is displayed.
- Play audio from your external device. The sound will be routed through the Trexonic Retro Record Player's speakers.
Setting the Alarm and Sleep Timer
Detailed instructions for setting the alarm and sleep timer are typically found in the full product manual. Generally, these functions are accessed via the TIMER/SLEEP button and navigation controls.
- Setting Clock: Press and hold MODE/CLK to enter clock setting mode, then use navigation buttons to adjust time.
- Setting Alarm: Press TIMER/SLEEP to cycle through alarm settings (e.g., alarm time, source).
- Sleep Timer: Press TIMER/SLEEP repeatedly to set a countdown timer for the unit to automatically turn off.
Maintenance
Proper care will ensure the longevity of your Trexonic Retro Record Player.
- Cleaning the Unit: Wipe the exterior with a soft, dry cloth. Do not use abrasive cleaners or solvents.
- Cleaning the Stylus: Use a soft brush (not included) to gently brush the stylus from back to front to remove dust. Do not touch the stylus with your fingers.
- Dust Cover: Keep the dust cover closed when not in use to protect the turntable from dust and debris.
- Record Care: Keep your vinyl records clean and stored vertically in their sleeves to prevent warping and dust accumulation.
Troubleshooting Guide
If you encounter any issues, please refer to the following table before seeking professional service.
| Problem | Possible Cause | Solution |
|---|---|---|
| No power | Power cord not securely connected. | Ensure the power cord is firmly plugged into the unit and the wall outlet. |
| No sound from speakers | Volume is too low or muted. Incorrect mode selected. | Increase volume. Press MODE/CLK to select the correct audio source. |
| Turntable not spinning or sound distorted | Speed setting incorrect. Stylus dirty or damaged. Tone arm not properly lowered. | Check the speed selector. Clean or replace stylus. Ensure tone arm is fully lowered onto the record. |
| CD not playing | CD inserted incorrectly or disc is scratched/dirty. Incorrect mode. | Ensure CD is inserted label-side up. Clean or try another CD. Select "CD" mode. |
| Bluetooth pairing issues | Device too far. Bluetooth not enabled on external device. | Move devices closer. Ensure Bluetooth is enabled and "Trexonic" is selected. |
| Poor radio reception | FM antenna not extended or positioned correctly. | Fully extend and adjust the FM wire antenna. Try repositioning the unit. |
Technical Specifications
| Feature | Specification |
|---|---|
| Model Number | TRX-16BLK |
| Power Input | DC 12V, 1000mA (via AC adapter) |
| Turntable Speeds | 33 1/3, 45, 78 RPM |
| Connectivity | Bluetooth, Wired (AUX-In, RCA Line-Out) |
| Media Support | Vinyl Records, Audio CDs, USB (MP3), SD Card (MP3) |
| Radio Frequencies | AM/FM |
| Dimensions (Approx.) | 13 x 12 x 6 inches (Package Dimensions) |
| Weight (Approx.) | 8 pounds |
| Material | Plastic |
Warranty Information and Customer Support
Trexonic products are designed and manufactured to the highest quality standards. For specific warranty details, please refer to the warranty card included with your purchase or visit the official Trexonic website. If you require technical assistance or have questions regarding your product, please contact Trexonic customer support through their official channels.
Please retain your proof of purchase for warranty claims.
Ask a question about this manual
Ask about setup, troubleshooting, compatibility, parts, safety, or missing instructions. Manuals+ will review the question and use this page’s manual context to help answer it.